Securing Spring Boot 3 Applications with Spring Security 6
In this article, we will explore how to secure a web application developed with the latest version of Spring Boot, utilizing the most recent updates in Spring Security. Our journey will take us through creating a Spring Boot web project, its integration with a PostgreSQL database via Spring Data JPA, and the application of security measures provided by the updated Spring Security framework.
Prerequisites
You must need these tools installed on your computer to follow this tutorial.
An HTTP client such as
Postman,Insomnia,cURL, etc.
Set up the database
We need Docker to run a container for Postgres 16; you can skip it if Postgres is installed on your computer. Run the command below to start the Docker container from the Postgres image:
docker run --name some-postgres -e POSTGRES_PASSWORD=mysecretpassword -e POSTGRES_DB=management-employee -p 5431:5432 -d postgres:16-alpineSet up the project
We won't go into the details of building a CRUD application since the focus of this article is on securing the application. However, a basic overview is provided for better understanding.
We have included the following dependencies in our project:
1. Spring Web: Enables building web applications with Spring, including RESTful services.
2. PostgreSQL Driver: Connects your application to a PostgreSQL database for data storage.
3. Spring Data JPA: Simplifies data access and manipulation through JPA repositories.
4. Lombok: Reduces boilerplate code by automatically generating getters, setters, and other common methods.
5. Spring Boot DevTools: Provides fast application restarts, live reload, and configuration options for a smoother development process.
The Spring Boot online project starter helps us create the project with these dependencies; go to the URL start.spring.io to generate a new project.
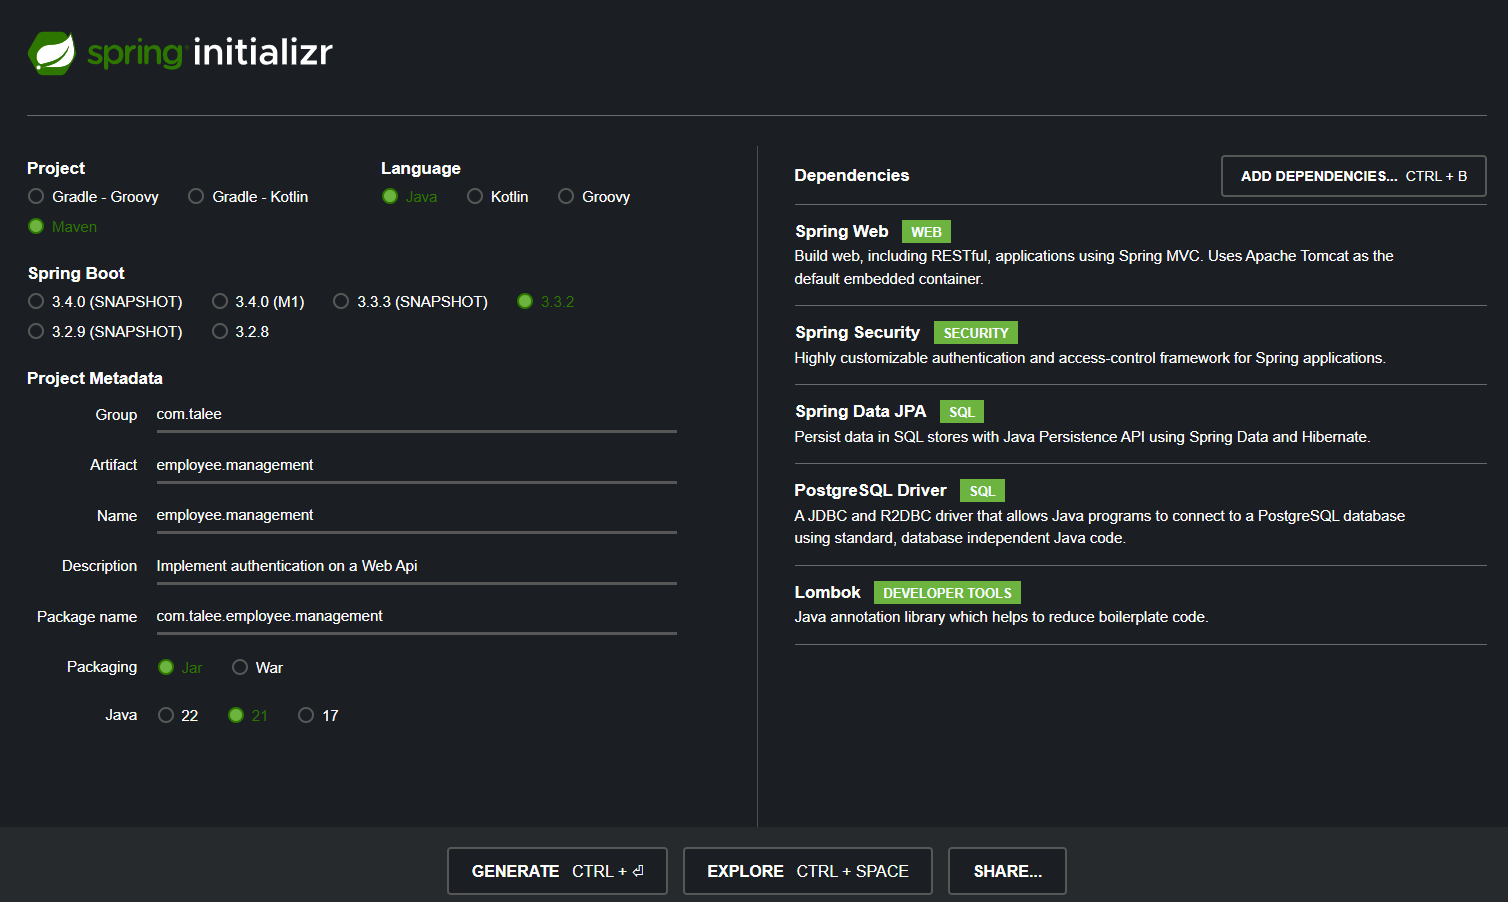
I chose Java 21 and Maven as the dependency manager, but you can use whatever you want.
Click on the button Generate to download the project, open it in your IDE, and install the Maven dependencies.
Developing a simple employee-based management system
Create the Employee Entity
This Java class defines an Employee entity with attributes such as employeeId, name, email, department, and company, utilizing JPA annotations for ORM and Lombok annotations for boilerplate code like getters, setters, and constructors.
package com.talee.employee.management.model;

import jakarta.persistence.Entity;
import jakarta.persistence.GeneratedValue;
import jakarta.persistence.GenerationType;
import jakarta.persistence.Id;
import lombok.AllArgsConstructor;
import lombok.Data;
import lombok.NoArgsConstructor;

@Entity
@Data
@NoArgsConstructor
@AllArgsConstructor
public class Employee {

  @Id
  @GeneratedValue(strategy = GenerationType.AUTO)
  private Long employeeId;
  private String name;
  private String email;
  private String nationality;
  private Integer old;

}
Create the Employee Repository
This interface defines a repository for Employee entities, extending Spring Data JPA to facilitate database operations.
package com.talee.employee.management.repo;

import com.talee.employee.management.model.Employee;
import org.springframework.data.jpa.repository.JpaRepository;

public interface EmployeeRepository extends JpaRepository<Employee, Integer> {
}
Create the Employee Service
The EmployeeService class interact with the EmployeeRepository to perform CRUD operations on Employee entities, allowing for the creation, retrieval, updating, and deletion of employee records in the database.
package com.talee.employee.management.service;

import com.talee.employee.management.model.Employee;
import java.util.List;
import java.util.Optional;
import org.springframework.stereotype.Service;

@Service
public class EmployeeService {

  private final EmployeeRepository repository;

  public EmployeeService(EmployeeRepository repository) {
    this.repository = repository;
  }

  public List<Employee> findAll() {
    return repository.findAll();
  }

  public Optional<Employee> findById(Integer id) {
    return repository.findById(id);
  }

  public Employee save(Employee employee) {
    return repository.save(employee);
  }

  public void deleteById(Integer id) {
    repository.deleteById(id);
  }

  public Optional<Employee> updateEmployee(Integer id, Employee employeeDetails) {
    return repository.findById(id).map(employee -> {
      employee.setName(employeeDetails.getName());
      employee.setEmail(employeeDetails.getEmail());
      employee.setNationality(employeeDetails.getNationality());
      employee.setOld(employeeDetails.getOld());
      return Optional.of(repository.save(employee));
    }).orElse(Optional.empty());
  }
}
Create the Employee Controller
package com.talee.employee.management.controller;

import com.talee.employee.management.model.Employee;
import com.talee.employee.management.service.EmployeeService;
import java.util.List;
import org.springframework.http.ResponseEntity;
import org.springframework.web.bind.annotation.DeleteMapping;
import org.springframework.web.bind.annotation.GetMapping;
import org.springframework.web.bind.annotation.PathVariable;
import org.springframework.web.bind.annotation.PostMapping;
import org.springframework.web.bind.annotation.PutMapping;
import org.springframework.web.bind.annotation.RequestBody;
import org.springframework.web.bind.annotation.RequestMapping;
import org.springframework.web.bind.annotation.RestController;

@RestController
@RequestMapping("/api/employees")
public class EmployeeController {

  private final EmployeeService service;

  public EmployeeController(EmployeeService service) {
    this.service = service;
  }

  @GetMapping
  public List<Employee> getAllEmployees() {
    return service.findAll();
  }

  @GetMapping("/{id}")
  public ResponseEntity<Employee> getEmployeeById(@PathVariable Integer id) {
    return service.findById(id)
        .map(ResponseEntity::ok)
        .orElseGet(() -> ResponseEntity.notFound().build());
  }

  @PostMapping
  public Employee createEmployee(@RequestBody Employee employee) {
    return service.save(employee);
  }


  @PutMapping("/{id}")
  public ResponseEntity<Employee> ulspdateEmployee(@PathVariable Integer id,
      @RequestBody Employee employeeDetails) {
    return service.updateEmployee(id, employeeDetails)
        .map(ResponseEntity::ok)
        .orElseGet(() -> ResponseEntity.notFound().build());
  }

  @DeleteMapping("/{id}")
  public ResponseEntity<?> deleteEmployee(@PathVariable Integer id) {
    return service.findById(id)
        .map(employee -> {
          service.deleteById(id);
          return ResponseEntity.ok().build();
        })
        .orElseGet(() -> ResponseEntity.notFound().build());
  }
}
Import data to Database
Our application is configured to automatically populate the database with initial data at startup, utilizing SQL files named schema.sql and data.sql.`
schema.sql
CREATE TABLE IF NOT EXISTS employee (
                          employee_id BIGSERIAL PRIMARY KEY,
                          name VARCHAR(255),
                          email VARCHAR(255),
                          nationality VARCHAR(255),
                          old INTEGER
);
data.sql
INSERT INTO Employee (name, email, nationality, old) VALUES ('Eric Cantona', 'eric.cantona@manutd.com', 'French', 57);
INSERT INTO Employee (name, email, nationality, old) VALUES ('Ryan Giggs', 'ryan.giggs@manutd.com', 'Welsh', 50);
INSERT INTO Employee (name, email, nationality, old) VALUES ('Paul Scholes', 'paul.scholes@manutd.com', 'English', 49);
INSERT INTO Employee (name, email, nationality, old) VALUES ('Roy Keane', 'roy.keane@manutd.com', 'Irish', 52);
INSERT INTO Employee (name, email, nationality, old) VALUES ('David Beckham', 'david.beckham@manutd.com', 'English', 48);
Configure the database connection
Let's configure the application to connect to the database and perform database table creation (using Hibernate under the hood). Open the application configuration file src/resources/application.yml and add the code below:
spring:
  application:
    name: employee-management
  datasource:
    url: jdbc:postgresql://localhost:5431/management-employee
    username: postgres
    password: 3+0M1606Pc_4
  jpa:
    hibernate:
      ddl-auto: update
    show-sql: true
    properties:
      hibernate:
        dialect: org.hibernate.dialect.PostgreSQLDialect
  sql:
    init:
      mode: always

server:
  port: 8018
Run the application with the command mvn spring-boot:run; it will start at port 8018.
If we pay attention to the console when starting the application, we can see the message displaying a security password generated because Spring Security has the HTTP Basic authentication enabled by default.
Protecting our Web Application using Default Spring Security Configuration
Note
Adding Spring Security to your Spring Boot project automatically makes it safer. This is because the creators of Spring decided they wanted every application to be secure right from the start.
How It Works
Once you include Spring Security in your project, it instantly sets up some security features for you. This means your application will have a basic level of security without you needing to do anything extra.
For securing our web application, we need another dependency i.e, Spring Security:
Spring Security: Adds authentication and authorization features to secure your application.
Given that our project is built with Maven and Spring Boot, the dependency for Spring Security would appear in the pom.xml file as follows:
<dependency>
    <groupId>org.springframework.boot</groupId>
    <artifactId>spring-boot-starter-security</artifactId>
</dependency>
Our final pom.xml file would be structured as follows to incorporate the specified dependencies:
<?xml version="1.0" encoding="UTF-8"?>
<project xmlns="http://maven.apache.org/POM/4.0.0" xmlns:xsi="http://www.w3.org/2001/XMLSchema-instance"
	xsi:schemaLocation="http://maven.apache.org/POM/4.0.0 https://maven.apache.org/xsd/maven-4.0.0.xsd">

	<!-- Basic POM Information -->
	<modelVersion>4.0.0</modelVersion>

	<!-- Parent Project Information -->
	<parent>
		<groupId>org.springframework.boot</groupId>
		<artifactId>spring-boot-starter-parent</artifactId>
		<version>3.3.2</version>
		<relativePath/> <!-- lookup parent from repository -->
	</parent>

	<!-- Project Coordinates -->
	<groupId>com.talee</groupId>
	<artifactId>employee.management</artifactId>
	<version>0.0.1-SNAPSHOT</version>
	<name>employee.management</name>
	<description>Implement authentication on a Web Api</description>
	<url/> <!-- URL for the project, can be filled as needed -->

	<!-- Licensing Information -->
	<licenses>
		<license/>
	</licenses>

	<!-- Developer Information -->
	<developers>
		<developer/>
	</developers>

	<!-- Source Control Management Information -->
	<scm>
		<connection/>
		<developerConnection/>
		<tag/>
		<url/>
	</scm>

	<!-- Project Properties -->
	<properties>
		<java.version>21</java.version>
	</properties>

	<!-- Project Dependencies -->
	<dependencies>
		<!-- Spring Boot Starter for JPA -->
		<dependency>
			<groupId>org.springframework.boot</groupId>
			<artifactId>spring-boot-starter-data-jpa</artifactId>
		</dependency>

		<!-- Spring Boot Starter for Security -->
		<dependency>
			<groupId>org.springframework.boot</groupId>
			<artifactId>spring-boot-starter-security</artifactId>
		</dependency>

		<!-- Spring Boot Starter for Web -->
		<dependency>
			<groupId>org.springframework.boot</groupId>
			<artifactId>spring-boot-starter-web</artifactId>
		</dependency>

		<!-- Spring Boot DevTools for Development -->
		<dependency>
			<groupId>org.springframework.boot</groupId>
			<artifactId>spring-boot-devtools</artifactId>
			<scope>runtime</scope>
			<optional>true</optional>
		</dependency>

		<!-- PostgreSQL JDBC Driver -->
		<dependency>
			<groupId>org.postgresql</groupId>
			<artifactId>postgresql</artifactId>
			<scope>runtime</scope>
		</dependency>

		<!-- Lombok for Boilerplate Code Reduction -->
		<dependency>
			<groupId>org.projectlombok</groupId>
			<artifactId>lombok</artifactId>
			<optional>true</optional>
		</dependency>

		<!-- Spring Boot Starter for Testing -->
		<dependency>
			<groupId>org.springframework.boot</groupId>
			<artifactId>spring-boot-starter-test</artifactId>
			<scope>test</scope>
		</dependency>

		<!-- Spring Security Test Dependency -->
		<dependency>
			<groupId>org.springframework.security</groupId>
			<artifactId>spring-security-test</artifactId>
			<scope>test</scope>
		</dependency>
	</dependencies>

	<!-- Build Configuration -->
	<build>
		<plugins>
			<plugin>
				<groupId>org.springframework.boot</groupId>
				<artifactId>spring-boot-maven-plugin</artifactId>
				<configuration>
					<excludes>
						<exclude>
							<groupId>org.projectlombok</groupId>
							<artifactId>lombok</artifactId>
						</exclude>
					</excludes>
				</configuration>
			</plugin>
		</plugins>
	</build>

</project>
Note
Adding Spring Security to your Spring Boot project automatically makes it safer. This is because the creators of Spring decided they wanted every application to be secure right from the start.
When attempting to access any API via the browser, the default login form will be presented like the one given below:
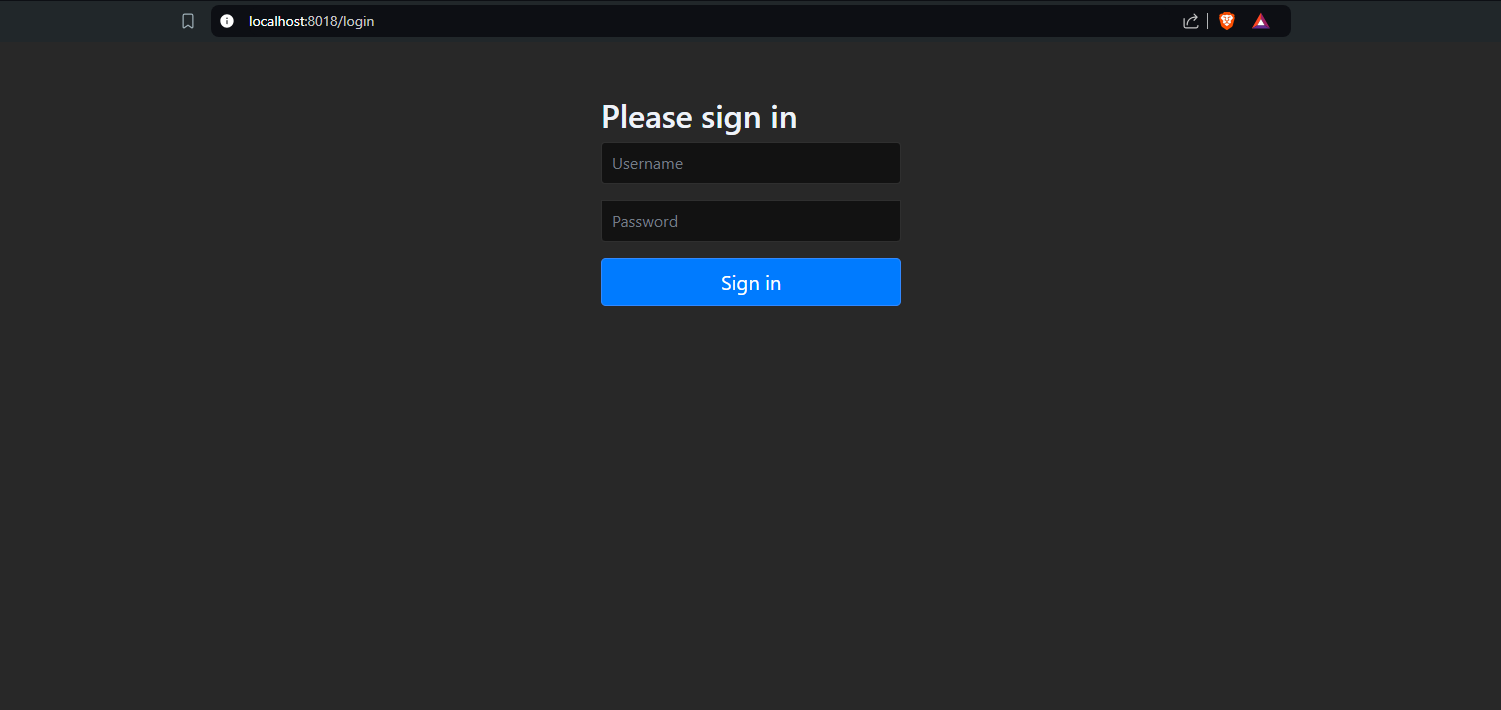
The default username provided by spring security is user, while the password is auto-generated and can be found in the console.
But this username password should not be used in real-time production scenarios
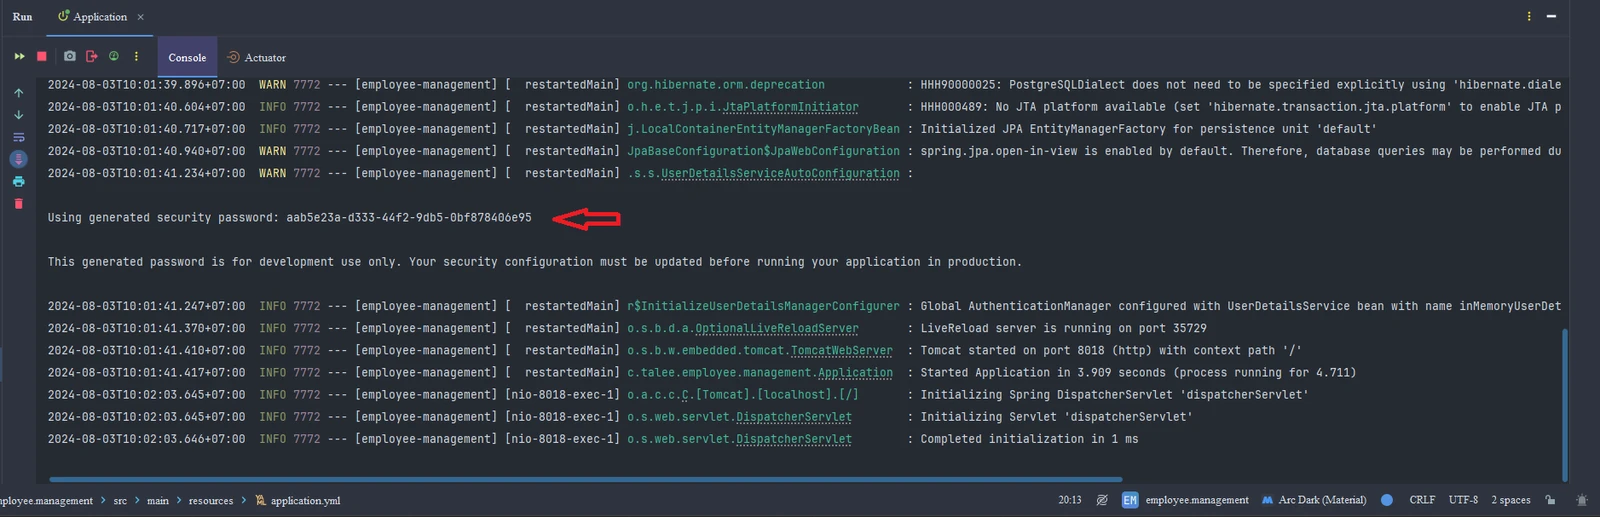
Here, we are trying to access an API i.e. to get the list of all employees. Attached is a small video to get a clearer picture.
Several limitations come with relying on the default Spring Security setup
Secures Everything: By default, it locks down all your endpoints, even the ones you might want to keep open.
Not Flexible Enough: The preset security settings are quite general. If your app needs specific security tweaks, you might find these settings a bit limiting.
Easy to Misconfigure: If you're not careful, sticking with the default settings could lead to security gaps or tricky bugs.
One-Size-Fits-All: It treats all apps the same, security-wise, which might not work for apps with unique security needs.
Tips
To achieve more precise control over our application's security mechanisms, like our own username, password, and password encryption for better authentication, and authorization of accessing certain APIs, we need to create a custom security configuration file that manages all these. Spring Security excels in offering flexibility for such customizations.
Tips
Customizing is Hard Work: Want to change the default security setup? Brace yourself for some complex coding.
Securing web application with our own custom security configuration
To set up our security system, we need to create a user class that includes fields such as username and password. This allows us to store user information in the database and authenticate users based on these credentials.
However, there’s an important aspect to note: Spring Security does not automatically recognize this custom user class. Instead, it works with its predefined UserDetails interface.
In simple terms, UserDetails is a special interface in Spring Security designed to handle user information in a way that Spring Security can understand. This means that for Spring Security to work with our custom user class, we need to adapt our class to fit this interface. Essentially, we need to convert our user class into one that implements the UserDetails interface.
Create the User Entities
package com.talee.employee.management.model;

import jakarta.persistence.Entity;
import jakarta.persistence.GeneratedValue;
import jakarta.persistence.GenerationType;
import jakarta.persistence.Id;
import lombok.AllArgsConstructor;
import lombok.Data;
import lombok.NoArgsConstructor;

@Entity
@Data
@NoArgsConstructor
@AllArgsConstructor
public class Users {

  @Id
  @GeneratedValue(strategy = GenerationType.IDENTITY)
  private int id;
  private String username;
  private String password;
}
Explanation for the above code:
This code sets up a simple User class to store user information in a database, specifically their ID, username, and password.
Create the UserPrincipal
package com.talee.employee.management.model;

import java.util.Collection;
import java.util.Collections;
import org.springframework.security.core.GrantedAuthority;
import org.springframework.security.core.authority.SimpleGrantedAuthority;
import org.springframework.security.core.userdetails.UserDetails;

public class UserPrincipal implements UserDetails {

  private Users users;

  public UserPrincipal(Users users) {
    this.users = users;
  }

  @Override
  public Collection<? extends GrantedAuthority> getAuthorities() {
    return Collections.singleton(new SimpleGrantedAuthority("USER"));
  }

  @Override
  public String getPassword() {
    return users.getPassword();
  }

  @Override
  public String getUsername() {
    return users.getUsername();
  }

  @Override
  public boolean isAccountNonExpired() {
    return true;
  }

  @Override
  public boolean isAccountNonLocked() {
    return true;
  }

  @Override
  public boolean isCredentialsNonExpired() {
    return true;
  }

  @Override
  public boolean isEnabled() {
    return true;
  }
}
Explanation for the above code:
The UserPrincipal class is a custom implementation of Spring Security's UserDetails interface, designed to integrate our own user model with Spring Security's authentication mechanisms.
This class acts as an adapter between our User class and what Spring Security expects in terms of user details.
Here’s a breakdown of its functionality:
Constructor: It takes an instance of our
Userclass. This allows theUserPrincipalto accessuser-specificdetails like username and password.getAuthorities(): This method specifies the roles or authorities granted to the user. In this case, every user is given a single authority of
"USER".getPassword() and getUsername(): These methods simply retrieve the password and username from the User instance, respectively.
Account Status Methods: The methods
isAccountNonExpired(),isAccountNonLocked(),isCredentialsNonExpired(), andisEnabled()are all overridden to return true. These methods are used by Spring Security to determine if the account is still active, locked, has expired credentials, or is enabled. Returningtruefrom all these methods suggests that in this simple implementation, these checks are not being used to restrict user access.
Create the UserRepo
package com.talee.employee.management.repo;

import com.talee.employee.management.model.Users;
import org.springframework.data.jpa.repository.JpaRepository;
import org.springframework.stereotype.Repository;

@Repository
public interface UserRepo extends JpaRepository<Users, Integer> {

  public Users findByUsername(String username);

}
Explanation for the above code:
The findByUsername(String username) method in the UserRepo interface is a specialized function that lets you find and retrieve a User based on their username. This method is set up so that Spring Data JPA can automatically handle the database search, meaning you don't have to write any additional SQL code. It returns the User object if it finds a match, or null if there is no user with that username.
Create the UserService
package com.talee.employee.management.service;

import com.talee.employee.management.model.Users;
import com.talee.employee.management.model.UserPrincipal;
import com.talee.employee.management.repo.UserRepo;
import org.springframework.beans.factory.annotation.Autowired;
import org.springframework.security.core.userdetails.UserDetails;
import org.springframework.security.core.userdetails.UserDetailsService;
import org.springframework.security.core.userdetails.UsernameNotFoundException;
import org.springframework.security.crypto.bcrypt.BCryptPasswordEncoder;
import org.springframework.stereotype.Service;

@Service
public class UserService implements UserDetailsService {

  @Autowired
  private UserRepo userRepo;
  private final BCryptPasswordEncoder encoder = new BCryptPasswordEncoder(12);

  public Users saveUser(Users users) {
    users.setPassword(encoder.encode(users.getPassword()));
    return userRepo.save(users);
  }

  @Override
  public UserDetails loadUserByUsername(String username) throws UsernameNotFoundException {
    Users users = userRepo.findByUsername(username);
    if (users == null) {
      throw new UsernameNotFoundException("Error 404");
    } else {
      return new UserPrincipal(users);
    }
  }
}
Explanation for the above code:
The UserService class in our application has two main jobs: managing user information and helping with login security.
UserDetailsService is an interface provided by Spring Security that is used to retrieve user-related data. It has a single method, loadUserByUsername(String username), which must be implemented to fetch a UserDetails object based on the username. The UserDetails interface itself is a core part of Spring Security, providing essential information (such as username, password, and granted authorities) necessary for security checks.
Here's a quick look at how it works:
User Repository and Password Encoder: This class connects to our database to access user information and uses a tool called
BCryptPasswordEncoderto make passwords safe. This tool scrambles the passwords so they aren't easy to guess or steal.saveUser Method: The
saveUsermethod: Whenever we need to save a new user's information, this method first hashes the user's password and then saves their details to our database. This way, even if someone gets into our database, they won't easily decrypt the passwords.loadUserByUsername Method: This method is all about finding the right user when someone tries to log in. It searches for a user by their username. If it finds the user, it prepares their information in a special format needed for checking who they are during login. If it can't find the user, it lets us know by throwing an error, which helps prevent strangers from getting in.
Overall, the UserService is key to keeping user details safe and making sure the right person logs in with the correct password.
Create the UserController
package com.talee.employee.management.controller;

import com.talee.employee.management.model.User;
import com.talee.employee.management.service.UserService;
import org.springframework.beans.factory.annotation.Autowired;
import org.springframework.http.HttpStatus;
import org.springframework.http.ResponseEntity;
import org.springframework.web.bind.annotation.CrossOrigin;
import org.springframework.web.bind.annotation.PostMapping;
import org.springframework.web.bind.annotation.RequestBody;
import org.springframework.web.bind.annotation.RestController;

@RestController
@CrossOrigin
public class UserController {

  @Autowired
  private UserService userService;

  @PostMapping("/register")
  public ResponseEntity<String> userRegister(@RequestBody User user) {
    if (userService.saveUser(user) != null) {
      return new ResponseEntity<>("User Registered Successfully", HttpStatus.OK);
    } else {
      return new ResponseEntity<>("Oops! User not registered", HttpStatus.OK);
    }
  }
}
Explanation for the above code:
The UserController class has a method called userRegister that manages the process of signing up new users. When a user successfully registers, it sends back a message User Registered Successfully; if the registration fails, it responds with Oops! User not registered.
Create the SecurityConfig
package com.talee.employee.management.config;

import org.springframework.beans.factory.annotation.Autowired;
import org.springframework.context.annotation.Bean;
import org.springframework.context.annotation.Configuration;
import org.springframework.security.authentication.dao.DaoAuthenticationProvider;
import org.springframework.security.config.Customizer;
import org.springframework.security.config.annotation.web.builders.HttpSecurity;
import org.springframework.security.config.annotation.web.configuration.EnableWebSecurity;
import org.springframework.security.config.annotation.web.configurers.AbstractHttpConfigurer;
import org.springframework.security.config.http.SessionCreationPolicy;
import org.springframework.security.core.userdetails.UserDetailsService;
import org.springframework.security.crypto.bcrypt.BCryptPasswordEncoder;
import org.springframework.security.web.SecurityFilterChain;

@EnableWebSecurity
@Configuration
public class SecurityConfig {

  @Autowired
  private UserDetailsService userDetailsService;

  @Bean
  public DaoAuthenticationProvider authenticationProvider() {
    DaoAuthenticationProvider provider = new DaoAuthenticationProvider();
    provider.setUserDetailsService(userDetailsService);
    provider.setPasswordEncoder(new BCryptPasswordEncoder(12));
    return provider;
  }


  @Bean
  public SecurityFilterChain securityFilterChain(HttpSecurity httpSecurity) throws Exception {
    httpSecurity.csrf(AbstractHttpConfigurer::disable)
        .cors(Customizer.withDefaults())
        .authorizeHttpRequests(auth ->
            auth
                .requestMatchers("/register")
                .permitAll().anyRequest()
                .authenticated())
        .sessionManagement(session ->
            session.sessionCreationPolicy(SessionCreationPolicy.STATELESS))
        .httpBasic(Customizer.withDefaults());

    return httpSecurity.build();
  }
}
Explanation for the above code:
- authenticationProvider() Method:
This method sets up the rules for checking who is trying to access our application:
User Details Service: Think of it as a way to look up information about users. When someone tries to log in, this service helps the system verify who they are by checking the username and password they provided.
Password Encoder: This part of the setup uses a special method (BCrypt) to handle passwords safely. When users create their passwords, this method scrambles them into a format that's very hard to decode. This means even if someone unauthorized gets access to the scrambled password, it's tough for them to figure out the actual password.
Tips
In essence, the authenticationProvider() method prepares our application to securely check if users are who they claim to be and to handle their passwords securely.
- securityFilterChain(HttpSecurity httpSecurity) Method
This method sets the rules for what is allowed in our application and how security is managed:
Turn off CSRF protection: CSRF is a type of attack that tricks the user into performing actions they didn’t intend to. For many applications, especially those that don’t maintain a continuous conversation with the user (like APIs), it’s safe to turn this off.
Control Access: We specifically say that anyone can access the
/registerendpoint without logging in (which is useful for new users registering). Every other request (or action) in the application needs the user to be logged in.Session Management: We configure our application to not keep any record of user sessions. This means each request to the server must include credentials, making it more secure for stateless applications like APIs.
Basic Authentication: This is a simple security measure that requires users to provide a username and password with their requests.
Tips
By setting up the SecurityFilterChain, we're essentially telling our application how to handle security checks and user access step by step. This configuration helps keep the application safe and ensures that only authorized users can access certain features.
Demo with our own custom security filter chain:
Some Additional Stuff:
Enhanced CORS Configuration in Spring Security
When developing a web application using frameworks like React or Angular, a common issue that arises when consuming APIs is related to Cross-Origin Resource Sharing (CORS).
CORS is a security policy implemented by browsers to prevent requests to your server from scripts running on pages hosted on other domains unless explicitly allowed.
Simply using the @CrossOrigin annotation on REST controller classes in Spring Boot may initially seem like the solution to enable cross-origin requests. This annotation configures the necessary HTTP headers to allow cross-origin interactions for that specific controller.
However, when Spring Security is integrated into a Spring Boot application, configuring CORS becomes slightly more complex. Spring Security applies a more stringent handling of CORS and security headers, which means that merely using the @CrossOrigin annotation might not be sufficient to handle CORS issues fully.
Tips
To effectively configure CORS in an application secured by Spring Security, you need to extend the security configuration to explicitly allow cross-origin requests.
Tips
This involves defining an additional bean in the SecurityConfig.java class or adjusting the security filter chain to include proper CORS configuration.
Extending Spring Security Configuration for CORS
- Define a CORS Configuration Source: This is a crucial step where you specify which origins, HTTP methods, and headers are allowed. It involves creating a
CorsConfigurationSourcebean that outlines these policies. For a React application running on port 3000 to successfully consume backend APIs protected by Spring Security, you need to configure CORS appropriately in your Spring Boot application. This setup ensures that the React application can make cross-origin requests to your secured backend.
@Bean
CorsConfigurationSource corsConfigurationSource() {
    CorsConfiguration configuration = new CorsConfiguration();
    configuration.setAllowedOrigins(Arrays.asList("http://localhost:3000"));
    configuration.setAllowedMethods(Arrays.asList("GET", "POST", "PUT", "DELETE", "OPTIONS"));
    configuration.setAllowCredentials(true);
    configuration.setAllowedHeaders(Arrays.asList("Authorization", "Content-Type"));
    configuration.setExposedHeaders(Arrays.asList("Authorization"));

    UrlBasedCorsConfigurationSource source = new UrlBasedCorsConfigurationSource();
    source.registerCorsConfiguration("/**", configuration);
    return source;
}- Integrate CORS with Spring Security: After defining the CORS configuration source, you must integrate this configuration with Spring Security. This is done by modifying the HttpSecurity object within the
SecurityFilterChainmethod to apply your CORS settings.
Now, our final SecurityFilterChain Bean will look like this:
 @Bean
    public SecurityFilterChain securityFilterChain(HttpSecurity httpSecurity) throws Exception {
        httpSecurity.csrf(AbstractHttpConfigurer::disable)
                .cors(c -> c.configurationSource(corsConfigurationSource()))
                .authorizeHttpRequests(auth ->
                        auth
                                .requestMatchers("/register")
                                .permitAll().anyRequest()
                                .authenticated())
                .sessionManagement(session ->
                        session.sessionCreationPolicy(SessionCreationPolicy.STATELESS))
                .httpBasic(Customizer.withDefaults());


        return httpSecurity.build();
    }
By following these steps, you ensure that CORS is handled appropriately in your Spring Boot application with Spring Security, enabling secure cross-origin requests from your frontend applications hosted on different domains. This configuration allows for a more flexible and secure setup compared to using the @CrossOrigin annotation alone.
Thanks! Happy coding!