Deploy Spring Boot Application to AWS EC2 using Docker
Here we are going to move a step further and show you how to deploy your project.
Cloud Services are something that none of us can stay away from. If you are into tech then it is kind of impossible that you did not hear about the Cloud.
And those who are familiar to this industry, AWS EC2 is not something new.
In this article, I will demonstrate step by step, how to deploy a spring boot application to the AWS EC2 instance.
Source Code — Sample application that I am going to use for this can be downloaded from here — #
1. General introduction
In this article, we will deploy a Spring Boot application using Docker on EC2 with the following contents:
- Packaging the Spring Boot application with Docker container
- Creating and deploying a new container on EC2.
2. Set Up Your Development Environment
Docker desktop installed on your local machine
3. AWS Setup
3.1 Create VPC
Access to VPC console and select Create VPC
Configuration Setup:
Resources to create :
VPC onlyName tag - optional:
vpc-app-southeast-1-dev-web-app-stackIPv4 CIDR block:
IPv4 CIDR manual inputIPv4 CIDR:
10.30.0.0/16IPv6 CIDR block:
No IPv6 CIDR blockTenancy:
Default
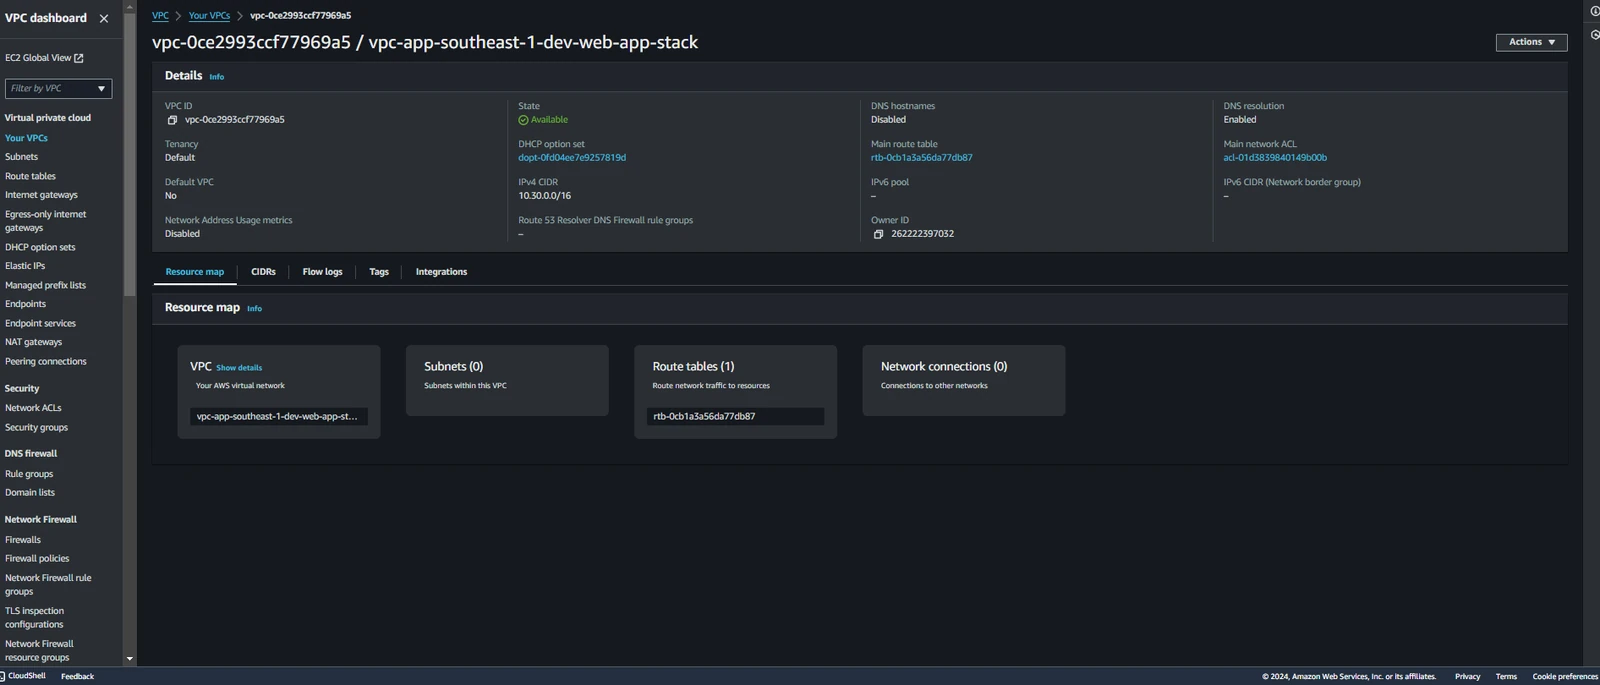
The VPC was successfully created and has the VPC ID: vpc-0ce2993ccf77969a5
3.2 Create a Subnet within a VPC
Access to VPC console and select tab Subnets -> Create Subnet
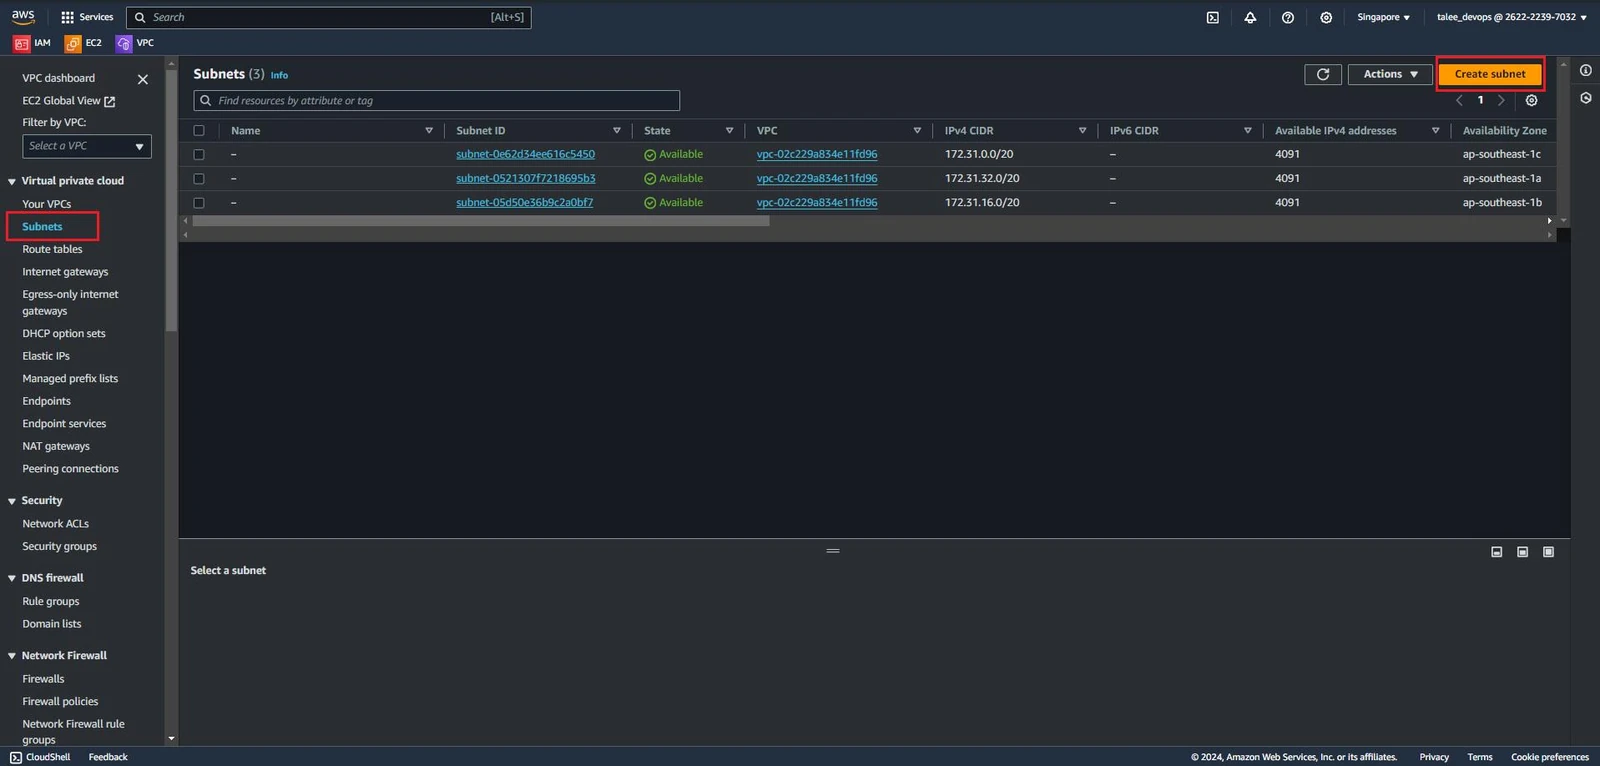
The subnets you are seeing are the default of AWS. In AWS, a default subnet is automatically created in each Availability Zone (AZ) within a Virtual Private Cloud (VPC) when the VPC is created. This default subnet has a route table that routes traffic to the default Internet Gateway (IGW), allowing the virtual machines in the subnet to communicate with the Internet.
The main purpose of a default subnet is to provide a convenient way to deploy virtual machines in an AWS region without having to create a subnet each time you want to deploy.
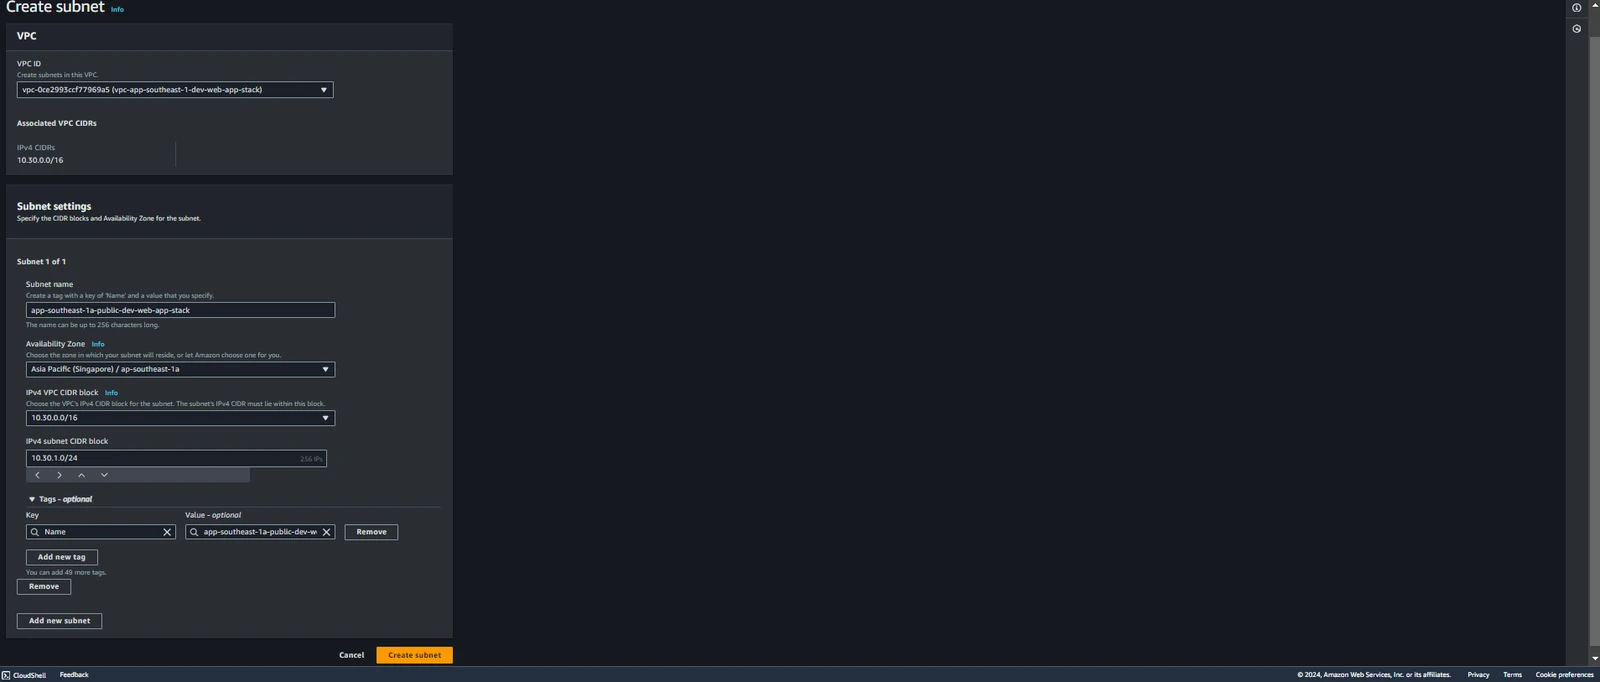
Configuration Setup:
Here we will create 1 public subnets (Note: In the VPC ID section, select the VPC we just created above).
VPC ID:
vpc-0ce2993ccf77969a5(vpc-app-southeast-1-dev-web-app-stack)Name:
app-southeast-1a-public-dev-web-app-stackAvailability Zone:
ap-southeast-1aIPv4 VPC CIDR block:
10.30.0.0/16IPv4 subnet CIDR block:
10.30.1.0/24
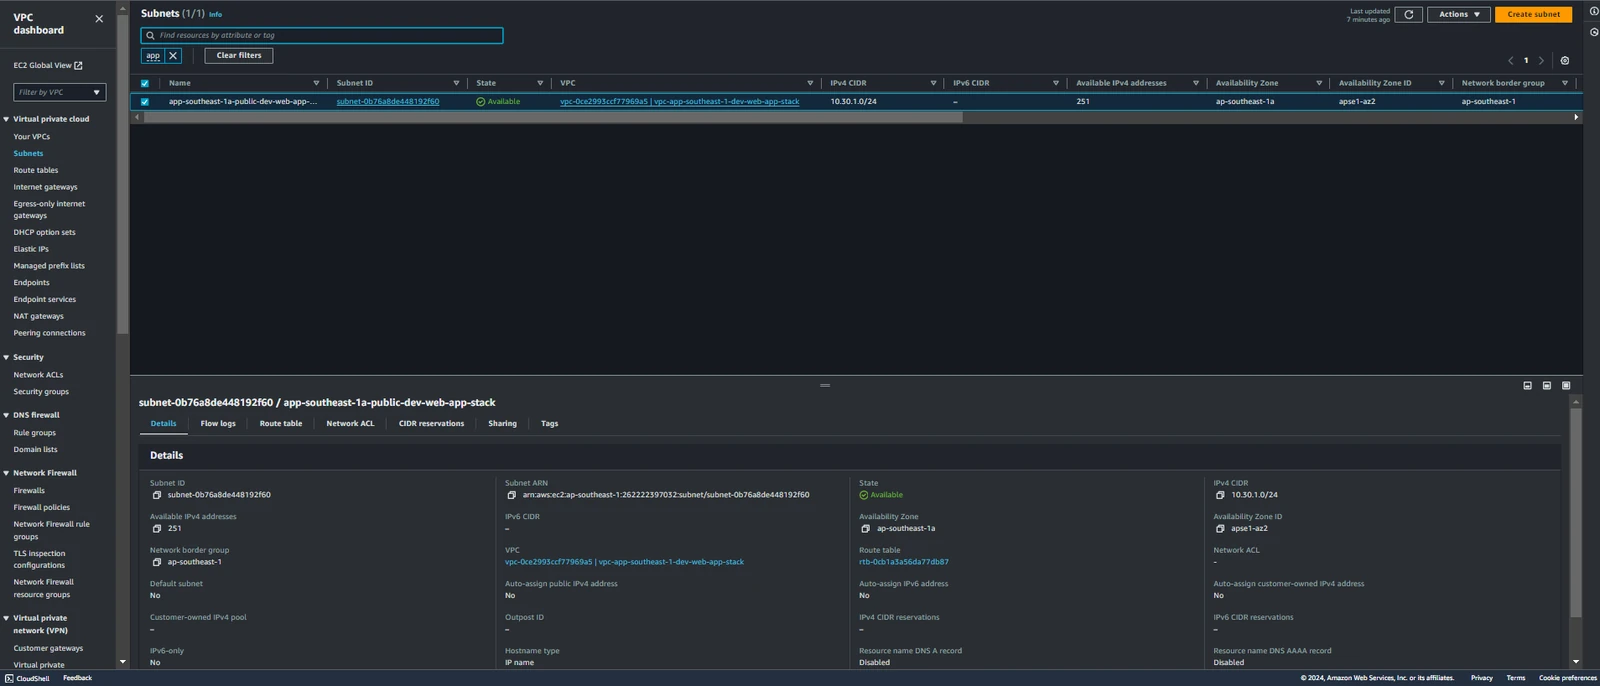
After creating, we can see that
1 public subnet have been successfully created.
3.3 Create Internet Gateways within a VPC
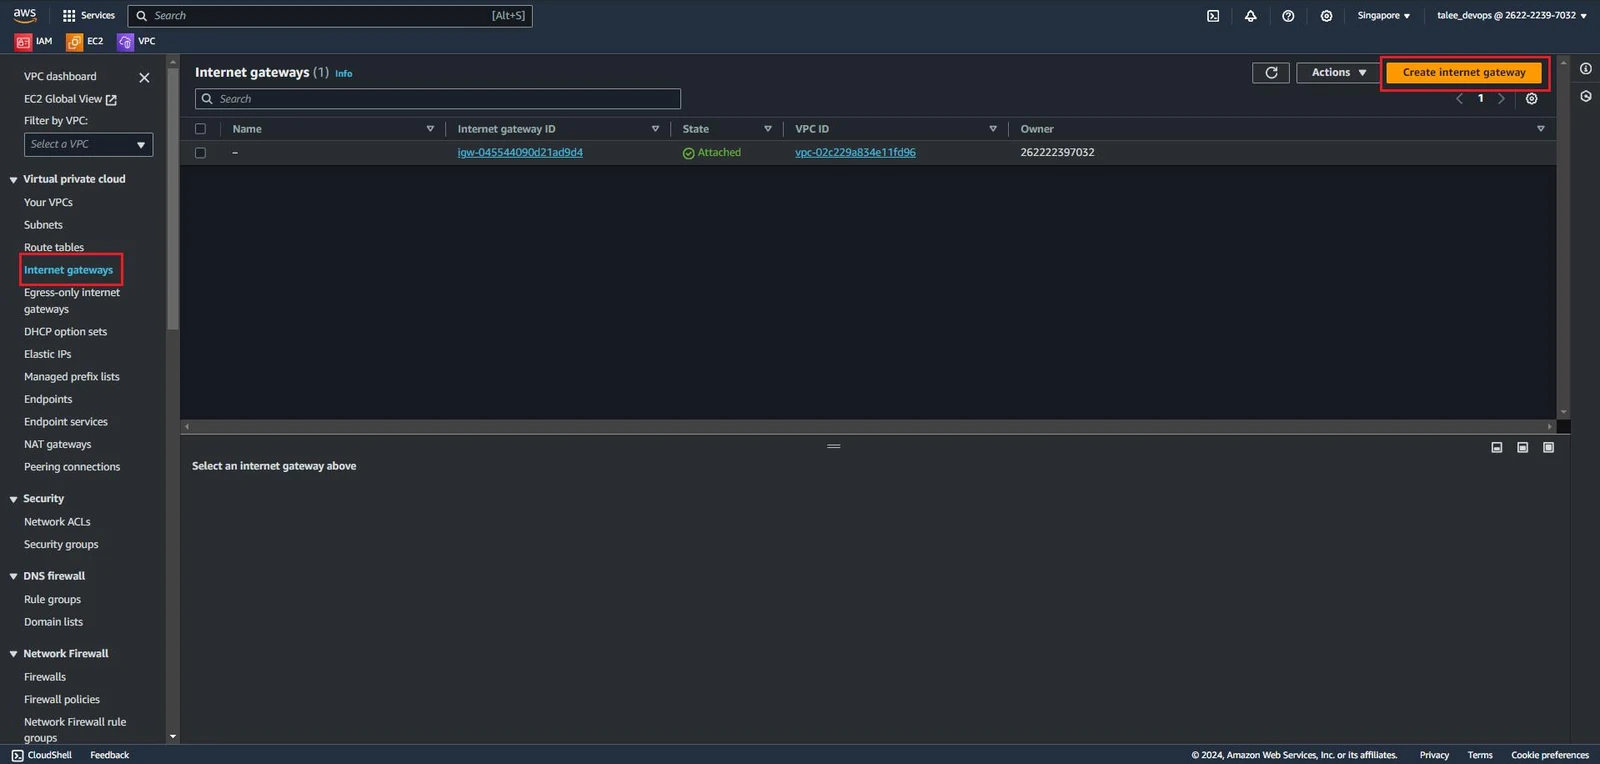
Access VPC console and select tab Internet Gateways -> Create internet gateway
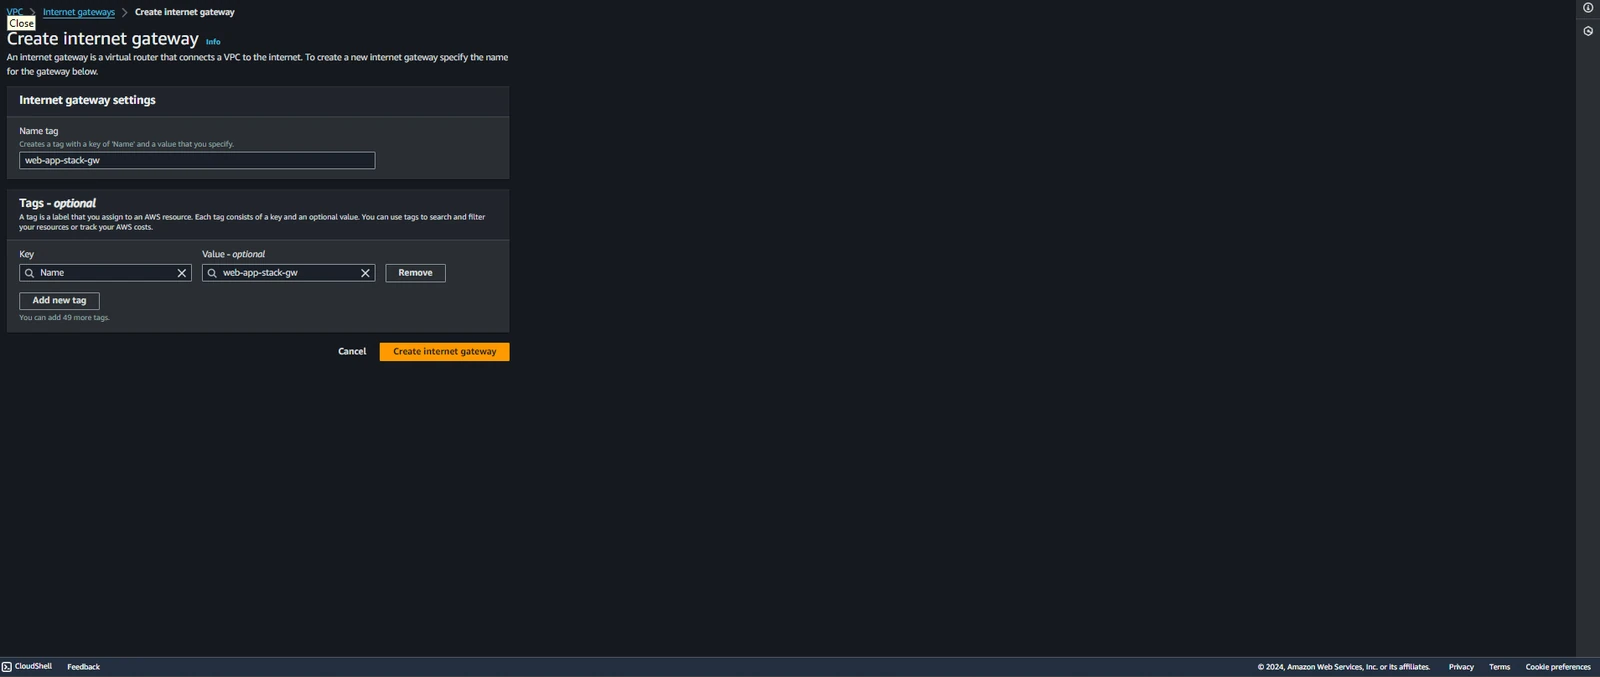
Configuration Setup:
- Name tag:
web-app-stack-gw
The IGW was successfully created and has the IGW ID: igw-0f97e3e6b347f9e1f
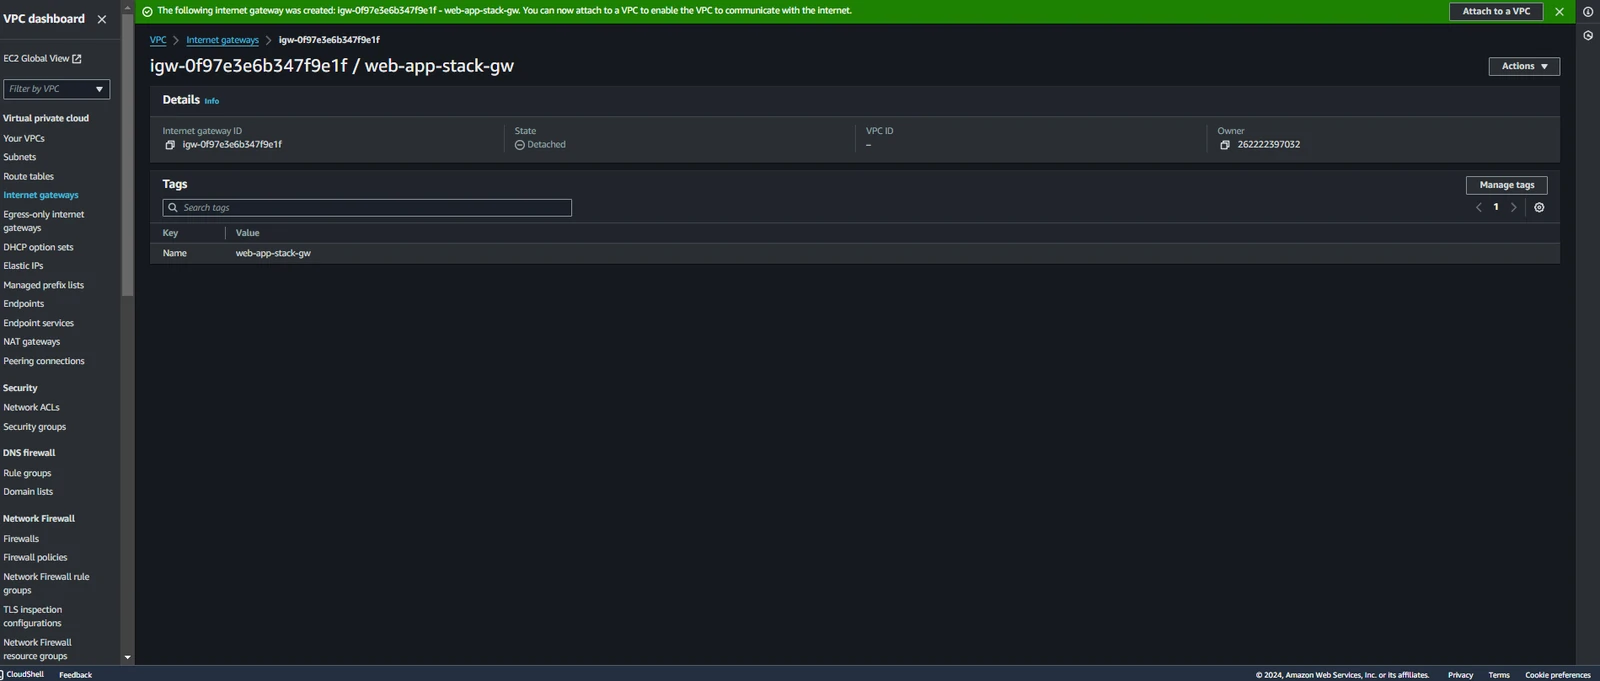
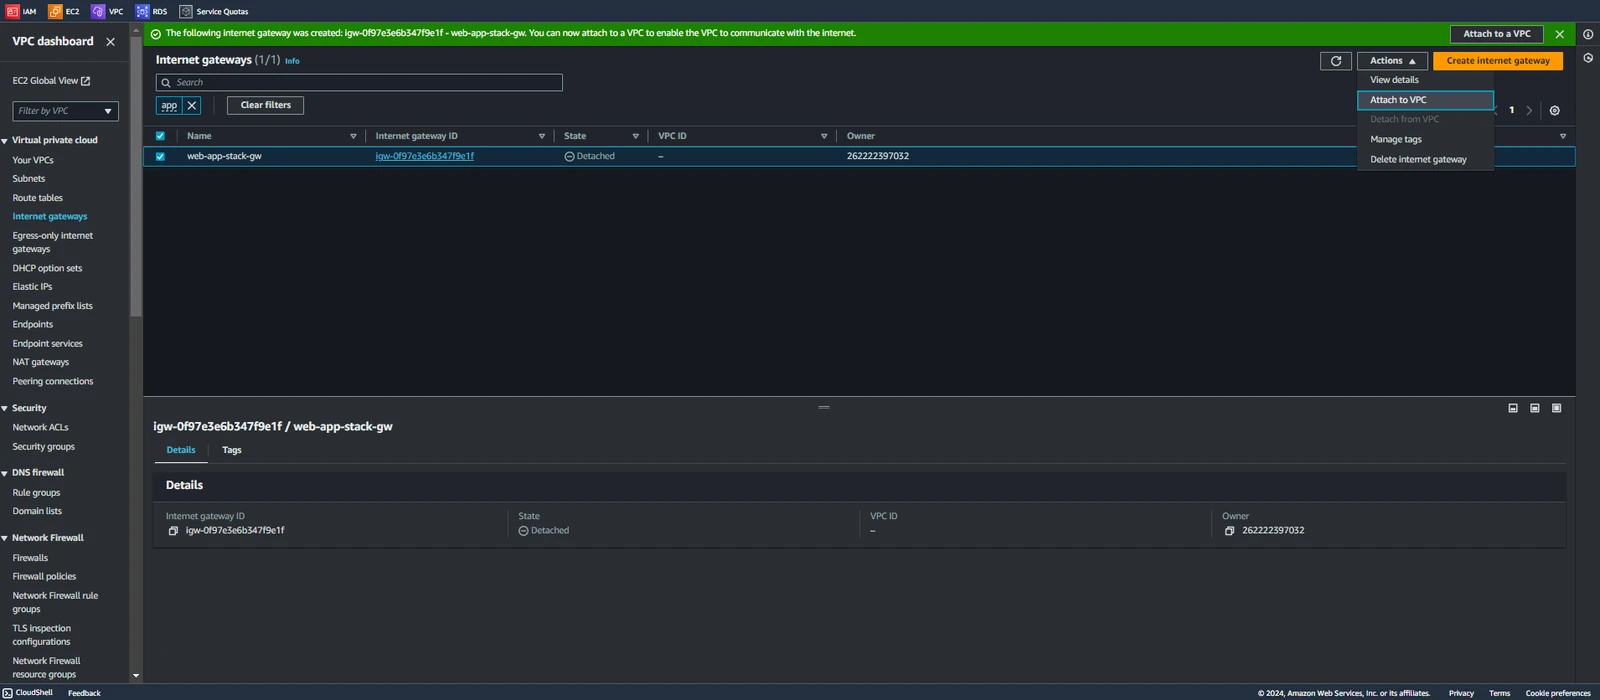
Here we can see that the State of the IGW is Detached (the IGW is not attached to any VPC and cannot provide Internet connectivity to any resources in the VPC). Therefore, we will Attach this IGW to the VPC (vpc-app-southeast-1-dev-web-app-stack) that was created earlier.
Select IGW(web-app-stack-gw) created -> Action -> Attach to VPC
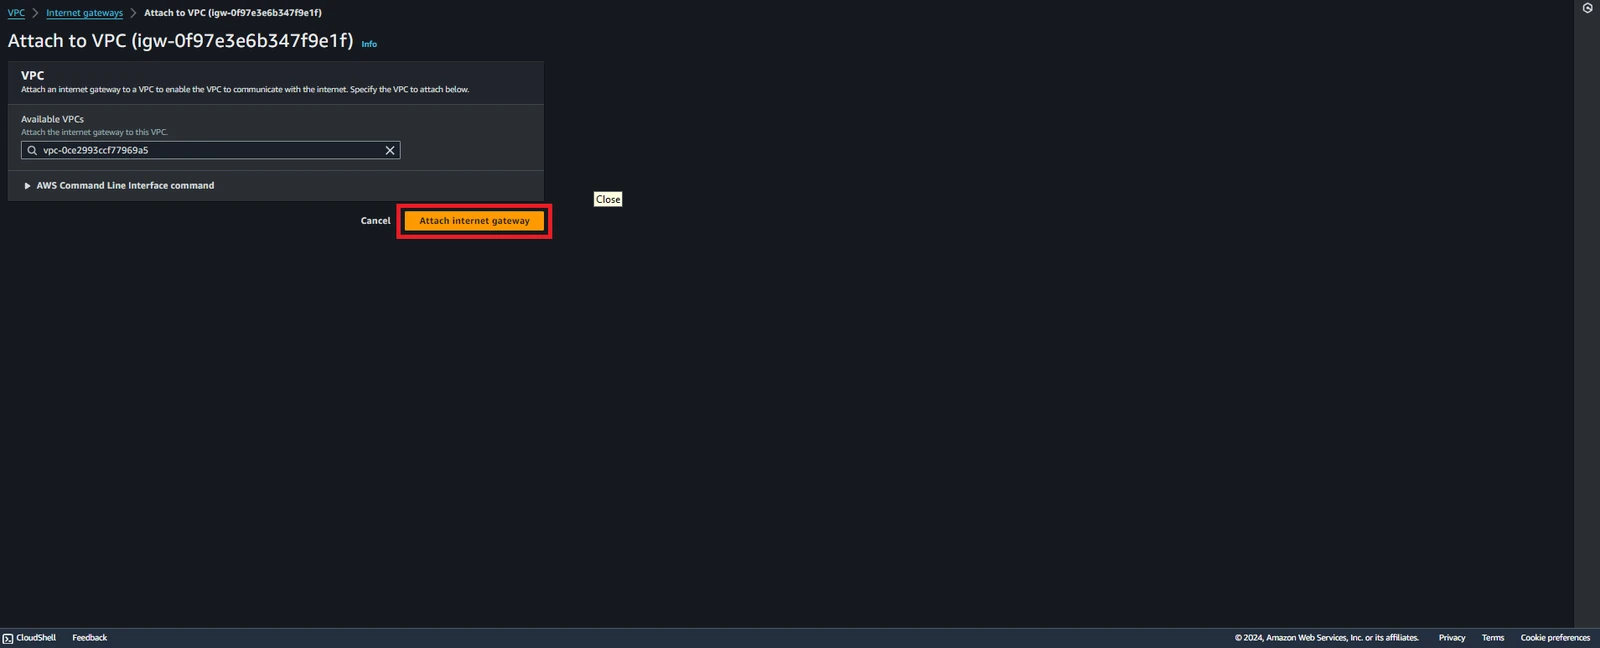
Continue by selecting the VPC ID(vpc-0ce2993ccf77969a5) created earlier -> Choose Attach internet gateway
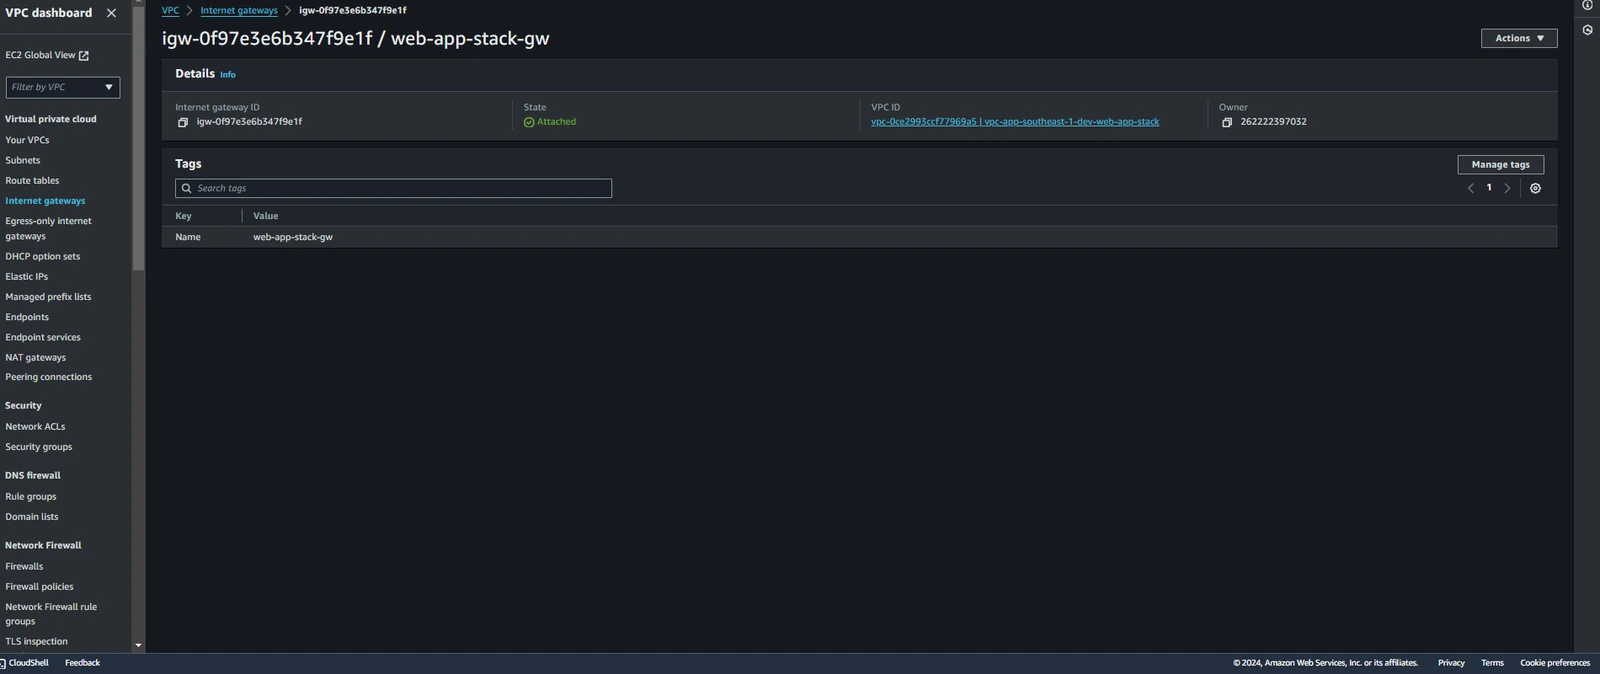
Successfully created and the State is now Attached.
3.4 Create Route Tables within a VPC
Access VPC console and select tab Route tables -> Route route table
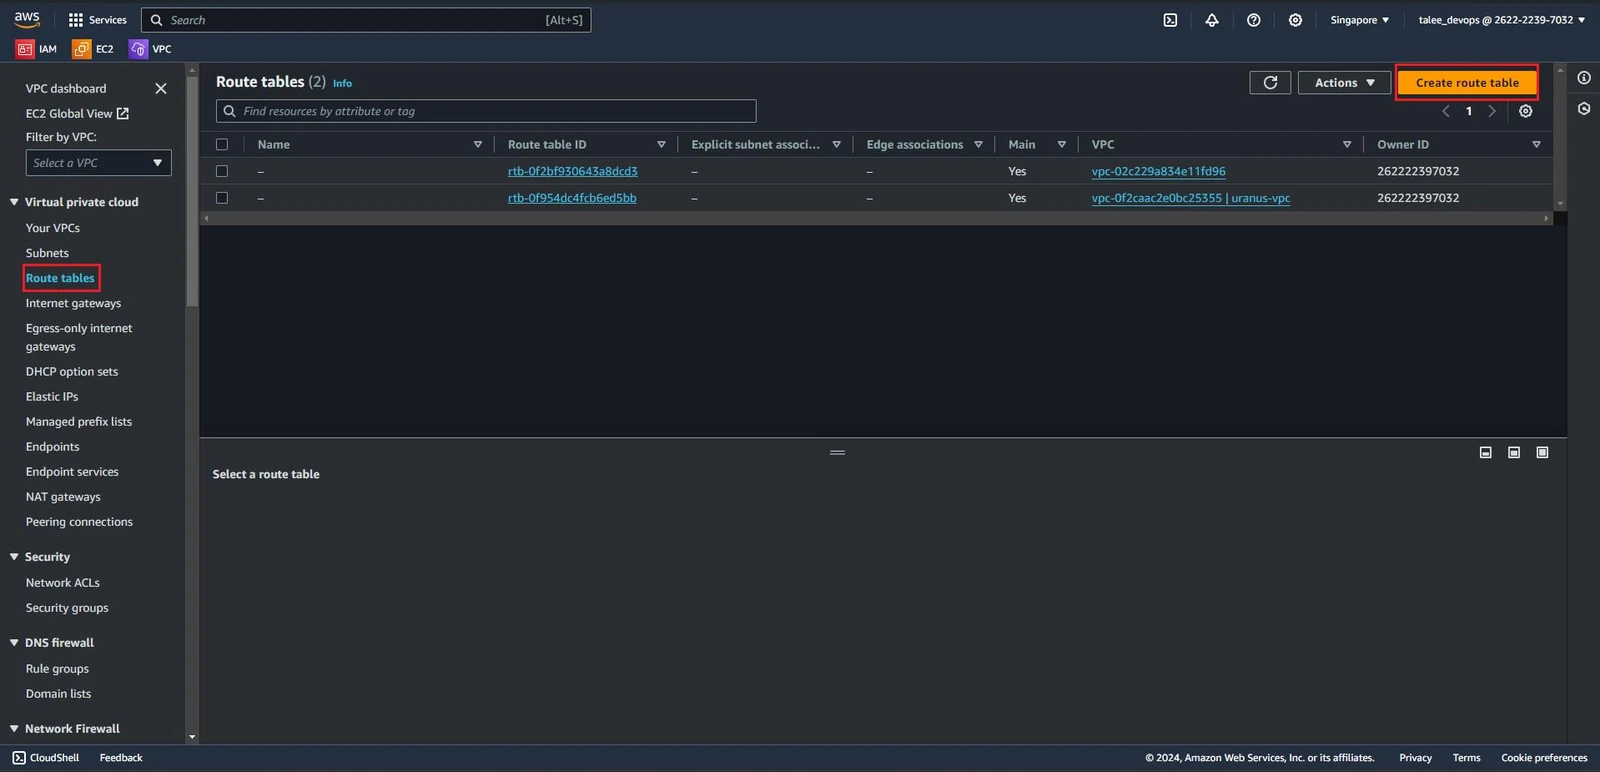
The Route Tables you are seeing are the default of AWS. In AWS, when you create a Virtual Private Cloud (VPC) in Amazon Web Services (AWS), AWS will automatically create a default Route Table for that VPC.
Configuration Setup:
Name optional:
web-app-stack-route-table-publicVPC:
vpc-0ce2993ccf77969a5(vpc-app-southeast-1-dev-web-app-stack)
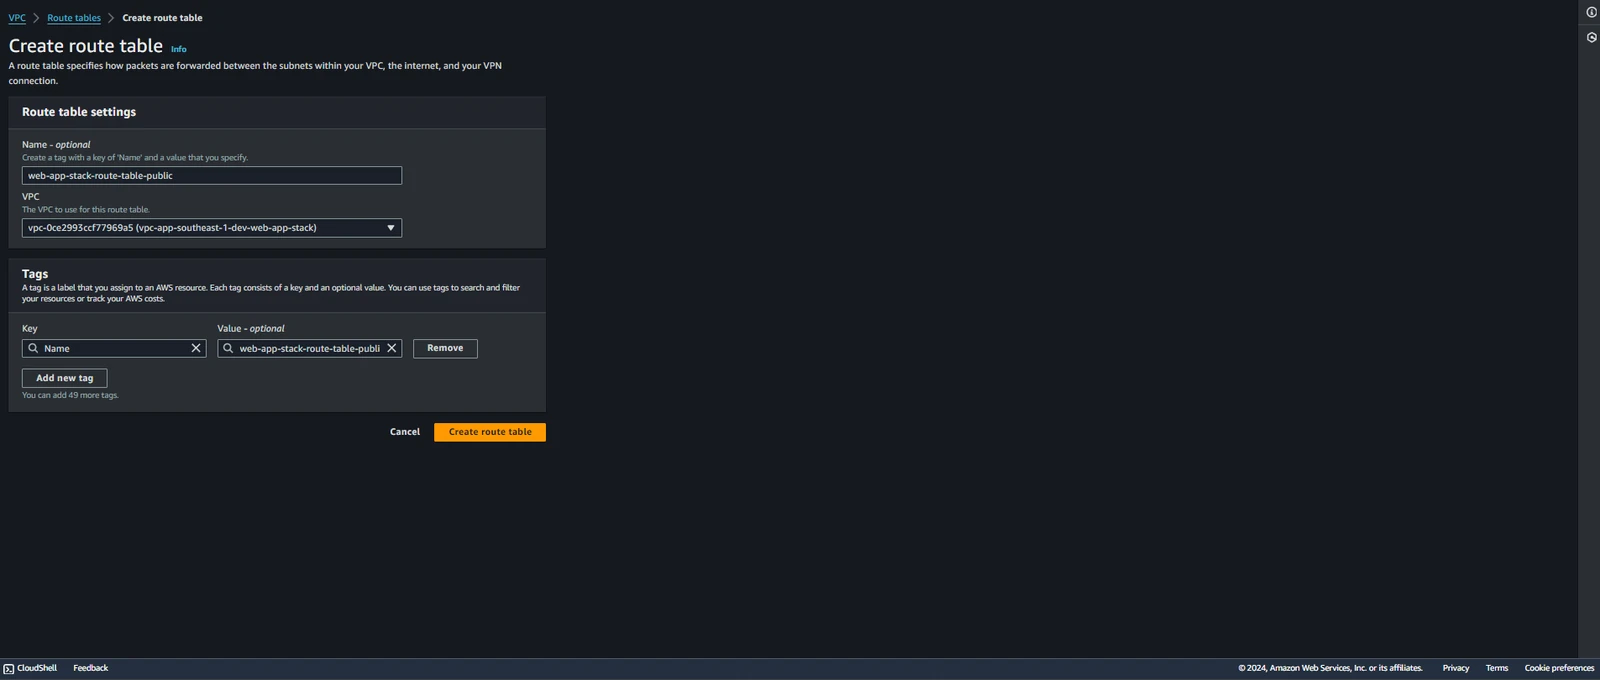
Select Create route table
Route Table was successfully created and has the Route Table ID: rtb-0ef6d58f29c45b44a
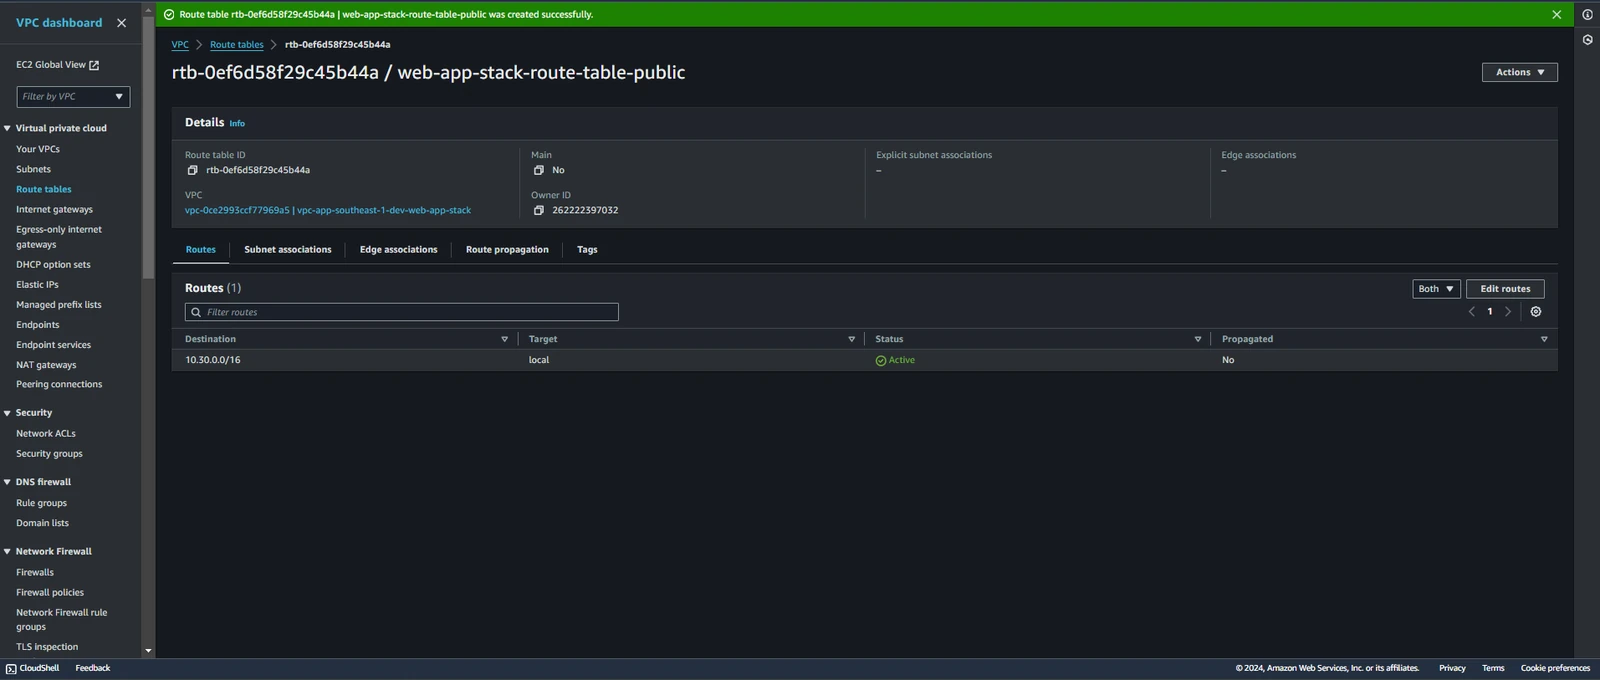
Check the Subnet associations tab and see that it is not currently assigned to any Subnet. Next, I will assign the Route Table: web-app-stack-route-table-public to the Public Subnets. Assigning the Route Table to Subnets has the following purposes for routing packets from resources within the Subnets:
Internet Access:
Public subnetstypically contain resources (e.g., web servers, web applications) that you want to be accessible from the Internet.Load Balancer: If you are using an
Elastic Load Balancer (ELB)to distribute traffic to servers within the public subnets, you need to assign aRoute Tablecontaining routes to theELB. This allows requests from the Internet to be routed to theELBand then to the servers.Connecting to AWS Services: Sometimes, you may want resources in the public subnets to access
AWSservices such asS3orDynamoDBwithout going through the Internet.Security and Management: By routing requests from the Internet into public subnets through a
Route Table, you can control and manage access to the resources in thesubnets. This can be done usingSecurity GroupsorNetwork Access Control Lists (NACLs).
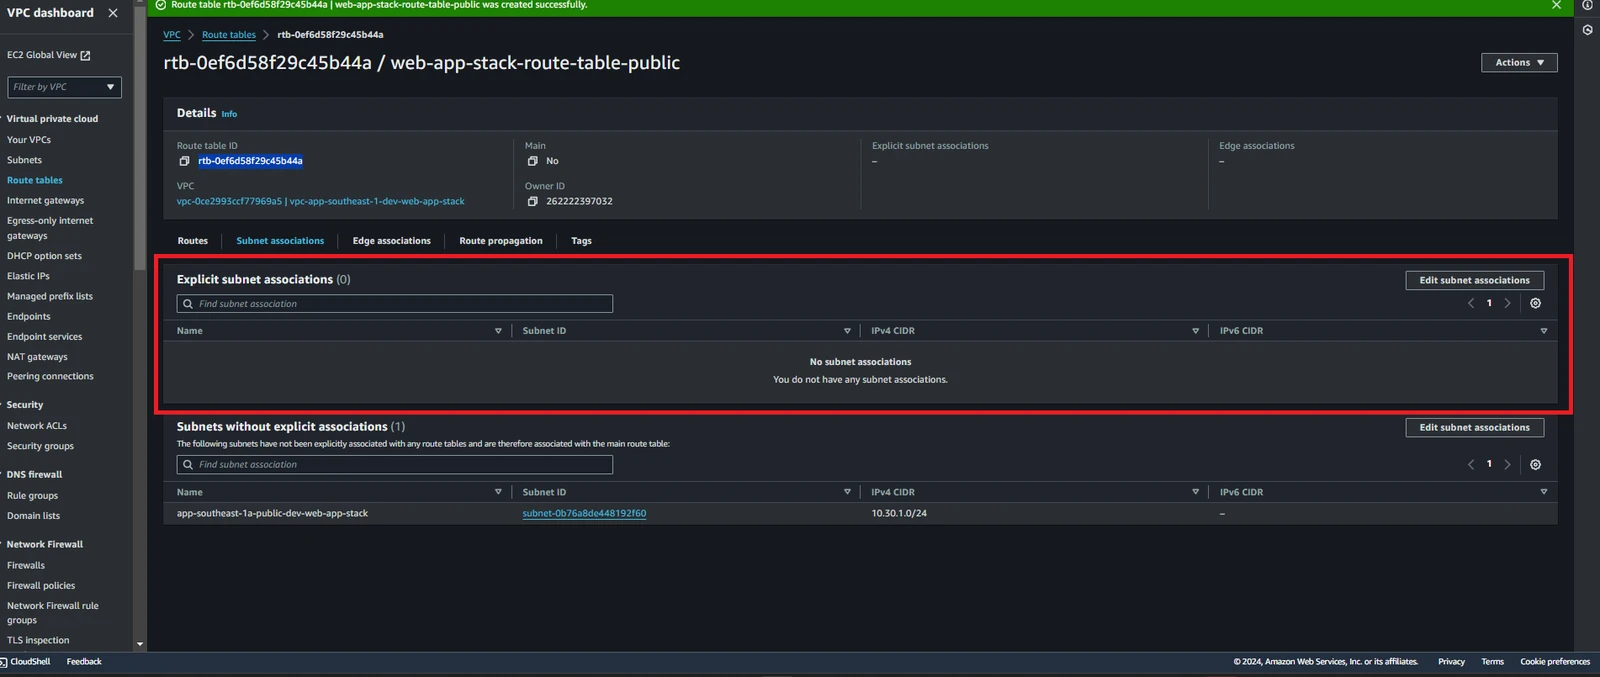
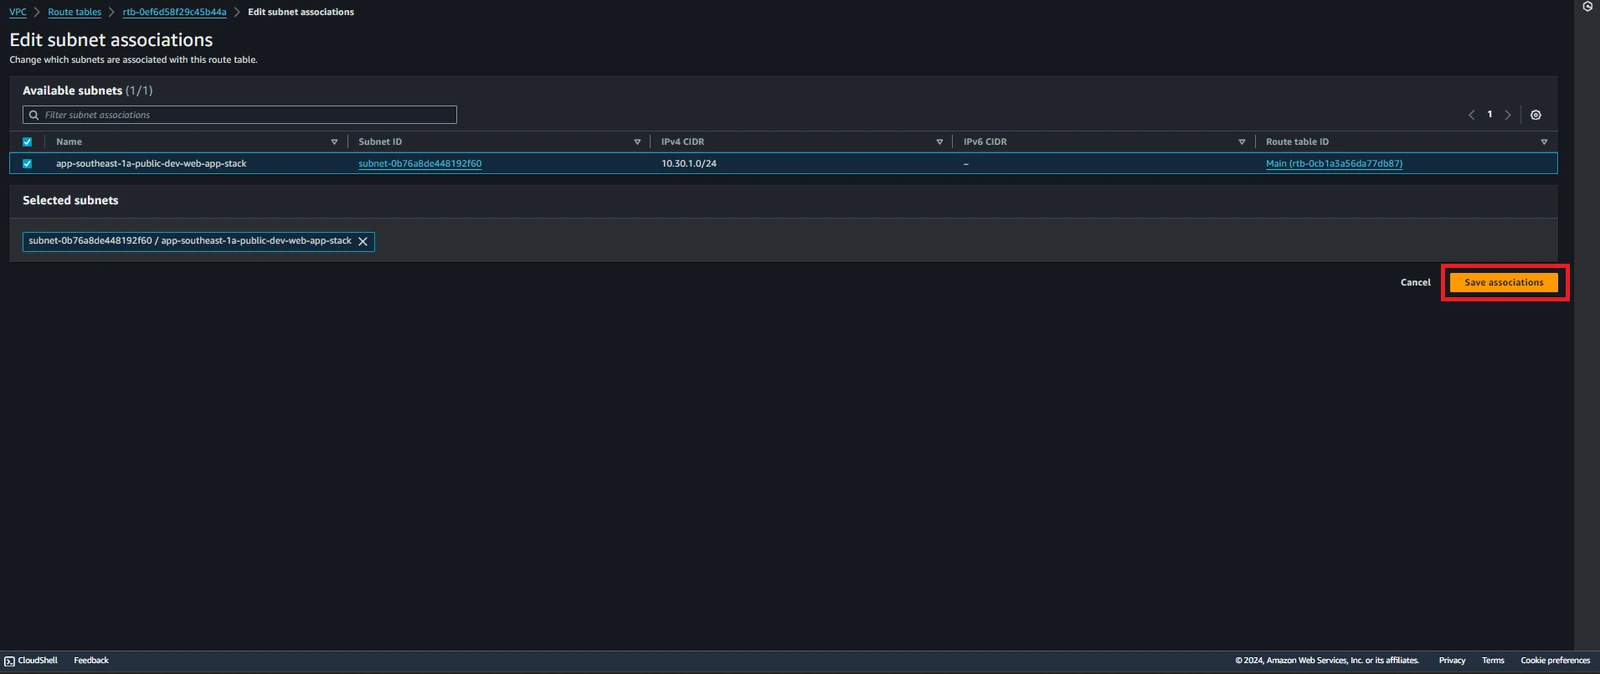
To assign the Route Table: web-app-stack-route-table-public to the Public Subnets:
Select the
Subnet associationstab.Click on
Edit subnet associations.Check the
Public subnetoptions. Specifically, select thePublic subnets:app-southeast-1a-public-dev-web-app-stackClick on
Save associations.
When successfully assigned, the screen will display the updated Subnet associations tab.
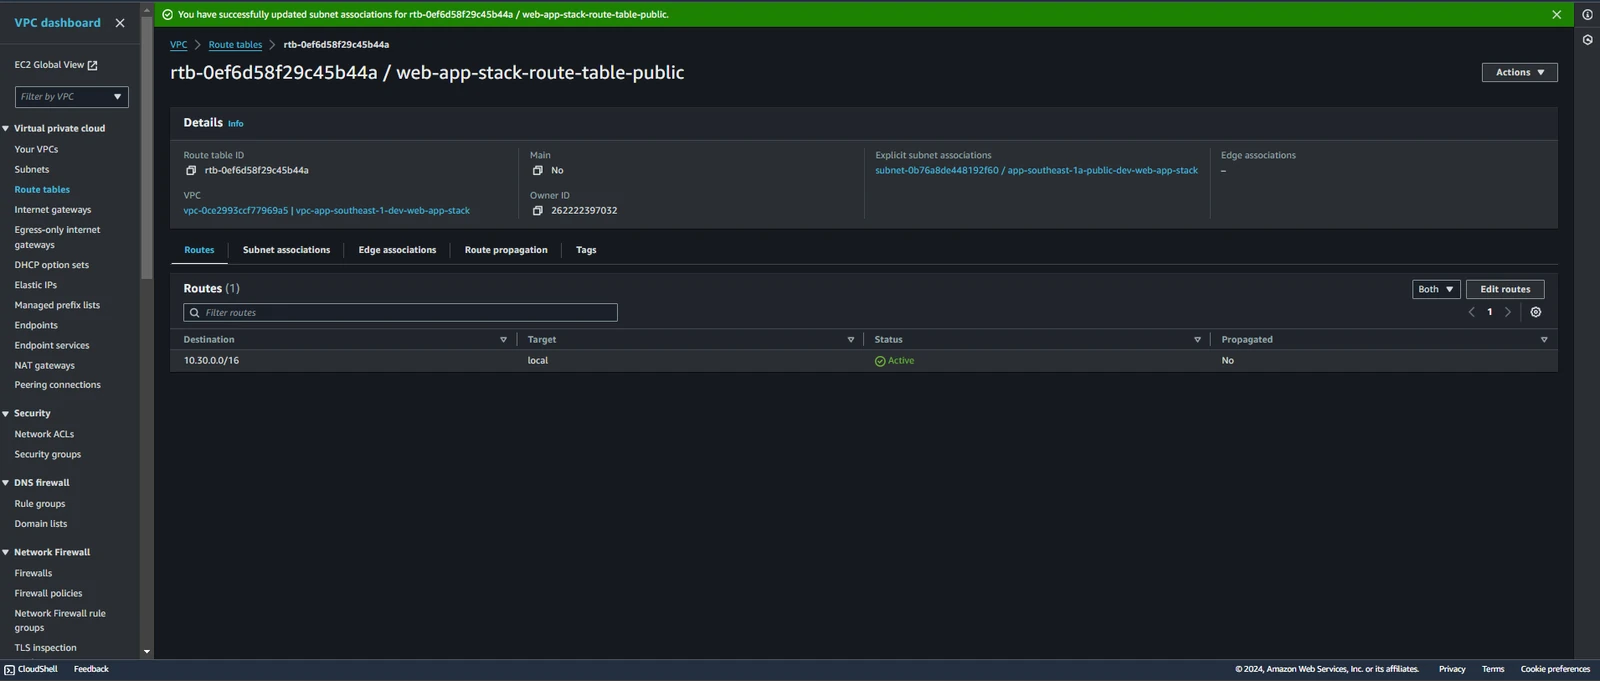
The next step is to assign the IGW ID: igw-0f97e3e6b347f9e1f to the Route Table: web-app-stack-route-table-public to enable access Internet.
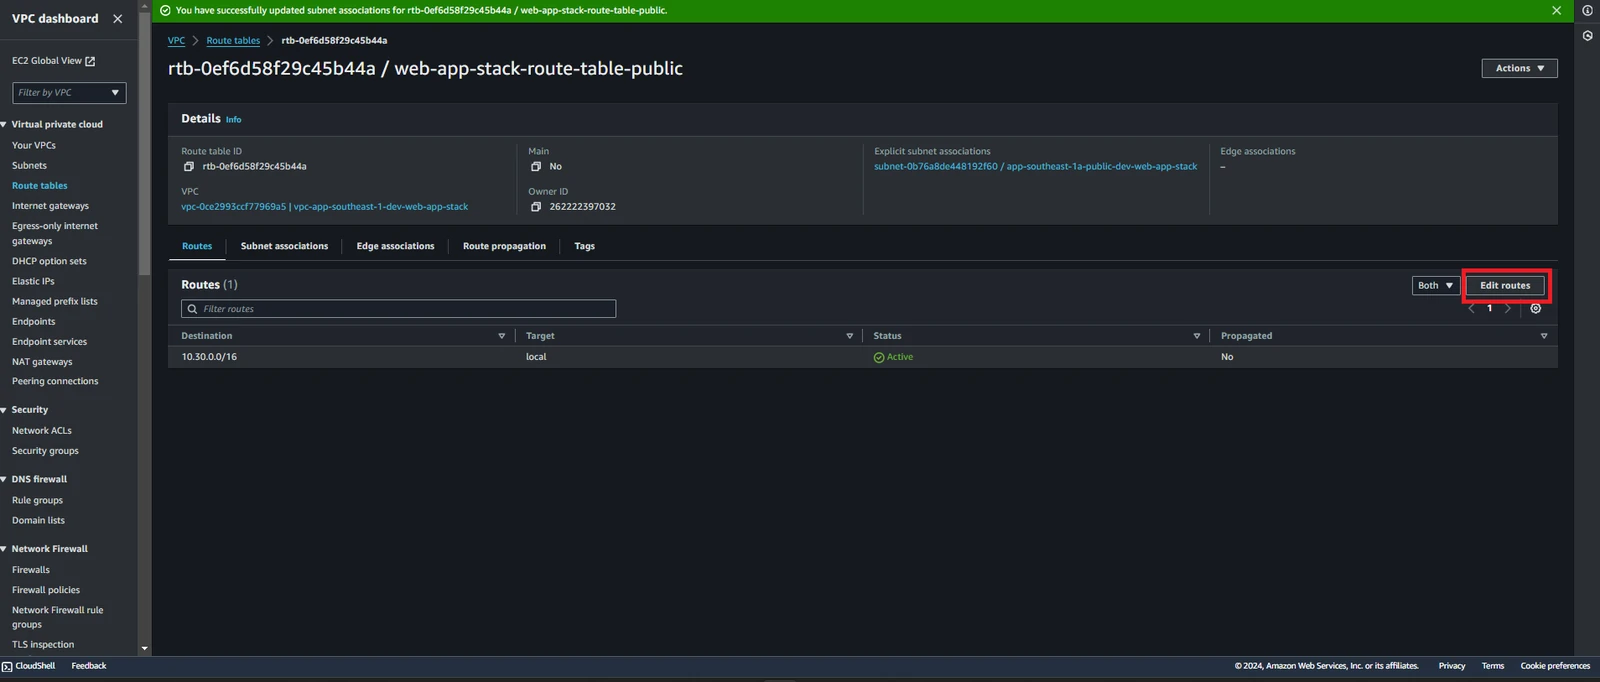
When you enter the screen, you'll see a default Destination, which is a special route used to route packets to resources within the same VPC. This route targets the internal IP addresses of the resources within the VPC and is used to enable communication between resources within the VPC without going through the Internet.
Next, select Add Route.
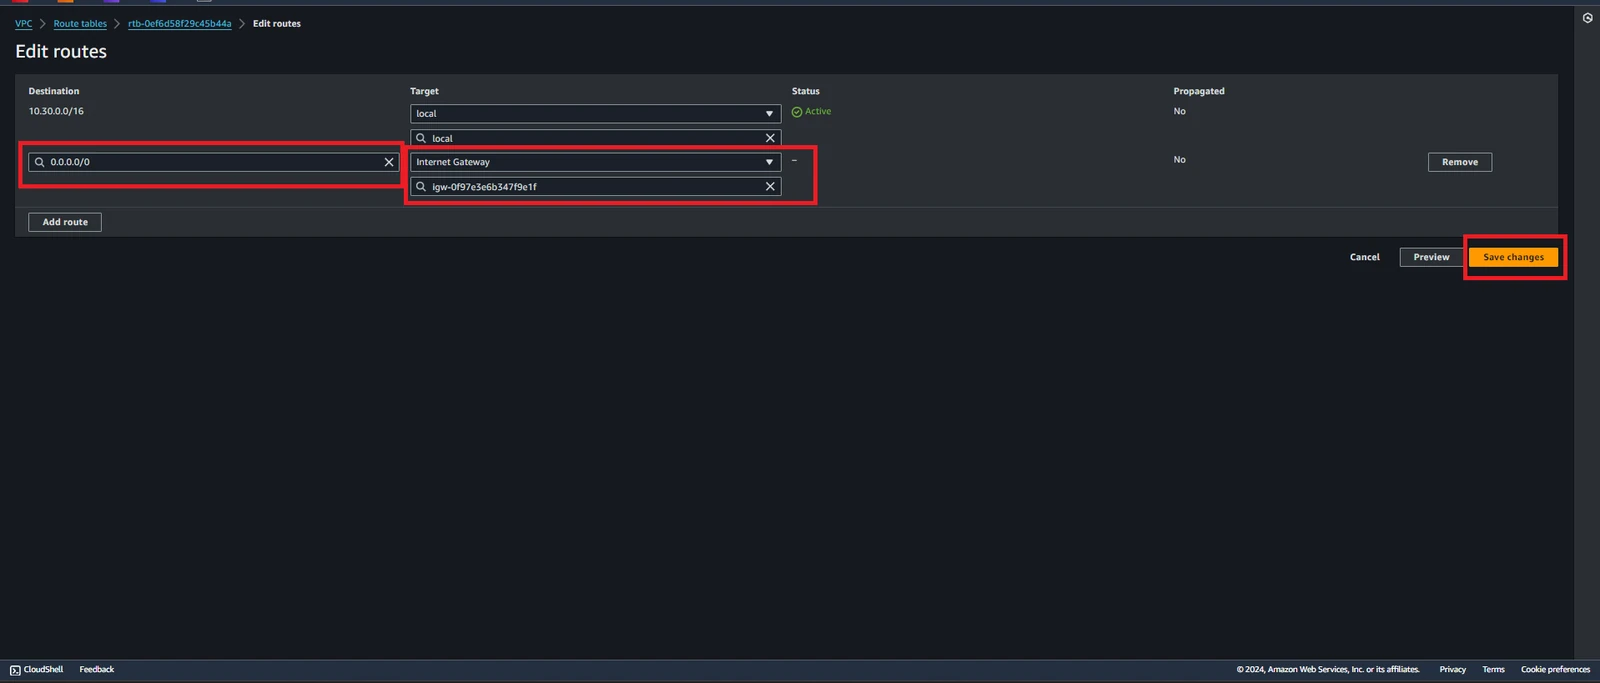
Configuration Setup:
Destination:
0.0.0.0/0.Target:
Internet Gateway(igw-0f97e3e6b347f9e1f).
Next, select Save changes. If you want to preview the changes, you can choose Review.
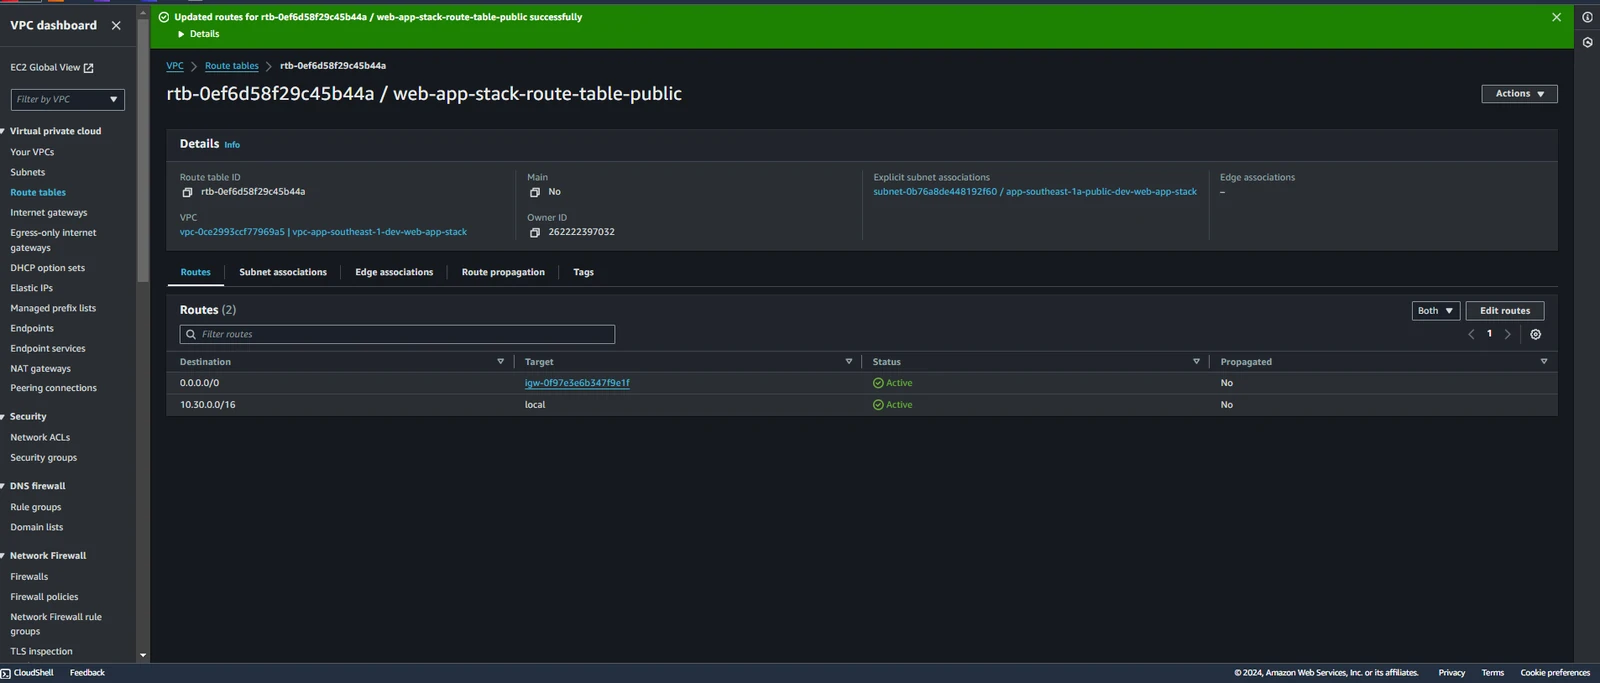
When completed, it will display Status: Status: Active.
3.5 Create Security Group
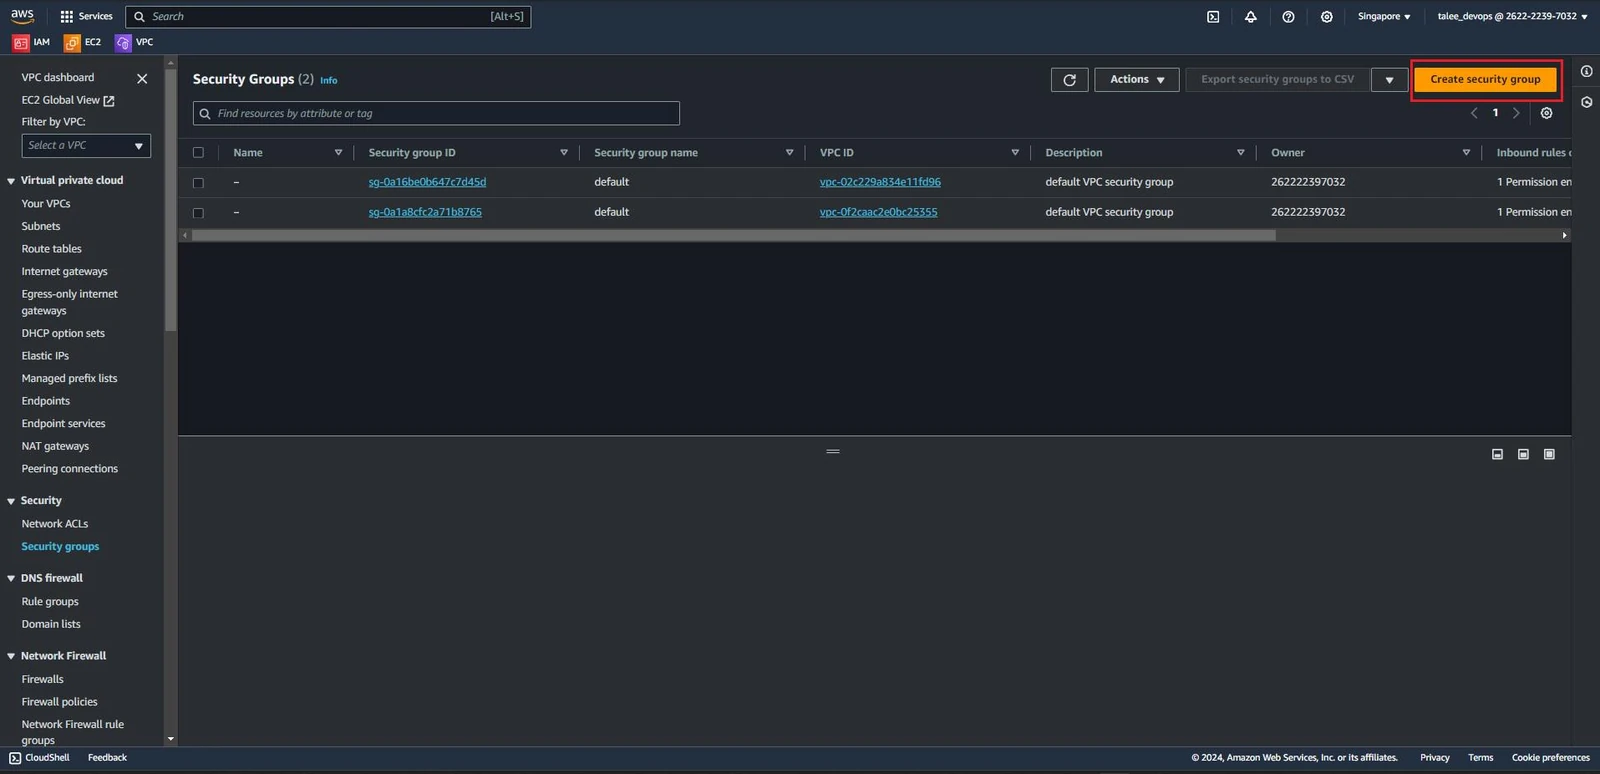
Access the VPC console and select the Security groups -> Create security group.
The Security Groups you are seeing are the default of AWS: a special security group automatically created for each new VPC (Virtual Private Cloud). This security group can be customized to adjust security rules for the resources within the VPC.
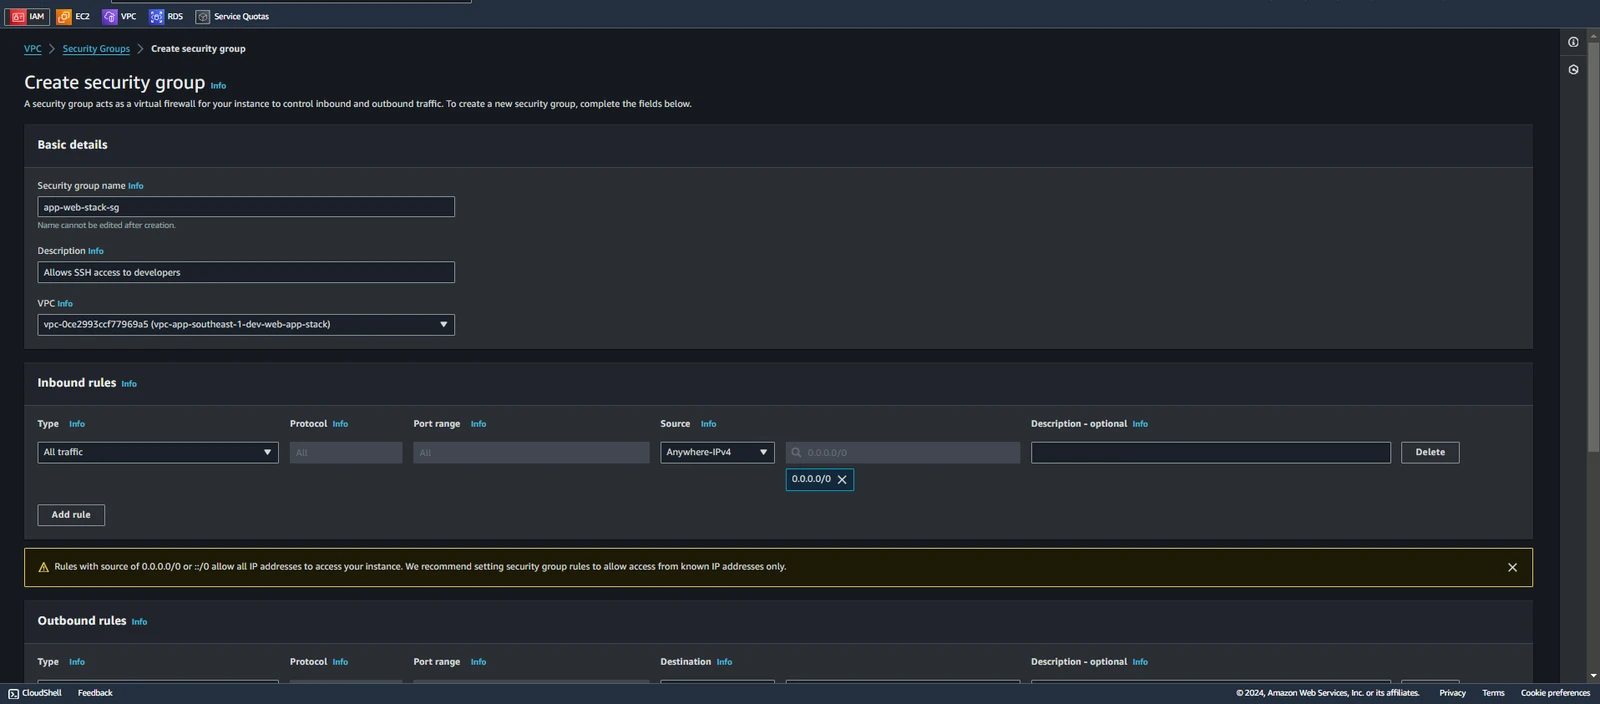
Configuration Setup:
Security group name:
app-web-stack-sgDescription:
Allows SSH access to developersVPC:
vpc-0ce2993ccf77969a5(vpc-app-southeast-1-dev-web-app-stack)Inbound rules:
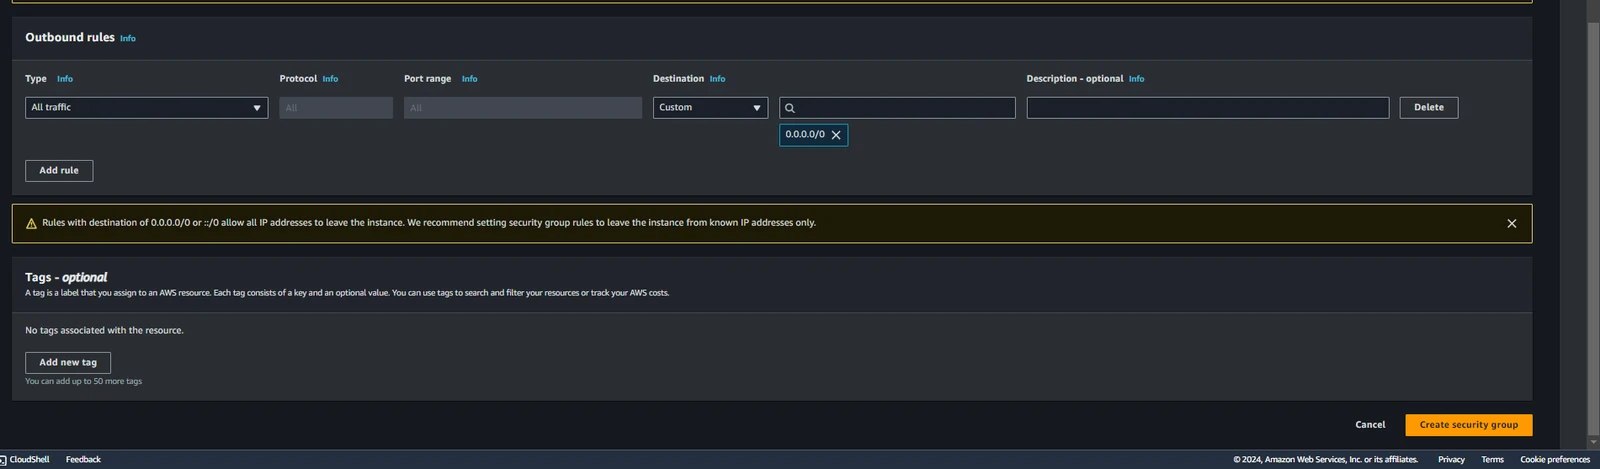
IPv4/All traffic/All/0.0.0.0/0Outbound rules:
IPv4/All traffic/All/0.0.0.0/0
Select Create security group.
The Security group was successfully created and has the Security group ID: sg-04837c0728cd79e89.
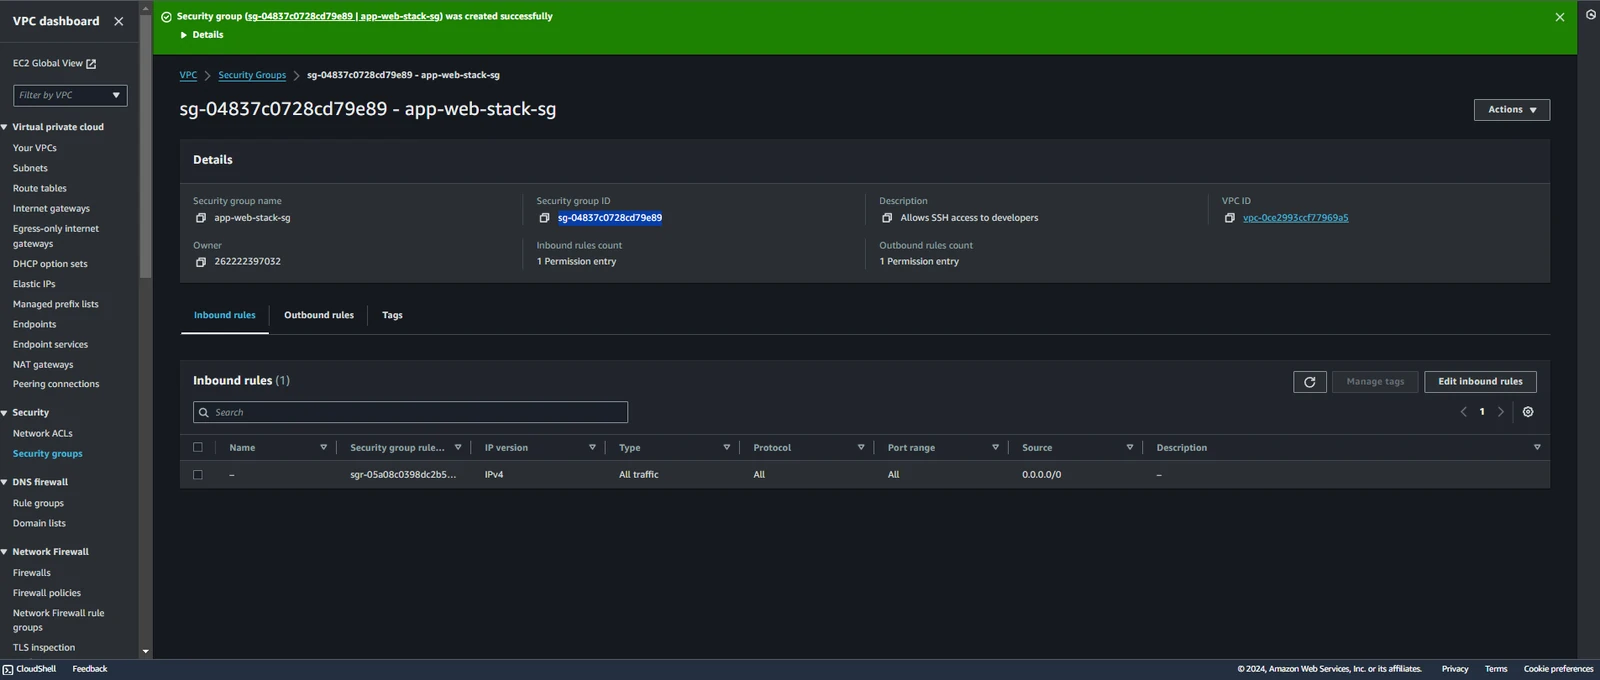
In this section, we have successfully created a virtual network environment (VPC) on AWS, including VPC, Subnets, Internet Gateway, Route Tables, and Security Groups. These are the basic steps to begin deploying an application on AWS. In the next lesson, we will continue to deploy Instances (EC2) to run the application.
3.6 Create EC2 Instances
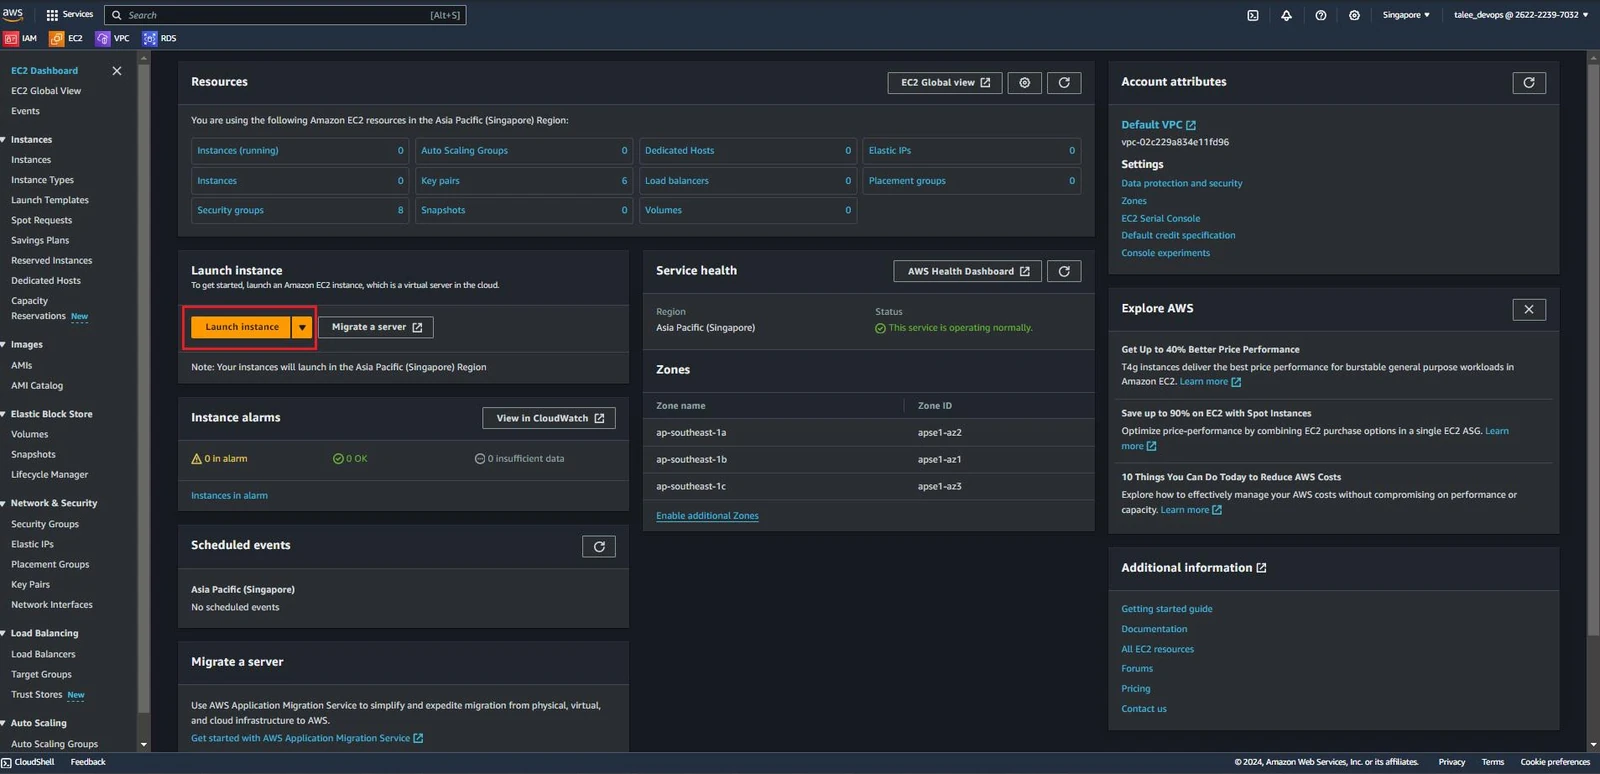
Access the Amazone EC2 and select Launch instance
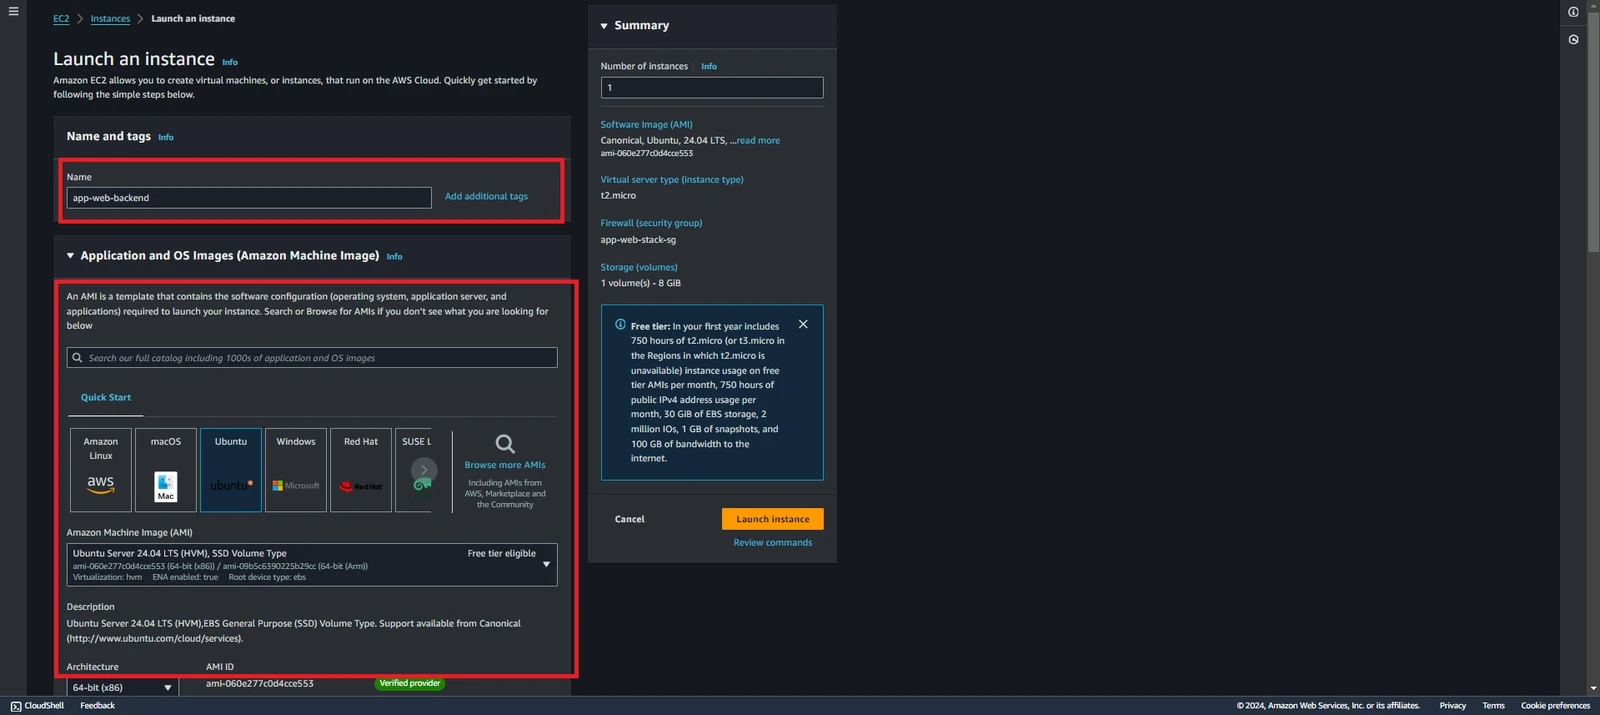
Configuration Setup:
Name :
app-web-backendQuick Start:
UbuntuAmazon Machine Image (AMI):
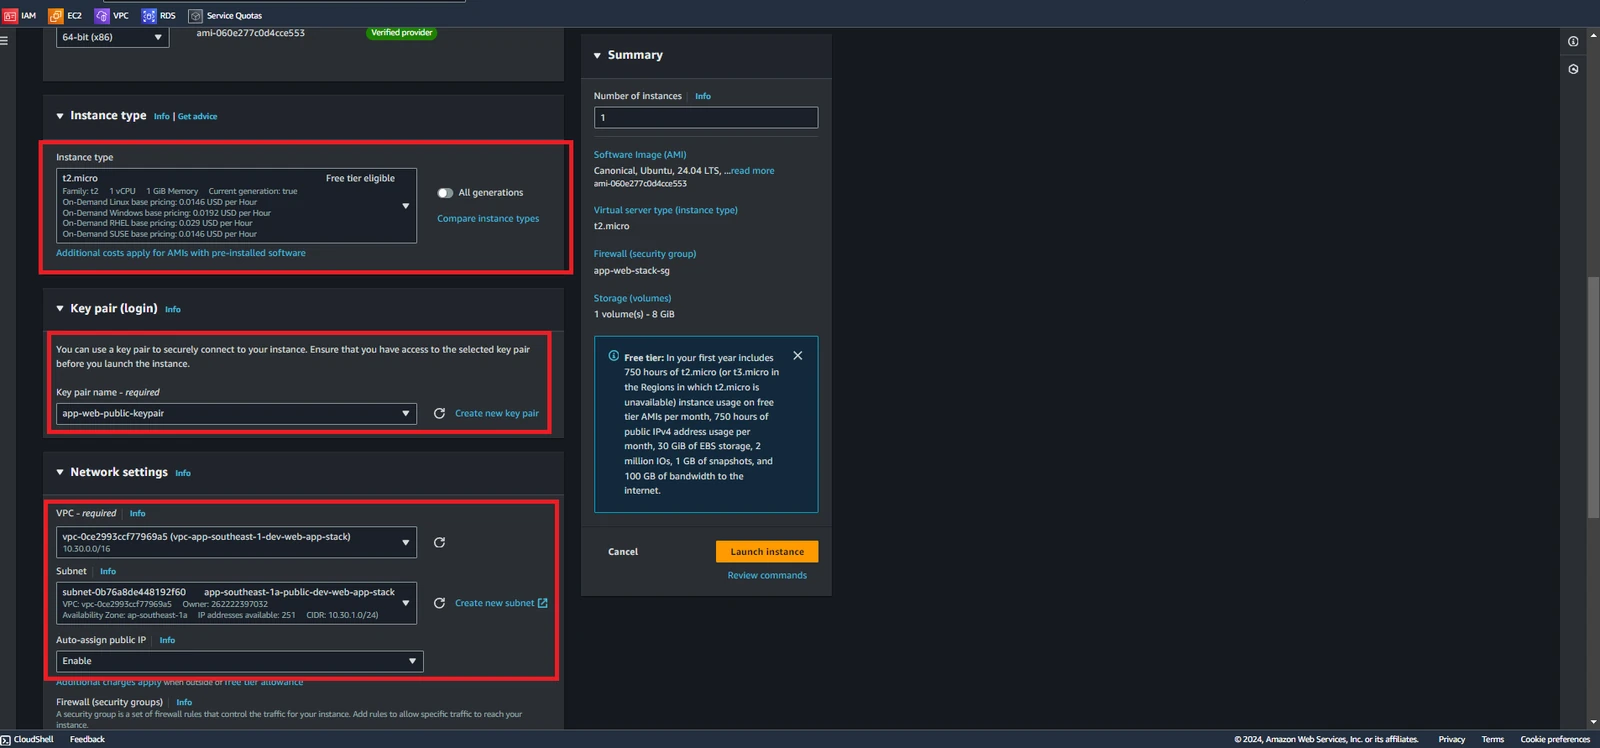
Ubuntu Server 22.04 LTSInstance type:
t2.microKey pair name - required:
app-web-public-keypairVPC - required:
vpc-0ce2993ccf77969a5(vpc-app-southeast-1-dev-web-app-stack)Subnet:
app-southeast-1a-public-dev-web-app-stackAuto-assign public IP:
EnableFirewall (security groups):
Select existing security groupCommon security groups:
app-web-stack-sg(sg-04837c0728cd79e89)
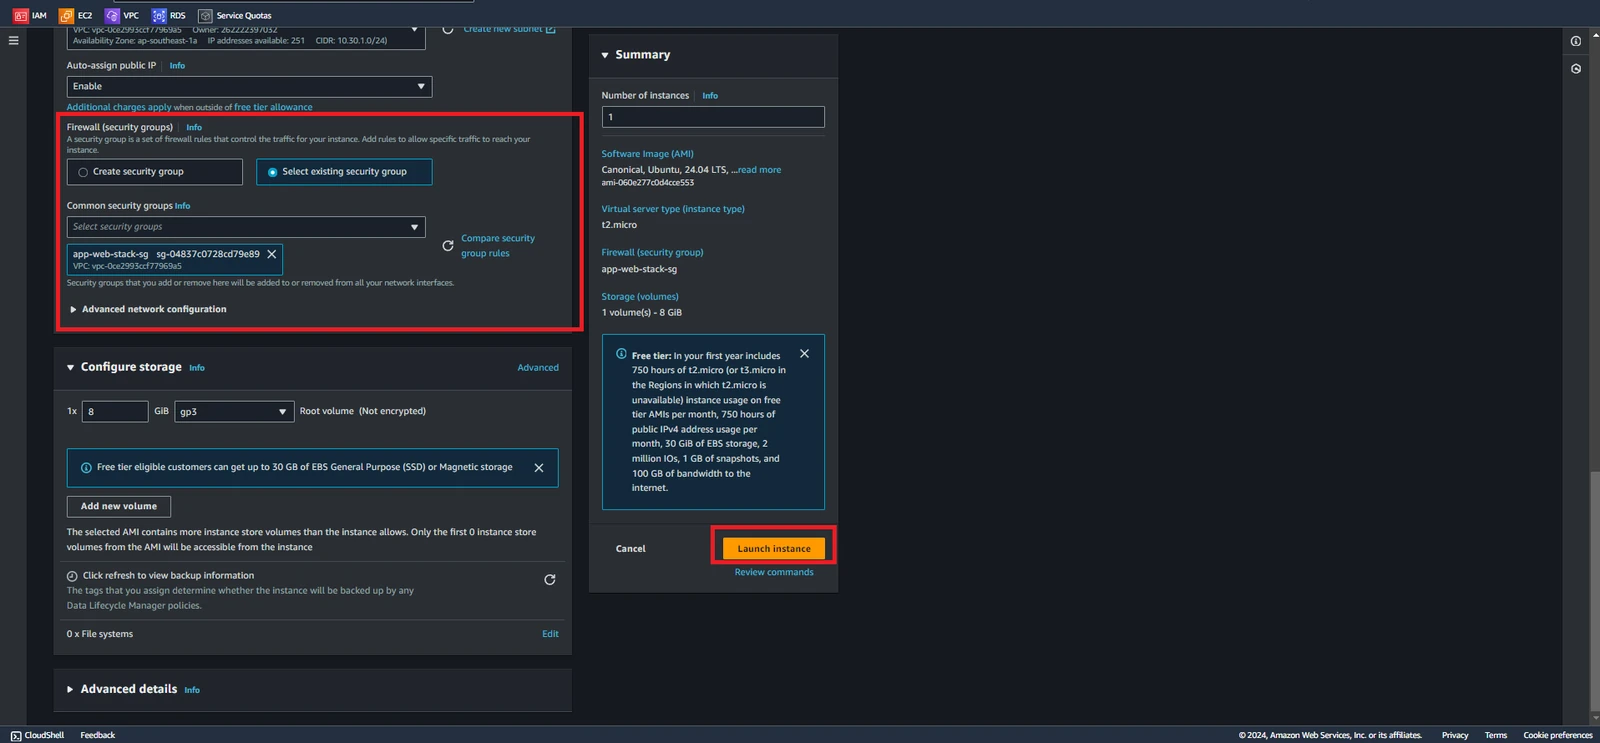
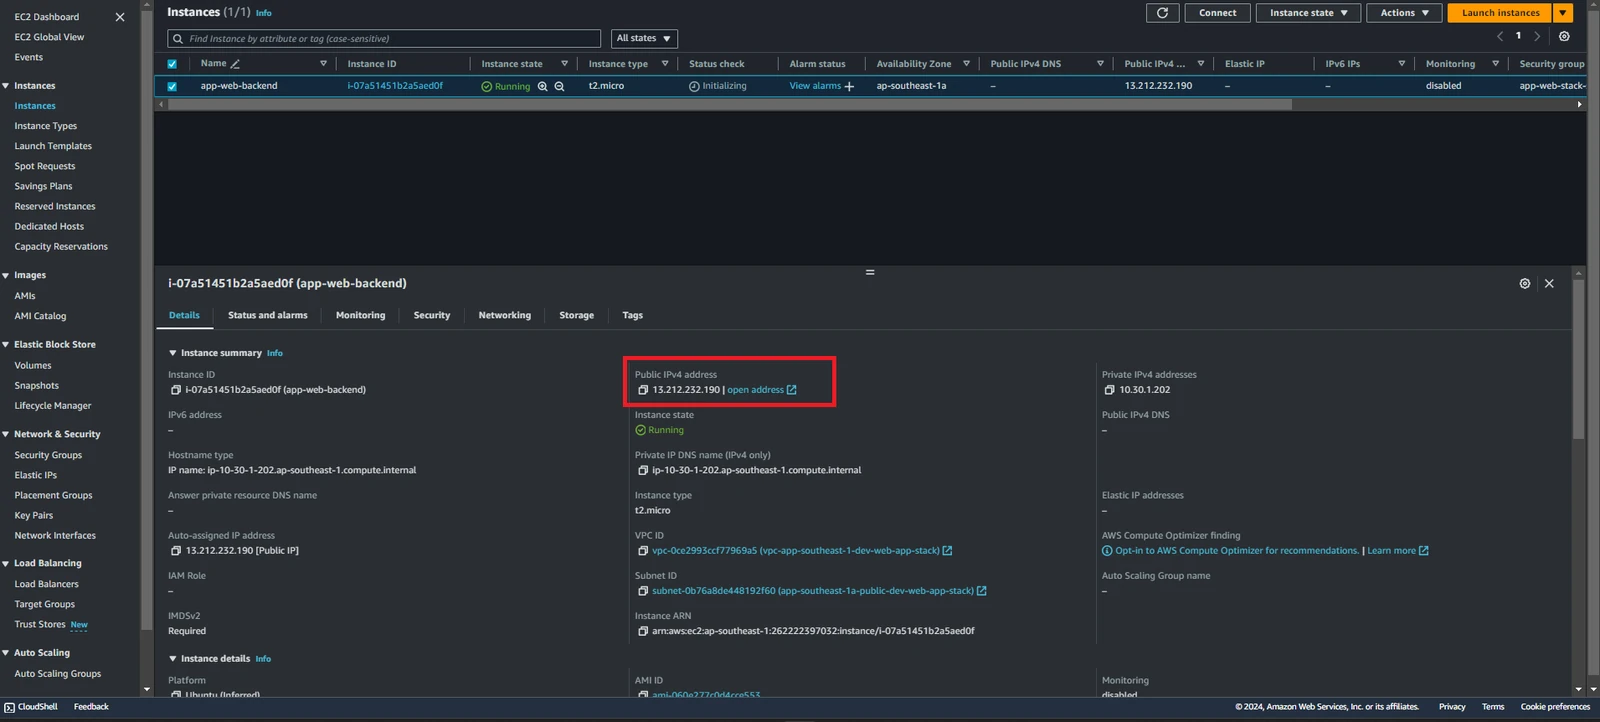
After creating, wait for a while until the Instance state: Running. Note the Public IPv4 address (this will be the IP address you will use to SSH into the instance).
4. Dockerize Spring Boot Application
First, we need to dockerize the application we’ve built, hence we need to do some modifications.
Open src/main/resources/application.yml and add the following modification to the server section as shown below:
server:
  port: ${SERVER_PORT:8018}

spring:
  h2:
    console:
      enabled: true
  datasource:
    url: ${H2_URL:jdbc:h2:mem:premier-league}
    driverClassName: org.h2.Driver
  jpa:
    database-platform: org.hibernate.dialect.H2Dialect
    show-sql: true
    hibernate:
      ddl-auto: create-drop
We’ll be passing the PORT and url via environment variables on the server, especially the port. If we manually enter the port for our application, there is every tendency that there going to be a port conflict. If the SERVER_PORT environment variable is not set, the default value 8018 will be used. By using environment variables in this way, you can maintain a single configuration file that works across different environments (development, staging, production) without needing to hard-code values.
4.1 Define Dockerfile
Next, create a Dockerfile and add the following:
# Define build arguments
ARG MVN_VERSION=3.9.5
ARG JDK_VERSION=21
# Build stage
FROM jelastic/maven:${MVN_VERSION}-openjdk-${JDK_VERSION} AS build
LABEL maintainer="taleedevops.today"
WORKDIR /app

# Copy the application code to the container
COPY . /app

# Build the application
RUN mvn clean install -Dmaven.test.skip=true

# Package stage
FROM openjdk:21-jdk-slim
COPY --from=build /app/target/*.jar /app/app.jar
EXPOSE 8018
ENTRYPOINT ["java", "-jar", "/app/app.jar"]
ARG MVN_VERSION=3.9.5: Defines a build argument for the Maven version, which can be overridden at build time.ARG JDK_VERSION=21: Defines a build argument for the JDK version, which can also be overridden at build time.FROM jelastic/maven:${MVN_VERSION}-openjdk-${JDK_VERSION} AS build: Starts a new build stage using a Maven image that includes the specified JDK version. This image will be used to build the application.LABEL maintainer="taleedevops.today": Adds a label to the image with the maintainer's information.WORKDIR /app: Sets the working directory to/appin the container.COPY . /app: Copies the entire content of the current directory (where the Dockerfile is located) into the/appdirectory in the container.RUN mvn clean install -Dmaven.test.skip=true: Runs the Maven build command inside the container to clean and install the project dependencies and compile the project, skipping tests.FROM openjdk:21-jdk-slim: Starts a new stage for the final image using a slim OpenJDK 21 base image.COPY --from=build /app/target/*.jar /app/app.jar: Copies the JAR file built in the previous stage from the/app/targetdirectory to the/appdirectory in the new image.\EXPOSE 8018: Informs Docker that the container will listen on port8018at runtime.ENTRYPOINT ["java", "-jar", "/app/app.jar"]: Specifies the command to run when the container starts, which is to execute the JAR file using Java.
Summary:
Build Stage:
Uses a Maven image with the specified JDK to build the application.
Copies the source code into the container.
Runs Maven to build the application, skipping tests.
Package Stage
Uses a slim JDK image for the runtime environment.
Copies the built JAR file from the build stage.
Exposes port
8018.Defines the entry point to run the application.
4.2 Generate Docker Image
You can create a docker image with the following command:
docker build -t <IMAGE_NAME>:<IMAGE_TAG> -f Dockerfile <PATH_TO_Dockerfile>Applies to projects:
#Build docker images
docker build -t tunganhle/premier-league:latest .
#Process
=> [internal] load build definition from Dockerfile                                                               0.1s
 => => transferring dockerfile: 530B                                                                               0.0s
 => [internal] load .dockerignore                                                                                  0.1s
 => => transferring context: 2B                                                                                    0.0s
 => [internal] load metadata for docker.io/library/openjdk:21-jdk-slim                                             3.8s
 => [internal] load metadata for docker.io/jelastic/maven:3.9.5-openjdk-21                                         3.6s
 => [auth] library/openjdk:pull token for registry-1.docker.io                                                     0.0s
 => [auth] jelastic/maven:pull token for registry-1.docker.io                                                      0.0s
 => [build 1/4] FROM docker.io/jelastic/maven:3.9.5-openjdk-21@sha256:c43af75dc23700d0687ad4c8773f2ab441af5fb8792  0.0s
 => CACHED [stage-1 1/2] FROM docker.io/library/openjdk:21-jdk-slim@sha256:7072053847a8a05d7f3a14ebc778a90b38c50c  0.0s
 => [internal] load build context                                                                                  0.1s
 => => transferring context: 9.46kB                                                                                0.0s
 => CACHED [build 2/4] WORKDIR /app                                                                                0.0s
 => [build 3/4] COPY . /app                                                                                        0.1s
 => [build 4/4] RUN mvn clean install -Dmaven.test.skip=true                                                     223.7s
 => [stage-1 2/2] COPY --from=build /app/target/*.jar /app/app.jar                                                 0.2s
 => exporting to image                                                                                             0.3s
 => => exporting layers                                                                                            0.3s
 => => writing image sha256:43644c5f7e399cf6fe9a946dc77f936c6eb525db19c52f98f6df4ae98e5c7404                       0.0s
 => => naming to docker.io/tunganhle/premier-league:latest
 #Done
Check the docker image with the command:
docker images

REPOSITORY                                  TAG       IMAGE ID       CREATED         SIZE
tunganhle/premier-league                    latest    43644c5f7e39   2 minutes ago   487MB
4.3 Push Docker Image to Docker HUB
For this step make sure you have a docker hub account.
Push your the image to your account.
docker push tunganhle/premier-league:latestImportant
Before pushing your image to Docker Hub, ensure that it is tagged correctly. The format for tagging an image is username/repository:tag. For example:
docker tag your-image:tag tunganhle/premier-league:latestReplace your-image:tag with the actual name and tag of your image. The latest tag is commonly used to indicate the most recent version of the image. Here's an example of the complete workflow from tagging to pushing:
# Tag the image
docker tag premier-league:1.0 tunganhle/premier-league:latest
# Log in to Docker Hub
docker login
# Push the image
docker push tunganhle/premier-league:latest- Automated Builds: Docker Hub can automatically build your images from a linked GitHub or Bitbucket repository. This can simplify your workflow by automatically pushing updates whenever you push changes to your source code repository.
- Repository Management: You can manage your repositories, set descriptions, and configure build settings directly from the Docker Hub web interface.
- Private Repositories: If you need to keep your images private, Docker Hub offers private repositories as part of its paid plans.
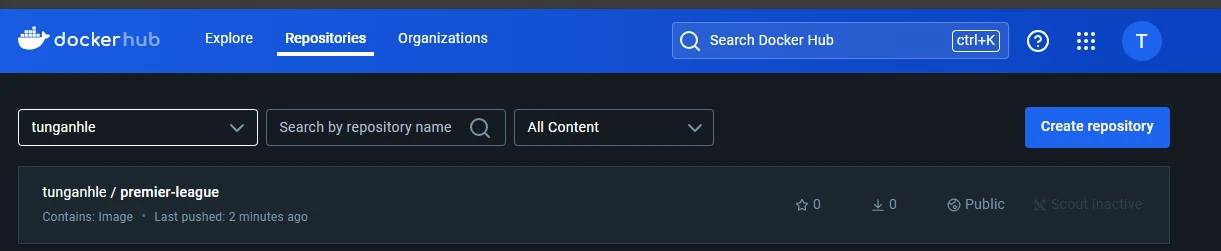
Once completed successfully, You will be able to see your image listed under repositories on your docker hub account.
5. Launch Application in AWS EC2
We are done with generating our artifacts in previous and step. Now its time to launch the docker image in the EC2 instance that we created earlier.
- Go to your terminal and run the following command to SSH into the instance.
# Navigate to the key pair and modify the permissions if not done already.
# If the permissions is set to 644 then you will be denied to ssh into the instance.
chmod 600 <key-pair.pem>
# SSH into the instance. Username changes on the basis of the image you are using.
ssh -i /path/keypair.pem ec2-user@<Instance-Public-IP>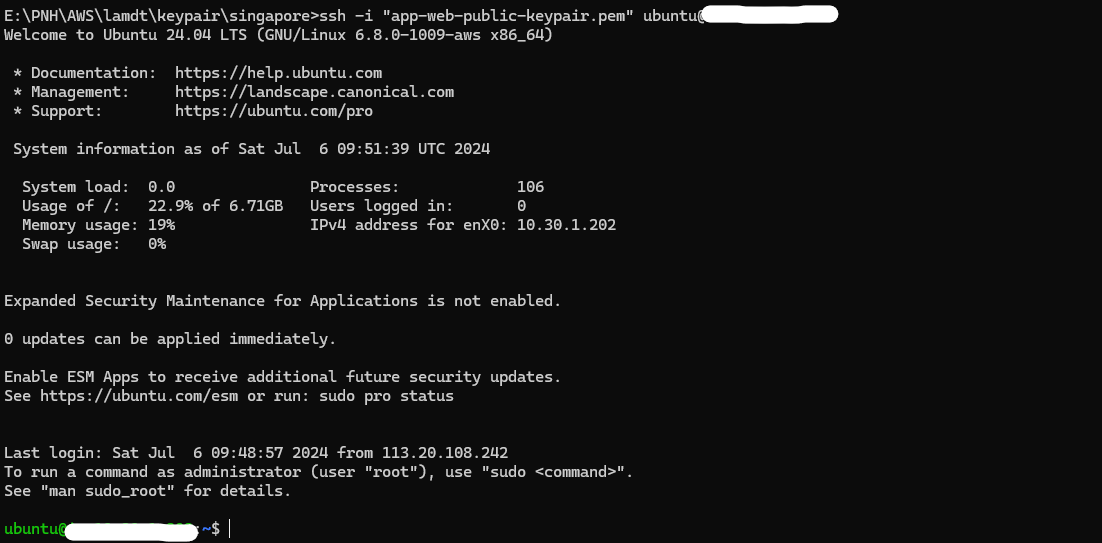
- RUN the following commands to update the instance.
# Install the updates to the instance. Depending on the image being used the update instruction changes. Refer to the documentation of your image provider to get the correct information.
sudo apt update -y
# This command installs Docker, an open-source platform for automating the deployment, scaling, and management of containerized applications.
sudo apt install docker.io -y
# Adding the user to the 'docker' group allows them to run Docker commands without needing to use 'sudo'.
sudo usermod -aG docker $USER
newgrp docker
# Start Docker Service
sudo service docker start- Check Docker Version
docker --version- Run docker container to test the application
# Start the application on Port 80
# In you modified application.yml of the downloaded spring boot application and changed the port then replace the source port with the value that is specified in your application.yml file.
docker run -d -p 8018:8018 <your-docker-hub-user-name>/premier-league:latest
docker ps
#Copy the docker container Id
docker logs <containerId>
# You will be able to see that your spring boot application is up and running on port 8018
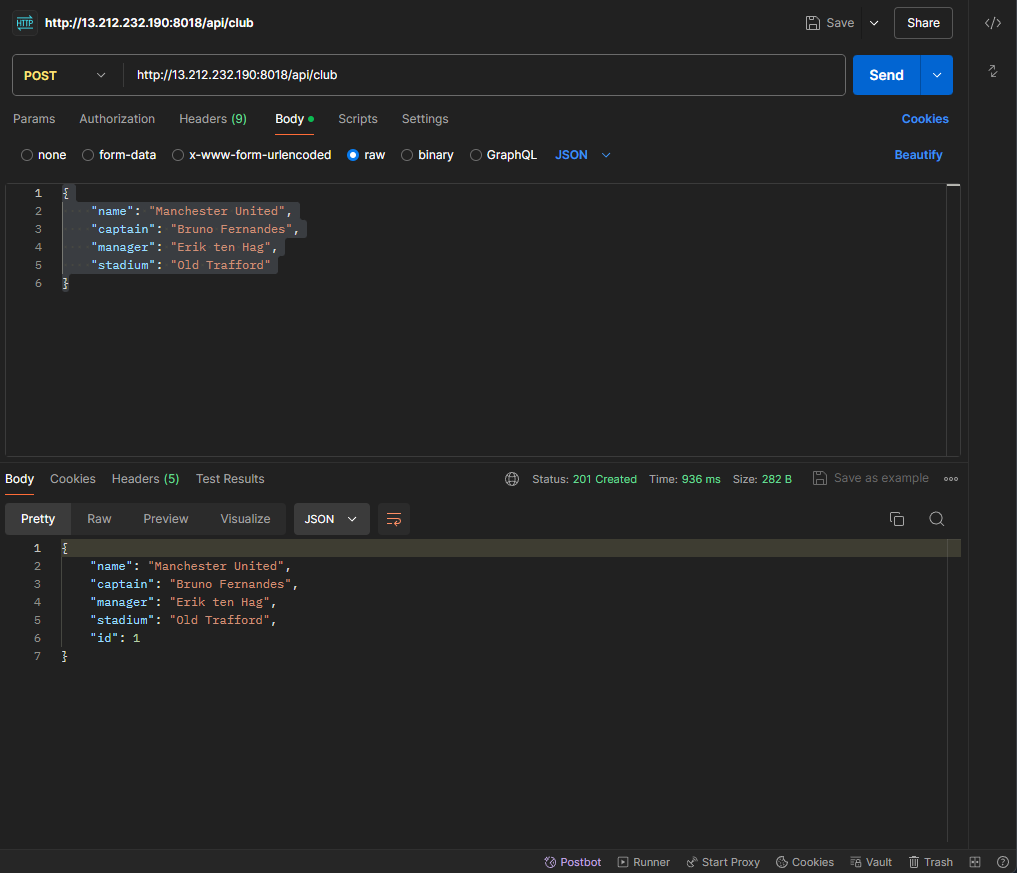
Open up a REST client. I will be using POSTMAN but you can also use terminal to CURL the POST request to the server.
Make sure you use http instead of https.
POST http://<your-instance-ip>:8018/api/club/
#Request Body
{
"name": "Manchester United",
"captain": "Bruno Fernandes",
"manager": "Erik ten Hag",
"stadium": "Old Trafford"
}
- Similarly you can execute the GET request to test if the student was created successfully or no.
GET http://<your-instance-ip>:8018/api/club/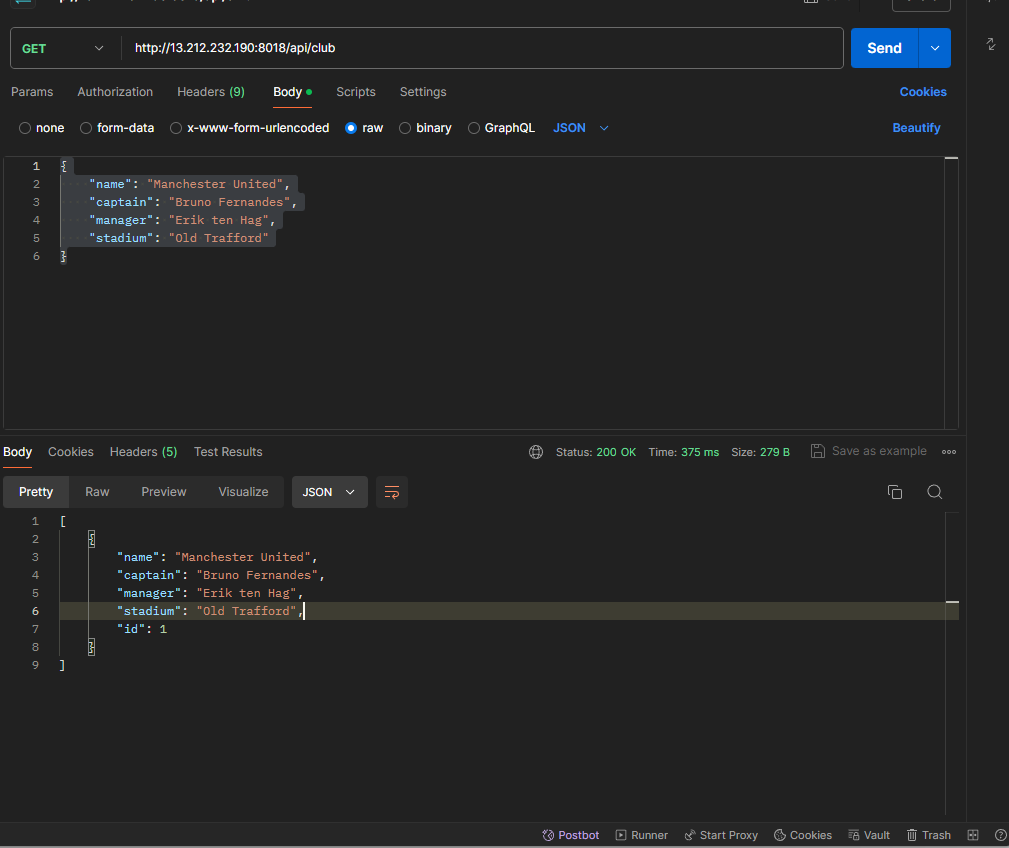
That's it. Your application is up and running on the EC2 instance in AWS.
Important
In the realistic scenario, these steps will be a part of the automated template that will run as a part of the deployment pipeline to reduce the manual overhead to do this one by one.
I hope you really enjoyed the article. Thanks for reading. Feel free to share. 😃