
Building A Web App with Spring Boot
What better way to learn than to understand the theoretical and practical parts of a technical topic? Here are the steps you should take to create a Spring Boot web API.
1. General introduction
In this article, we will create a simple Spring Boot API application for managing a club. Through the implementation of this application, we will explore the basic components necessary to build an API application.
2. Set Up Your Development Environment
Java Development Kit (JDK): Spring Boot requires JDK 8, 11, or later.
Integrated Development Environment (IDE): IntelliJ IDEA, Eclipse, or VS Code are popular choices.
Build Tool: Maven or Gradle.
2.1 Install JDK
- Windows/Mac/Linux: Download and install the JDK from the Oracle website or use OpenJDK.
Verify the installation by running:
java -version
javac -version
2.2 Install an IDE
IntelliJ IDEA: Download and install from JetBrains.
Eclipse: Download and install from Eclipse.
VS Code: Download and install from Microsoft.
2.3 Install Maven or Gradle
Maven: Download and install from Apache Maven.
Gradle: Download and install from Gradle.
Verify the installation:
mvn -v  # for Maven
gradle -v  # for Gradle
3. Generate a Spring Boot Project with Spring Initializr
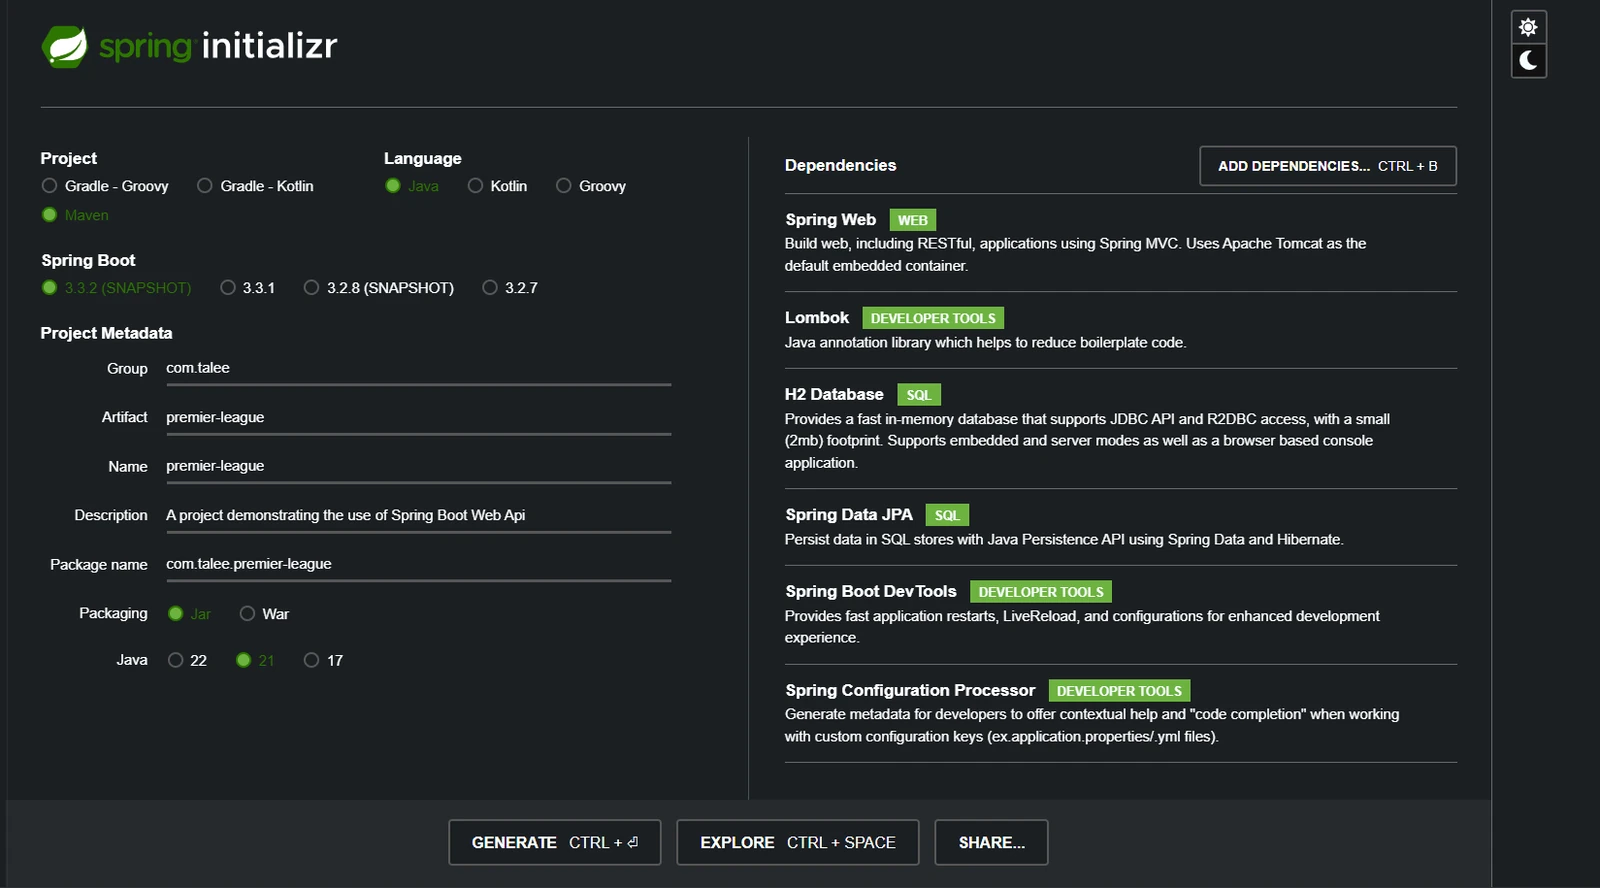
Spring Initializr is a web-based tool that helps you quickly bootstrap Spring Boot projects. Follow these steps to quickly generate one:
Open your web browser and go to https://start.spring.io/.
| Project | Value |
|---|---|
Project | Maven |
Language | Java |
Spring Boot | Choose the desired version (e.g., 3.3.2 (SNAPSHOT)) |
Group | com.talee (replace with your desired package name) |
Artifact | premier-league (replace with your desired project name) |
Packaging | Jar |
Java | Choose the desired version (17) |
Dependencies | Spring Web Lombok H2 Database Spring Data JPA Spring Boot DevTools Spring Configuration Processor |
Language | Java |
Import the Project into Your IDE
Unzip the downloaded ZIP file to a directory of your choice.
Open your IDE and import the project as a Maven project. If you are using IntelliJ IDEA, go to File -> New -> Project from Existing Sources and select the project's directory. Follow the instructions to complete the import process.
Create A Club Entities
Open the generated project in your IDE.
Create a directory for models src/main/java/com/talee/premier/league/entities
The following Club.java file defines the fields of information about a Club:
package com.talee.premier.league.entities;

import jakarta.persistence.Column;
import jakarta.persistence.Entity;
import jakarta.persistence.GeneratedValue;
import jakarta.persistence.GenerationType;
import jakarta.persistence.Table;
import lombok.AllArgsConstructor;
import lombok.Builder;
import lombok.Data;
import lombok.EqualsAndHashCode;
import lombok.NoArgsConstructor;

@Data
@Entity
@Builder
@NoArgsConstructor
@AllArgsConstructor
@Table(name = "club")
@EqualsAndHashCode(callSuper = false)
public class Club {

  @jakarta.persistence.Id
  @GeneratedValue(strategy = GenerationType.IDENTITY)
  private long Id;

  @Column(unique = true)
  private String name;

  private String captain;

  private String manager;

  private String stadium;
}
Let me explain what the piece of code above is doing
package com.talee.premier.league.entities;This line shows the package to which the Club class belongs. Packages are used to group related classes together.
The @Entity annotation indicates that this class represents a persistent entity in the database. It is typically used with JPA to map the class to a database table.
The @Data and @EqualsAndHashCode annotations are provided by Lombok, a library that reduces boilerplate code. @Data generates getters, setters, toString(), and equals() and hashCode() methods. @EqualsAndHashCode(callSuper = false) tells Lombok to generate equals() and hashCode() methods based only on the fields in this class and not in any superclass.
@Builder is another Lombok annotation that generates a builder pattern for the class, allowing the convenient creation of instances.
@NoArgsConstructor and @AllArgsConstructor are Lombok annotations that generate constructors with no arguments and constructors with all arguments, respectively.
@Table(name = "club") specifies the name of the database table associated with this entity. In this case, the table name is "club".
@Id indicates that the id field is the primary key of the entity.
@GeneratedValue(strategy = GenerationType.IDENTITY): It's a JPA annotation that defines the strategy for generating the primary key values. In this case, the IDENTITY strategy indicates that the primary key values will be automatically generated by the database.
If you don’t add this annotation, the id field will not be incremented by the database, hence, when you want to insert another record you’ll be greeted with a unique key constraint.
The private access modifier restricts direct access to these fields, and the appropriate getter and setter methods will be generated by Lombok's @Data annotation.
name: Represents the name of the club.captain: Represents the captain of the club.manager: Represents the manager of the club.stadium: Represents the stadium of the club.
Create ClubRepository
Create a directory for repositories
src/main/java/com/talee/premier/league/repositoryCreate a new Java class,
ClubRepository.java, and add the following piece of code
package com.talee.premier.league.repository;

import com.talee.premier.league.entities.Club;
import org.springframework.data.jpa.repository.JpaRepository;

public interface ClubRepository extends JpaRepository<Club, Long> {

}
The
ClubRepositoryinterface extendsJpaRepository<Club, Long>What this means is thatClubRepositoryinherits the methods that are defined inJpaRepositoryspecific to theClubentity.\The inherited
JpaRepositoryinterface contains methods such assave,findById,findAll,delete, etc., which are suited for carrying out common database operations on theClubentity.The
Longtype argument represents the data type of the primary key of theClubentity.
Create ClubService
Create a directory for services
src/main/java/com/talee/premier/league/servicesCreate a new Java class in the directory you just created
ClubService.java, and add the following piece of code
package com.talee.premier.league.services;

import com.talee.premier.league.entities.Club;
import com.talee.premier.league.repository.ClubRepository;
import java.util.List;
import org.springframework.stereotype.Service;

@Service
public class ClubService {

  private final ClubRepository clubRepository;

  ClubService(ClubRepository clubRepository) {
    this.clubRepository = clubRepository;
  }

  public List<Club> getAllClubs() {
    return clubRepository.findAll();
  }

  public Club createClub(Club club) {
    return clubRepository.save(club);
  }

  public Club getClubById(Long id) {
    return clubRepository.findById(id)
        .orElseThrow(() -> new IllegalArgumentException("Club not found"));
  }

  public Club updateClub(Long id, Club clubDetail) {
    Club club = clubRepository.findById(id)
        .orElseThrow(() -> new IllegalArgumentException("Club not found"));

    club.setName(clubDetail.getName());
    club.setCaptain(clubDetail.getCaptain());
    club.setManager(clubDetail.getManager());
    club.setStadium(clubDetail.getStadium());

    return clubRepository.save(club);
  }

  public void deleteClub(Long id) {
    clubRepository.deleteById(id);
  }
}
Below is an explanation of what the piece of code above does
The following methods define the operations or actions that can be performed on club.
getAllClub: Gets all clubs by callingclubRepository.findAll(), which queries the database and comes back with a list of club.createClub: This adds a new club by callingclubsRepository.save()with the givenclubobject, which saves the club to the database and comes back with the savedclub.getClubById: This fetches a specific club by its ID by callingclubRepository.findById()with the given ID. If the club is found, it is returned. Else, it throwsIllegalArgumentExceptiona "Club not found" message.updateClub: This updates a specific club identified by its ID. What it does first is to get the existing club from the database usingclubRepository.findById(). If the said club is found, it will update its name and price with the details contained in theclubDetailobject. Finally, it saves the updated club usingclubRepository.save()and returns the updated club.deleteClub: This deletes a specificclubidentified by its ID by invoking theclubRepository.deleteById(id), which deletes the product from the database.
From the above, you can deduce that ClubService abstracts the business logic related to clubs and interacts with the ClubRepository data access operations. This allows for the separation of concerns, modularity, testability, and maintainability in the Spring Boot Web API architecture.
Create ClubController
Create a directory for controllers src/main/java/com/talee/premier/league/controllers
Create a new Java class, ClubController.java, and add the following piece of code
package com.talee.premier.league.controllers;

import com.talee.premier.league.entities.Club;
import com.talee.premier.league.services.ClubService;
import java.util.List;
import org.springframework.beans.factory.annotation.Autowired;
import org.springframework.http.HttpStatus;
import org.springframework.http.ResponseEntity;
import org.springframework.web.bind.annotation.DeleteMapping;
import org.springframework.web.bind.annotation.GetMapping;
import org.springframework.web.bind.annotation.PathVariable;
import org.springframework.web.bind.annotation.PostMapping;
import org.springframework.web.bind.annotation.PutMapping;
import org.springframework.web.bind.annotation.RequestBody;
import org.springframework.web.bind.annotation.RequestMapping;
import org.springframework.web.bind.annotation.RestController;

@RestController
@RequestMapping("/api/club")
public class ClubController {

  private final ClubService clubService;

  @Autowired
  public ClubController(ClubService clubService) {
    this.clubService = clubService;
  }

  @GetMapping
  public ResponseEntity<List<Club>> getAllClubs() {
    List<Club> clubs = clubService.getAllClubs();
    return ResponseEntity.ok(clubs);
  }

  @PostMapping
  public ResponseEntity<Club> createClub(@RequestBody Club Club) {
    Club createdClub = clubService.createClub(Club);
    return ResponseEntity.status(HttpStatus.CREATED).body(createdClub);
  }

  @GetMapping("/{id}")
  public ResponseEntity<Club> getClubById(@PathVariable Long id) {
    Club club = clubService.getClubById(id);
    return ResponseEntity.ok(club);
  }

  @PutMapping("/{id}")
  public ResponseEntity<Club> updateClub(@PathVariable Long id,
      @RequestBody Club ClubDetails) {
    Club updatedClub = clubService.updateClub(id, ClubDetails);
    return ResponseEntity.ok(updatedClub);
  }

  @DeleteMapping("/{id}")
  public ResponseEntity<Void> deleteClub(@PathVariable Long id) {
    clubService.deleteClub(id);
    return ResponseEntity.noContent().build();
  }
}
Below is an explanation of what ClubController does:
Starting with the methods annotated with @GetMapping, @PostMapping, @PutMapping, and @DeleteMapping. These annotations specify the corresponding HTTP methods (GET, POST, PUT, DELETE) for the API endpoints.
getAllClubs: This method sends all the requests for getting all clubs to theclubService.getAllClubs()and returns them in the response body.createClub: This method directs all requests for creating a new club by callingclubService.createClub()with the providedclubobject in the request body. It returns the createdclubin the response body with a status code of 201 (CREATED).getClubById: This method directs all requests for getting a specificclubby its ID by callingclubService.getClubById()with the provided ID. It returns the club in the response body.updateClub: This method directs all requests for updating a specificclubidentified by its ID. It callsclubService.updateClub()with the provided ID andclubdetails in the request body. It returns the updatedclubin the response body.deleteClub: This method directs all requests for deleting a specificclubidentified by its ID by callingclubService.deleteClub(). It returns a response with a status code of 204 (NO CONTENT), indicating a successful deletion with no response body.
From the piece of code above, you can see that the ClubController acts as a manager, they don’t contain any business logic, they just route the request to the corresponding methods in ClubService
Set up the H2 Database
For the purpose of demonstration, we will use a temporary database. Below is the configuration to set up the database.
Rename
application.propertiesinsrc/main/resources/ to application.ymlNext, add the below Yaml configuration to
src/main/resources/application.yml
spring:
  h2:
    console:
      enabled: true
  datasource:
    url: jdbc:h2:mem:premier-league
    driverClassName: org.h2.Driver
  jpa:
    database-platform: org.hibernate.dialect.H2Dialect
    show-sql: true
    hibernate:
      ddl-auto: create-drop

server:
  port: 8018
Build and Run the Application
Open a terminal or command prompt.
Navigate to the project's root directory.
Run the following command to build the project:
Open your terminal.
Navigate to the project directory:
cd ~/premier-leagueBuild the project:
mvn clean installRun the application:
mvn spring-boot:run
The Spring Boot application will start, and you will see log messages showing that the server is up and running.
Let’s test our Spring Boot Web API
To test our API, we need to download and install a REST Client called Postman. A REST Client is an application that API developers use to test their Web APIs.
NB: You can use any REST Client of your choice, it must not be Postman
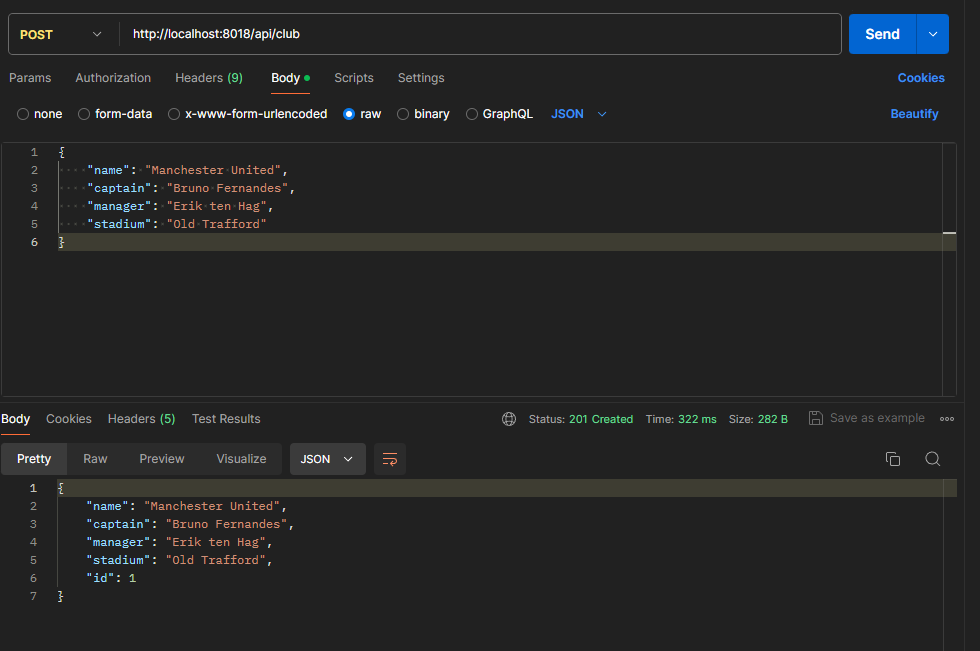
First, we need to create a resource, we need to add a club into our database. To do that we need to create a POST request to this endpoint http://localhost:8018/api/club in JSON format as shown in the image below.
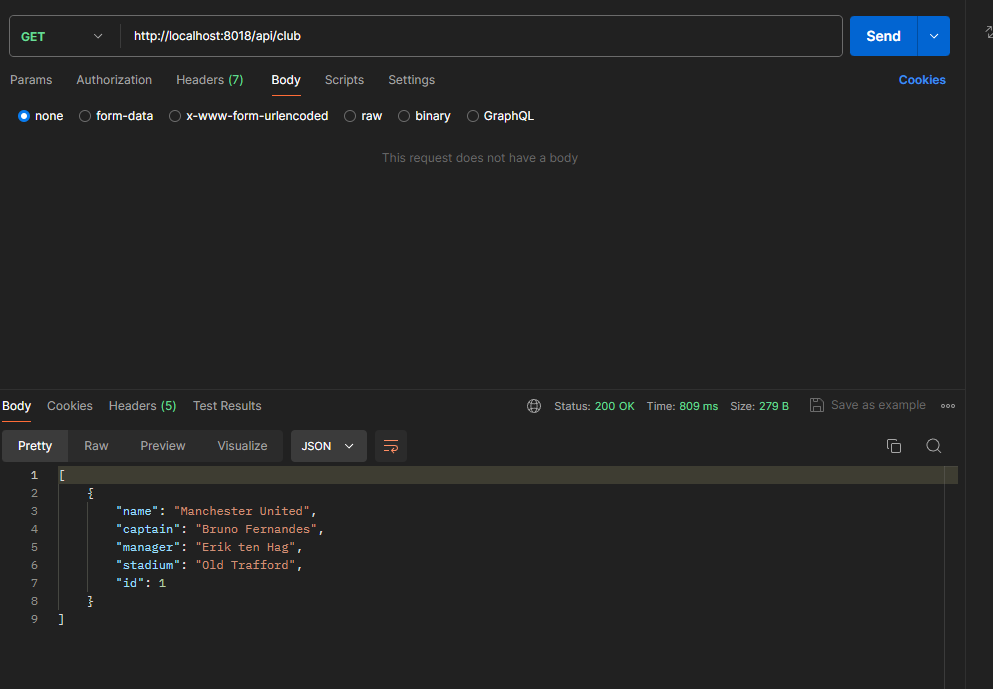
To Fetch all the clubs that have been added or created, send a GET request to http://localhost:8018/api/club as shown in the image below.
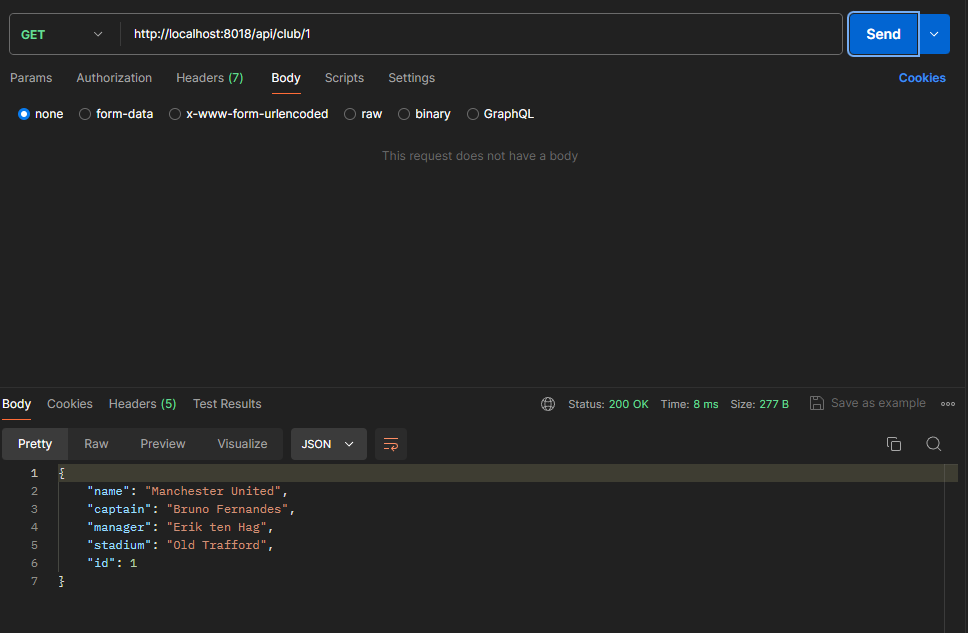
To Fetch just one club or a particular club, send a GET request with the specific ID to http://localhost:8018/api/club/1 as shown in the image below.
To update any club, send a PUT request with the specific ID to http://localhost:8018/api/club/1 as shown in the image below.
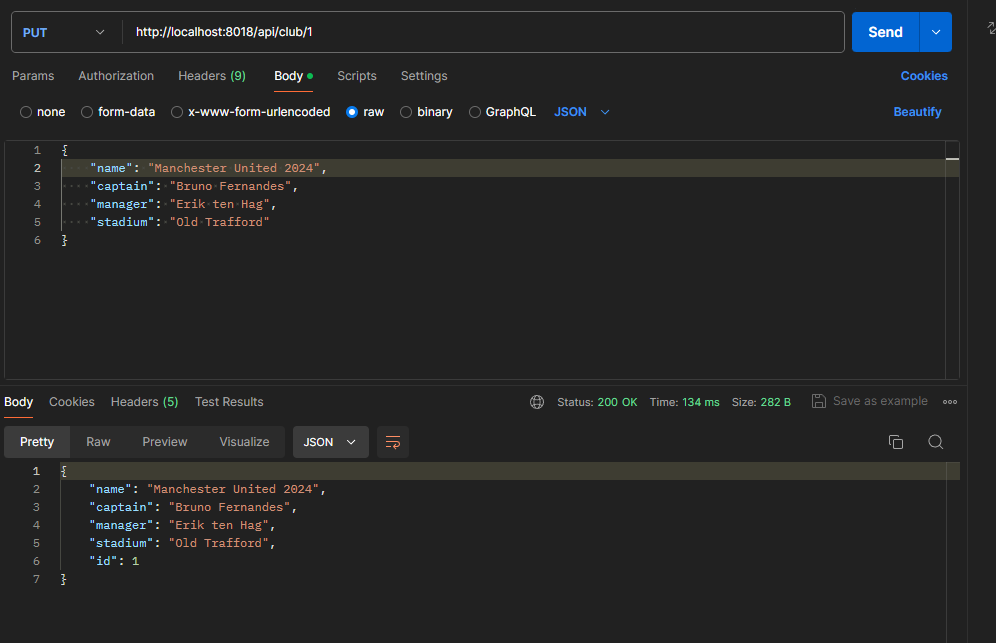
To delete a club, send a DELETE request with the specific ID to http://localhost:8018/api/club/1 as shown in the image below:
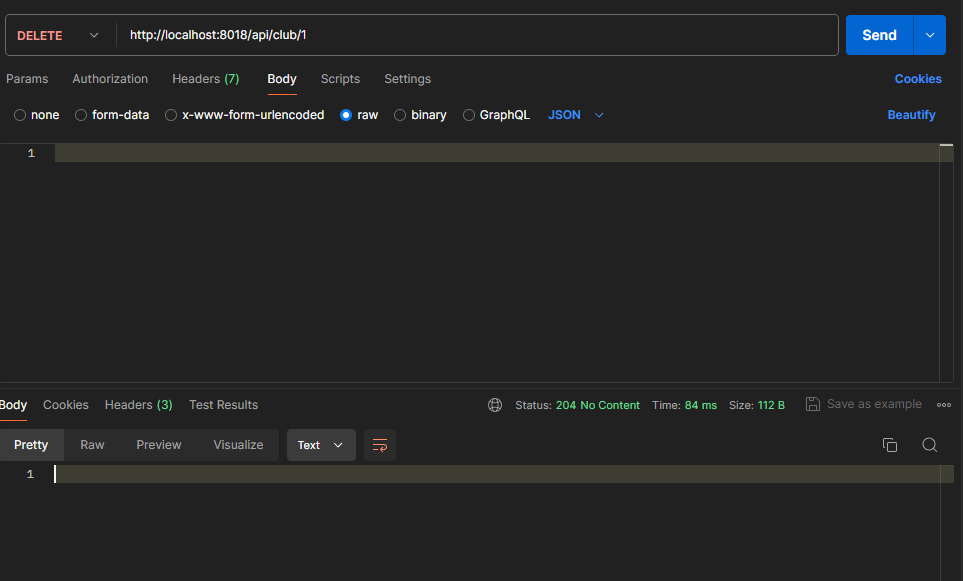
Congratulations, our Spring Boot Web API is working as intended.
4. Summary
In this blog post, we explored how to implement a simple Spring Boot application, including the preparation steps and the implementation of the application's APIs. In the next post, we will learn about packaging the application and deploying it on Docker.