How To Reduce Docker Image Size
This blog talks about different optimization techniques that you can quickly implement to make the smallest and minimal docker image. We will also look at some of the best tools for Docker Image Optimization.
Docker as a container engine makes it easy to take a piece of code & run it inside a container. It enables engineers to collect all the code dependencies and files into a single location which can be run anywhere, quite quickly & easily.
The whole concept of “run anywhere” images starts from a simple configuration file called Dockerfile. First, we add all the build instructions, such as the code dependencies, commands, and base image details, in Dockerfile.
Need for Docker Image Optimization
Even though the Docker build process is easy, many organizations make the mistake of building bloated Docker images without optimizing the container images.
In typical software development, each service will have multiple versions/releases, and each version requires more dependencies, commands, and configs. This introduces a challenge in Docker image build, as now – the same code requires more time & resources to be built before it can be shipped as a container.
Also, by installing unwanted libraries, we increase the chance of a potential security risk by increasing the attack surface.
Therefore, your Docker image size matters for reasons such as:
Faster deployments time to download, transfer and load into the container runtime, and improved team productivity and application performance.
Better storage utilization on your machine.
Reduced network bandwidth when transferring between
hostsandcontainerorchestration environments.Reducing image size and removing unnecessary files eliminate vulnerable components that expose images to security issues.
Build and portability efficiency speeds up the build processes and improves resource usage.
From the cloud perspective, smaller images can be uploaded to the cloud easily and are easy to maintain. Public cloud providers follow pay-as-you-go costing. To get the benefit one needs to minimize the image. From theKubernetesperspective, The smaller the size of the image the faster the pod starts.
How to Reduce Docker Image Size?
If we take a container image of a typical application, it contains a base image, Dependencies/Files/Configs, and cruft (unwanted software)
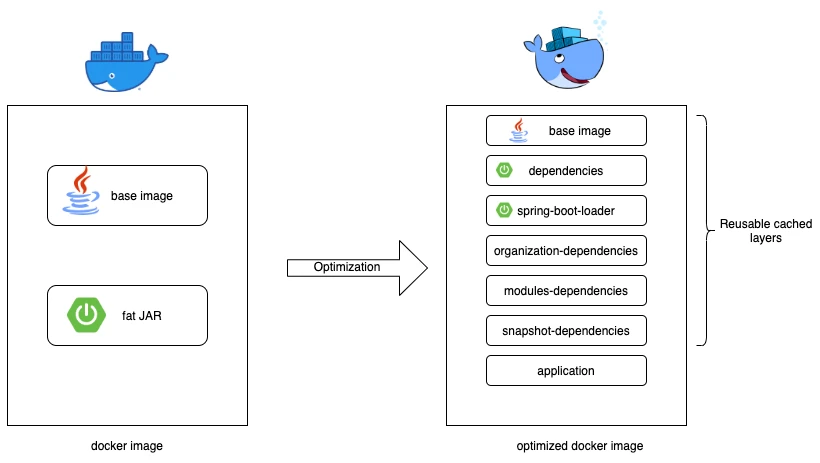
So it all boils down to how efficiently we can manage these resources inside the container image.
Let’s look at different established methods of optimizing Docker images. Additionally, we have given practical examples to understand docker image optimization in real time.
Either you use the examples given in the article or try the optimization techniques on existing Dockerfiles.
The following are the methods by which we can achieve docker image optimization:
1. Using distroless/minimal base images
2. Multistage builds
3. Minimizing the number of layers
4. Understanding caching
5. Using Dockerignore
6. Keeping application data elsewhere
7. Do not Install Unnecessary Packages
8. After Installation Do The Clean-Up
9. Use docker --squash flag at build time
10. Do not Install Editors Using Dockerfile
Method 1: Use Minimal Base Images
Your first focus should be on choosing the right base image with a minimal OS footprint. Selecting a smaller base image can significantly reduce the size of your final Docker image, which leads to faster deployment times and reduced attack surface.
| Registry | Base Images |
|---|---|
Official OpenJDK Images | openjdk:17: ~ 375MB openjdk:17-jdk: ~ 375MB openjdk:17-jdk-slim: ~ 210.63MB openjdk:17-alpine: ~ 181.71MB |
Amazon Corretto | amazoncorretto:17: ~ 252MB |
AdoptOpenJDK | adoptopenjdk:17-jdk-hotspot: ~ 492MB adoptopenjdk:17-jdk-openj9: ~ 225MB |
Microsoft Build of OpenJDK | mcr.microsoft.com/openjdk/jdk:17: ~ 492MB |
Distroless | gcr.io/distroless/java17: ~ 130MB gcr.io/distroless/java17-debian11: ~ 130MB gcr.io/distroless/java17-debian12: ~ 130MB |
By choosing an appropriate base image, you can ensure that your application only includes the necessary dependencies and libraries, making it leaner and more secure. Here's a brief overview of some popular minimal base images for Java 17:
Official OpenJDK Images: These are the standard images provided by theOpenJDKcommunity. They are robust but can be on the larger side.Amazon Corretto: Amazon'sdistribution of OpenJDK, which is optimized for performance and stability onAmazon Web Services (AWS).AdoptOpenJDK: An open, community-led initiative to build prebuilt binaries of theOpenJDK. These images come in variants likeHotSpotandOpenJ9.Microsoft Build of OpenJDK: Microsoft's own build ofOpenJDK, which is fully compatible with theOpenJDKstandards.Distroless: These images contain only the essential runtime dependencies without anOS shell, reducing the size and attack surface.
You can further reduce the base image size using distroless images. It is a stripped-down version of the operating system. Distroless base images are available for java, nodejs, python, Rust, etc.
Distroless images are so minimal that they don’t even have a shell in them. So, you might ask, then how do we debug applications? They have the debug version of the same image that comes with the busybox for debugging.
Also, most of the distributions now have minimal base images.
Note
You cannot directly use the publicly available base images in project environments. You need to get approval from the enterprise security team to use the base image. In some organizations, the security > team itself publishes base images every month after testing & security scanning. Those images would be available in the common organization docker private repository.
Method 2: Use Docker Multistage Builds
The multistage build pattern is evolved from the concept of builder pattern where we use different Dockerfiles for building and packaging the application code. Even though this pattern helps reduce the image size, it puts little overhead when it comes to building pipelines.
In multistage build, we get similar advantages as the builder pattern. We use intermediate images (build stages) to compile code, install dependencies, and package files in this approach. The idea behind this is to eliminate unwanted layers in the image.
After that, only the necessary app files required to run the application are copied over to another image with only the required libraries, i.e., lighter to run the application.
Let’s see this in action, with the help of a practical example where we create a simple Nodejs application and optimize its Dockerfile.
First, let’s create the code. We will have the following folder structure.
├── .mvn
├── src
├── target
├── DockerfileDistroless
├── DockerfileMultipleOnStage
├── DockerfileOnStage
├── mvnw
├── pom
A simple Dockerfile for this application would like this – Save it as DockerfileOnStage.
# Use an official Maven image that includes JDK 17 as the base image
FROM maven:3.8.1-openjdk-17-slim

# Set the working directory inside the container for the build and application
WORKDIR /app

# Copy the pom.xml file and the src directory to the container
COPY pom.xml .
COPY src ./src

# Install the dependencies and package the Spring Boot application
RUN mvn clean install -DskipTests

# Copy the packaged Spring Boot JAR file to the final location
RUN cp target/reduce-docker-image-0.0.1-SNAPSHOT.jar .

# Expose the port that the Spring Boot application will run on
EXPOSE 8018

# Run the Spring Boot application
CMD ["java", "-jar", "reduce-docker-image-0.0.1-SNAPSHOT.jar"]
Now I can build the Docker image for my Spring Boot application. Executing the command below I create an image using the DockerfileOnStage I just written. I will name the image demo-image and I will set the version to v1.
Let’s see the storage space that it requires by building it.
docker build -t demo-image:v1 -f DockerfileOnStage .After the build is complete. Let’s check its size
docker image ls
So the size is 551MBs.
Now, let’s use this method to create a multistage build.
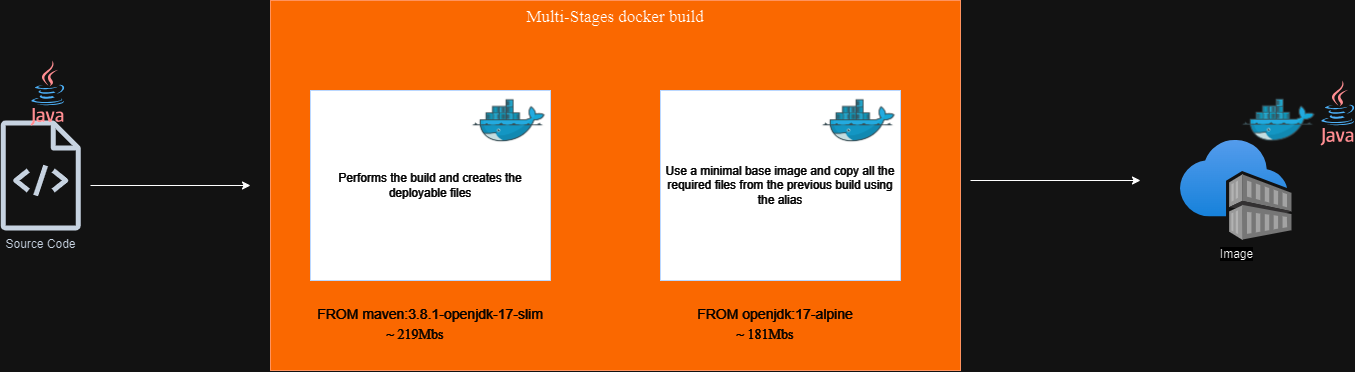
We will use maven:3.8.1-openjdk-17-slim as the base image, i.e., the image for all the dependencies & modules installation, after that, we will move the contents into a minimal and lighter ‘alpine‘ based image. The ‘alpine‘ image has the bare minimum utilities & hence is very light.#
Also, in a single Dockerfile, you can have multiple stages with different base images. For example, you can have different stages for build, test, static analysis, and package with different base images.
Let’s see what the new Dockerfile might look like. We are just copying over the necessary files from the base image to the main image.
Save the following as DockerfileMultipleOnStage.
# Use an official Maven image that includes JDK 17 as the base image
FROM  maven:3.8.1-openjdk-17-slim AS build

# Set the working directory inside the container for the build and application
WORKDIR /app

# Copy the pom.xml file and download the dependencies
COPY pom.xml .
RUN mvn dependency:go-offline -B

# Copy the source code and build the application
COPY src ./src
RUN mvn clean install -DskipTests

# Stage 2: Create the final runtime image
FROM openjdk:17-alpine

# Set the working directory inside the container for the application
WORKDIR /app

# Copy the Spring Boot application JAR file from the build stage
COPY --from=build /app/target/reduce-docker-image-0.0.1-SNAPSHOT.jar .

# Expose the port that the Spring Boot application will run on
EXPOSE 8018

# Run the Spring Boot application
CMD ["java", "-jar", "reduce-docker-image-0.0.1-SNAPSHOT.jar"]
Let’s see the storage space that it requires by building it.
docker build -t demo-image:v2 -f DockerfileMultipleOnStage .After the build is complete. Let’s check its size using
docker image lsThis is what we get.

So the new reduced image size is 346MBs as compared to the image with all dependencies.
That’s an optimization of over 37%!
However, if we would have used the same base image we used in the build stage, we wouldn’t see much difference
You can further reduce the image size using distroless images. Here is the same Dockerfile with a multistage build step that uses the Google JDK distroless image instead of alpine.
# Stage 1: Build the application
FROM maven:3.8.1-openjdk-17-slim AS build

# Set the working directory inside the container for the build
WORKDIR /app

# Copy the pom.xml file and download the dependencies
COPY pom.xml .
RUN mvn dependency:go-offline -B

# Copy the source code and build the application
COPY src ./src
RUN mvn clean install -DskipTests

# Stage 2: Create the final runtime image using a distroless image
FROM gcr.io/distroless/java17-debian11

# Set the working directory inside the container for the application
WORKDIR /app

# Copy the Spring Boot application JAR file from the build stage
COPY --from=build /app/target/reduce-docker-image-0.0.1-SNAPSHOT.jar .

# Expose the port that the Spring Boot application will run on
EXPOSE 8018

# Run the Spring Boot application
CMD ["reduce-docker-image-0.0.1-SNAPSHOT.jar"]
If you build the above DockerfileDistroless, your image will be 246MBs,

That’s an optimization of over 55%!
Method 3: Minimize the Number of Layers
Docker images work in the following way – each RUN, COPY, FROM Dockerfile instructions add a new layer & each layer adds to the build execution time & increases the storage requirements of the image. These layers are stacked on top of each other, and each layer represents a filesystem delta—essentially a set of changes or additions to the previous layer. Therefore, reducing the number of layers in our image can be a key optimization technique.
A Dockerfile to achieve this would be as follows
FROM ubuntu:latest

ENV DEBIAN_FRONTEND=noninteractive

RUN apt-get update -y

RUN apt-get upgrade -y

RUN apt-get install vim -y

RUN apt-get install net-tools -y

RUN apt-get install dnsutils -y
We wish to also look into the build time for this image.
The Docker daemon has an in-built capability to display the total execution time that a Dockerfile is taking.
To enable this feature, take the following steps:
- Create a
daemon.jsonfile with the following contents at/etc/docker/
{
  "experimental": true
}- Execute the following command to enable the feature.
export DOCKER_BUILDKIT=1Let’s build it and see the storage & build time.
time docker build -t tunganhle/optimize:3.0 --no-cache -f Dockerfile .It would display the execution times in the terminal.
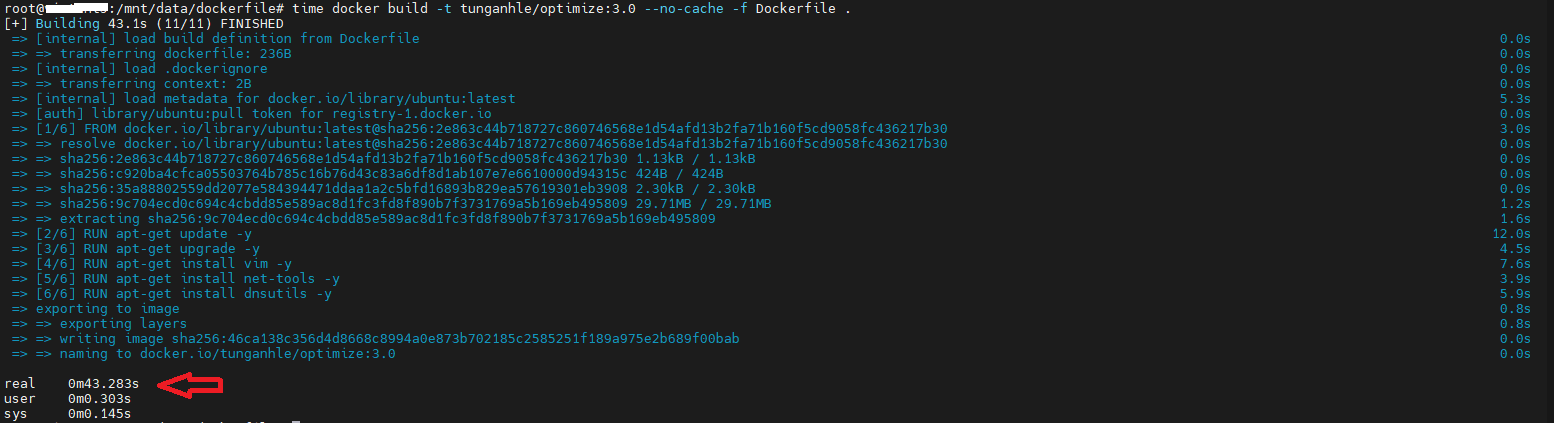
After the build is complete – the execution time comes to be 43.2 seconds.
Let’s check its size using
docker image lsThis is what we get.

So the size is 239MBs
Let’s combine the RUN commands into a single layer & save it as DockerfileV2.
FROM ubuntu:latest

ENV DEBIAN_FRONTEND=noninteractive

RUN apt-get update -y && \
    apt-get upgrade -y && \
    apt-get install --no-install-recommends vim net-tools dnsutils -y
In the above RUN command, we have used --no-install-recommends flag to disable recommended packages. It is recommended whenever you use install in your Dockerfiles
Let’s see the storage & build time required by building it.
time docker build -t tunganhle/optimize:4.0 --no-cache -f DockerfileV2 .It would display the execution times in the terminal.
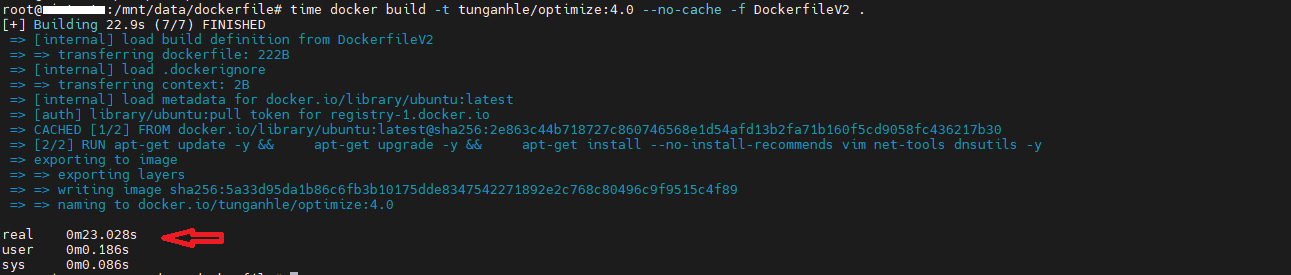
After the build is complete – the execution time comes to be 23 seconds.
Let’s check its size using
docker image lsThis is what we get.

So the size is 235MBs.
Using this optimization technique, the execution time was reduced from 43.2s to 23s & the storage size was reduced from 239MBs to 235MBs.
Method 4: Understanding Caching
Often, the same image has to be rebuilt again & again with slight modifications in code.
As Docker uses layered filesystem, each instruction creates a layer. Due to which, Docker caches the layer and can reuse it if it hasn’t changed.
Due to this concept, it’s recommended to add the lines which are used for installing dependencies & packages earlier inside the Dockerfile – before the COPY commands.
The reason behind this is that docker would be able to cache the image with the required dependencies, and this cache can then be used in the following builds when the code gets modified.
Also, COPY and ADD instructions in a Dockerfile invalidate the cache for subsequent layers. Which means, Docker will rebuild all the layers after COPY and ADD.
This means, it is recomended to add instructions that are less likely to change earlier in the Dockerfile.
For example, let’s take a look at the following two Dockerfiles.
FROM node:18

WORKDIR /app

# Copy package files and install dependencies (less likely to change often)
COPY package*.json ./
RUN npm install

# Copy the rest of the codebase (more likely to change often)
COPY . .

# ... (rest of the Dockerfile)
In this example, the npm install step is executed only if package.json or package-lock.json changes.
If they remain the same, Docker will reuse the cached layer, and the expensive operation of installing dependencies is skipped, speeding up the build process.
The application code, which changes more frequently, is copied after the dependencies, ensuring that changes to the code don't invalidate the cache for the package installation layer.
This optimized ordering allows for more efficient use of Docker's caching mechanism
Method 5: Use Dockerignore
As a rule, only the necessary files need to be copied over the docker image.
Docker can ignore the files present in the working directory if configured in the .dockerignore file.
It also improves caching by ignoring unnecessary files and prevents unnecessary cache invalidation.
This feature should be kept in mind while optimizing the docker image.
git/
node_modules/
Dockerfile
.dockerignore
*.md
tests/
*.log
tmp/
This is particularly useful for larger codebases or when we have files and directories that are large but not needed in the Docker image, such as test folders, .git directories, or temporary build artifacts.
Method 6: Keep Application Data Elsewhere
Storing application data in the image will unnecessarily increase the size of the images.
It’s highly recommended to use the volume feature of the container runtimes to keep the image separate from the data.
If you are using Kubernetes, ensure
Method 7: Do not Install Unnecessary Packages
Install packages with apt-get one should add the --no-install-recommends tag. This will not install the recommended packages that come with the main. This will decrease the image size and not affect the quality of the required image.
FROM base_image
RUN apt-get update -y && apt install -y --no-install-recommends \
 [packages]
Method 8: After Installation Do The Clean-Up
To install packages some temporary files are used. After installation is finished these files are no longer required. One can clean this up by adding rm -rf /var/lib/apt/lists/* to the same line from which packages are installed.
FROM base_image
RUN apt-get update -y && apt install -y --no-install-recommends \
package_one \
package_two \
&& rm -rf /var/lib/apt/lists/*
Method 9: Use docker --squash flag at build time
Build the Docker image using the --squash flag to squash some Docker layers and create a resulting image with fewer layers
In server configuration, if experimental : false then –squash will not work. To enable this
- Create a
/etc/docker/daemon.jsonfile
vim /etc/docker/daemon.json{
"experimental": true
}- Restart
docker daemonto reflect the change
systemctl restart docker- To check experimental value
docker version -f '{{.Server.Experimental}}'If it gets true then after use --squash flag.
If dockerfile is in same directory,
docker image build --squash -t <imagename> .Using same Dockerfile create two different images
vim DockerfileFROM python:3.9
RUN apt-get update
RUN apt-get install nginx -y
RUN apt-get install php -y- To build an image without
--squashflag
docker image build -t tunganhle/withoutsquash:learn .- To build an image with
--squashflag
docker image build --squash -t tunganhle/squash:learn .- To check the difference in both images
docker imagesImage size is 974 MB without squash –flag and 971 MB with –squash flag.
Method 10: Do not Install Editors Using Dockerfile
Developers may use the tools like, curl/vim/nano in the Dockerfiles, which results in a large image. To get the benefits of debugging inside the container install it in the development phase and remove it after finishing.
# Use a minimal base image
FROM python:3.9-slim

# Set environment variables
ENV DEBIAN_FRONTEND=noninteractive

# Install necessary packages, including vim for development
RUN apt-get update && \
    apt-get install -y --no-install-recommends \
    build-essential \
    curl \
    vim \
    nano

# Copy your application code
WORKDIR /app
COPY . /app

# Install application dependencies
RUN pip install --no-cache-dir -r requirements.txt

# Perform any necessary development steps here
# For example, using vim to edit configuration files or code
# ...

# Remove unnecessary packages, including vim, after development
RUN apt-get remove -y vim nano && \
    apt-get autoremove -y && \
    apt-get clean && \
    rm -rf /var/lib/apt/lists/* /tmp/* /var/tmp/*

# Expose the necessary port
EXPOSE 8080

# Set the entry point for the container
CMD ["python", "app.py"]
Docker Image Optimization Tools
Following are some of the open-source tools that will help you optimize the Docker images. You can choose a tool and make it part of your Docker Image Pipeline to ensure only optimized images get created for application deployments.
1. Dive: It is an image explorer tool that helps you discover layers in the Docker & OCI containers images. Using Dive, you can find ways to optimize your Docker images. Check out the Dive Github repo for more details.
2. SlimtoolKit: It helps you optimize your Docker images for security and size. Check out the Docker Slim Github repo for more details. You can reduce the docker image size up to 30x using Slim.
3. Docker Squash: This utility helps you to reduce the image size by squashing image layers. The squash feature is also available in the Docker CLI using squash flag.