A Step-by-Step guide to Build and Push Your Own Docker Images to DockerHub
In this article, you will learn to build a Docker image from scratch and deploy and run your application as a Docker container using Dockerfile
As you know Docker is a tool for packaging, deploying, and running applications in lightweight containers. If you want to learn about the basics of Docker, refer to the Docker explained blog.
If you don’t have Docker installation, check out the docker installation guide.
Dockerfile Explained
A Dockerfile is a script that automatically creates containers on the Docker platform. A Dockerfile is basically a text document that contains all the commands a user could call on the command line to assemble an image.
The Docker platform runs natively on Linux and allows developers to build and run containers, self-contained applications or systems with no dependencies on the underlying infrastructure. Built upon the resource-isolation features of the Linux kernel, Docker helps developers and system administrators port applications across different systems and machines by running them inside containers.
Dockerfiles enable greater flexibility and portability of business applications. IT organizations use Dockerfiles to package applications and their dependencies in a virtual container that can run on premises. In public or private clouds, or on bare metal. Such containers allow multiple applications, worker tasks and other processes to run autonomously on a single physical machine or across multiple virtual machines. Kubernetes is an open source system for automatically managing and orchestrating containerized applications created by Dockerfiles.
In a Dockerfile everything on the left is INSTRUCTION, and on the right is an ARGUMENT to those instructions. Remember that the file name is "Dockerfile" without any extension.
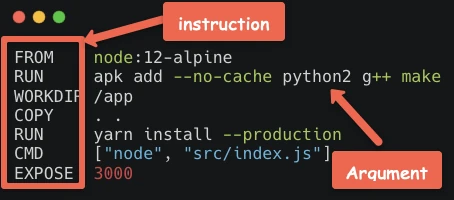
The following table contains the important Dockerfile instructions and their explanation.
| Dockerfile Instruction | Explanation |
|---|---|
FROM | To specify the base image that can be pulled from a container registry( Docker hub, GCR, Quay, ECR, etc.) |
RUN | Executes commands during the image build process. |
ENV | Sets environment variables inside the image. It will be available during build time as well as in a running container. If you want to set only build-time variables, use ARG instruction. |
COPY | Copies local files and directories to the image |
EXPOSE | Specifies the port to be exposed for the Docker container. |
ADD | It is a more feature-rich version of the COPY instruction. It also allows copying from the URL that is the source and tar file auto-extraction into the image. However, usage of COPY command is recommended over ADD. If you want to download remote files, use curl or get using RUN. |
WORKDIR | Sets the current working directory. You can reuse this instruction in a Dockerfile to set a different working directory. If you set WORKDIR, instructions like RUN, CMD, ADD, COPY, or ENTRYPOINT gets executed in that directory. |
VOLUME | It is used to create or mount the volume to the Docker container |
USER | Sets the user name and UID when running the container. You can use this instruction to set a non-root user of the container. |
LABEL | It is used to specify metadata information of Docker image |
ARG | Is used to set build-time variables with key and value. the ARG variables will not be available when the container is running. If you want to persist a variable on a running container, use ENV. |
SHELL | This instruction is used to set shell options and default shell for the RUN, CMD, and ENTRYPOINT instructions that follow it. |
CMD | It is used to execute a command in a running container. There can be only one CMD, if multiple CMDs then it only applies to the last one. It can be overridden from the Docker CLI. |
ENTRYPOINT | If you don’t specify any ENTRYPOINT, it defaults to /bin/sh -c. You can also override ENTRYPOINT using the --entrypoint flag using CLI. Please refer CMD vs ENTRYPOINT for more information. |
Build Docker Image Using Dockerfile
In this section, you will learn to build a docker image using a real-world example. We will create an Nginx docker image from scratch with a custom index page.
The following image shows the high-level workflow of the image build process.
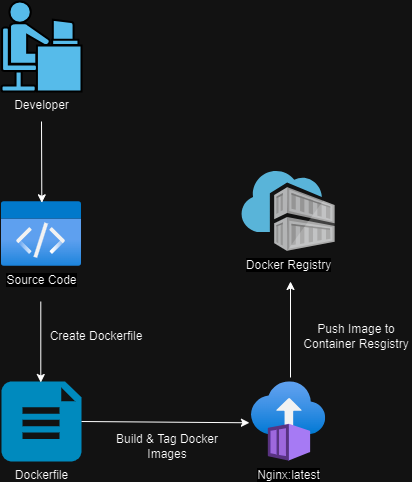
Follow the steps given below to build a docker image.
Tips
Github Repo: The Dockerfile and configs used for this article is hosted on a Docker image examples Github repo. You can clone the repo for reference.
Step 1: Create the required Files and folders
Create a folder named nginx and create a folder named files
mkdir nginx && cd nginx
mkdir files
Create a .dockerignore file
touch .dockerignoreStep 2: Create a sample HTML file and config file
When you build a docker image for real-time projects, it contains code or application config files.
For demo purposes, we will create a simple HTML file & config file as our app code and package it using Docker. This is a simple index.html file. You can create your own if you want.
cd into the files folder
cd filesCreate a index.html file
vi index.htmlCopy the following contents to the index.html and save the file.
<html>
  <head>
    <title>Dockerfile</title>
  </head>
  <body>
    <div class="container">
      <h1>My App</h1>
      <h2>This is my first app</h2>
      <p>Hello everyone, This is running via Docker container</p>
    </div>
  </body>
</html>
Step 3: Create the Dockerfile
Create a Dockerfile in the nginx folder.
vi DockerfileHere’s the simple Dockerfile content for our use case. Add the content to the Dockerfile.
# Use the official NGINX image from the Docker Hub
FROM nginx:alpine

# Copy the custom HTML file to the NGINX default location
COPY /files/index.html /usr/share/nginx/html/index.html

# Expose port 80 to the outside world
EXPOSE 80

# Start NGINX
CMD ["nginx", "-g", "daemon off;"]
Here’s the explanation of each step:
FROM nginx:alpine
Purpose: This line tells Docker to use the official
NGINX imagefromDocker Hubas the base image for your newDocker image.nginx: This specifies that the image should be based on
NGINX, which is a high-performance web server.alpine: This specifies that the image should use the
Alpine Linux distribution, which is a small, security-oriented, lightweight Linux distribution. Using alpine makes the image smaller and more efficient.
COPY index.html /usr/share/nginx/html/index.html
Purpose: This line copies the local file
index.htmlfrom your project directory on your host machine to the directory/usr/share/nginx/html/inside theDocker image./usr/share/nginx/html/index.html: This is the default directory where
NGINXserves static files. By copying yourindex.htmlfile here,NGINXwill serve thisHTMLfile when the server is accessed.
EXPOSE 80
Purpose: This line indicates that the container will listen on
port 80at runtime.80: This is the default port for
HTTPtraffic. By exposing this port, it allows traffic from your host machine to be routed to the web server running inside theDocker container.
CMD ["nginx", "-g", "daemon off;"]
Purpose: This line specifies the command that should be run when the container starts.
nginx: This is the command to start the
NGINXweb server.-g "daemon off;": This option tells
NGINXto run in the foreground (not as a background daemon). This is important in a Docker container because the container needs to keep running as long as the main process is running. IfNGINXwere to run as a daemon and detach from the terminal, the container would stop immediately because the main process would have exited.
Summary
When you build and run this Dockerfile, the following happens:
Dockerpulls the officialNGINXimage (based on Alpine Linux) fromDocker Hub.The custom
index.htmlfile is copied into the appropriate directory whereNGINXserves static files.Port 80is exposed, so when the container runs, it listens forHTTPtraffic on thisport.The
NGINXserver is started in the foreground, ensuring the container stays up and running, serving yourHTMLcontent.
By following these steps, you create a lightweight Docker container that serves a custom HTML page using NGINX.
Step 4: Build your first Docker Image
The final folder & file structure would look like the following.
nginx
├── Dockerfile
├── .dockerignore
└── files
    ├── index.html
Now, we will build our image using the Docker command. The below command will build the image using Dockerfile from the same directory.
docker build -t nginx:1.0 .-tis for tagging the image.nginxis the name of the image.1.0is the tag name. If you don’t add any tag, it defaults to the tag named latest.. (dot)at the end means, we are referring to theDockerfilelocation as the docker build context. That is our current directory.
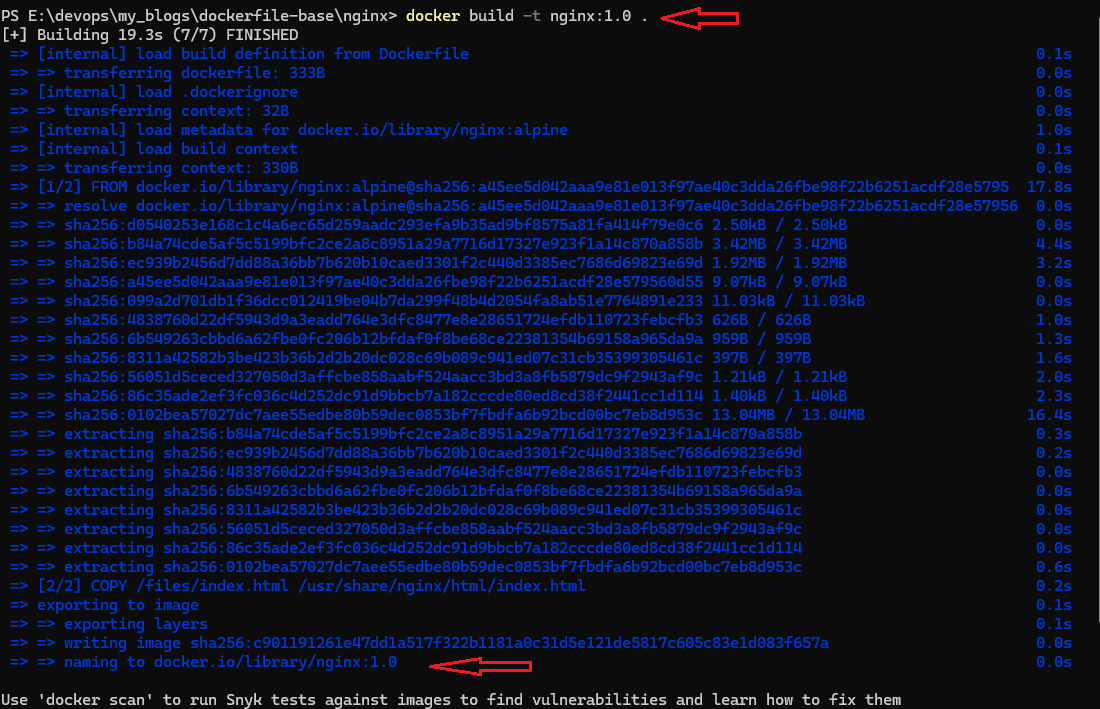
If the Dockerfile is in another folder then you need to specify it explicitly.
docker build -t nginx /path/to/folderNow, we can list the images by using this command.
docker images
We can see the tag is 1.0 here. If we want to put a specific tag we can put it like this image-name:<tag>. If you don’t specify any tag, it defaults to latest tag.
docker build -t nginx:2.0 .A single image can have multiple tags. There are two approaches we generally follow to tag the image:
Stable Tags – We can continue to pull a specific tag, which continues to get updates. Our tags are always constant, but the image content is changed.
Unique Tags – We use a different and unique tag for each image. There are different ways to provide unique tags for example date-time stamp, build number, commit ID, etc.
Note
When it comes to production, a recommended docker image tagging method is semantic versioning (Semver).
Docker caches the build steps. So if we build the image again the process will move a little faster
Using large images slows down the build and deployment time of containers. If you want to learn more about optimizing Docker images, check out reduce docker image guide.
Step 5: Test the Docker Image
Now after building the image, we will run the Docker image. The command will be
docker run -d -p 9090:80 --name webserver nginx:1.0-dflag is for running the container in detached mode-pflag for the port number, the format is local-port:container-port--namefor the container name, webserver in our case
We can check the container by using the below command
docker ps
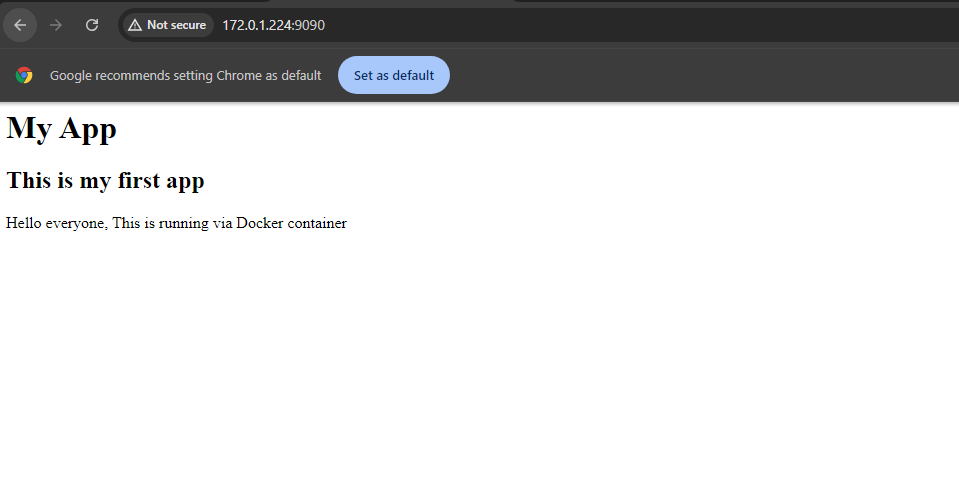
Now in the browser, if you go to http://<host-ip>:9090, you can see the index page which displays the content in the custom HTML page we added to the docker image.
Push Docker Image To Docker Hub
To push our Docker image to the Docker hub, we need to create an account in the Docker hub.
Post that, execute the below command to log in from the terminal. It will ask for a username and password. Provide the Docker hub credentials.
docker login
After login, we now need to tag our image with the docker username as shown below.
docker tag nginx:1.0 <username>/<image-name>:tagFor example, here tunganhle is the dockerhub username.
Run docker images command again and check the tagged image will be there.

Now we can push our images to the Docker hub using the below command.
docker push tunganhle/nginx:1.0
Now you can check this image will be available in your Docker Hub account.

Using heredoc With Dockerfile
Dockerfile also supports heredoc syntax. If we have multiple RUN commands then we can use heredoc syntax as shown below.
RUN <<EOF
apt-get update
apt-get upgrade -y
apt-get install -y nginx
EOF
Also, let’s say you want to execute a Python script from a Dockerfile, you can use the following syntax.
RUN python3 <<EOF
with open("/hello", "w") as f:
    print("Hello", file=f)
    print("World", file=f)
EOF
You can also use the heredoc syntax to create a file. Here is an Nginx example.
FROM nginx

COPY <<EOF /usr/share/nginx/html/index.html
<html>
  <head>
    <title>Dockerfile</title>
  </head>
  <body>
    <div class="container">
      <h1>My App</h1>
      <h2>This is my first app</h2>
      <p>Hello everyone, This is running via Docker container</p>
    </div>
  </body>
</html>
EOF
Dockerfile Best Practices
Some of the Dockerfile practices that we should follow:
Use a
.dockerignorefile to exclude unnecessary files and directories to increase the build’s performance.Use
trusted base imagesonly and keep updating the images periodically.Each instruction in the
Dockerfileadds an extra layer to theDocker image. Minimize the number of layers by consolidating the instructions to increase the build’s performance and time.Run as a
Non-Root Userto avoid security breaches.Keep the image small: Reduce the image size for faster deployment and avoid installing unnecessary tools in your image. Use minimal images to reduce the attack surface.Use specific tags over the latest tag for the image to avoid breaking changes over time.
Avoid using multiple
RUNcommands as it creates multiple cacheable layers which will affect the efficiency of the build process.Never share or copy the application credentials or any sensitive information in the
Dockerfile. If you use it, add it to.dockerignoreUse
EXPOSEandENVcommands as late as possible inDockerfile.Use a linter: Use alinterlike hadolint to check yourDockerfilefor common issues and best practices.Use a single process per container: Each container should run a single process. This makes it easier to manage and monitor containers and helps to keep containers lightweight.Use multi-stage builds: Usemulti-stagebuilds to create smaller and more efficient images.
Possible Docker Build Issues
If there is a syntax error or an invalid argument in
Dockerfile,docker buildcommand will fail with an error message. Correct the syntax to resolve this.Always try to give the container name using
docker runcommand otherwise Docker automatically assigns a name to the container and it might lead to several problems.Sometimes we get
Bind for 0.0.0.0.:8080 failed: port is already allocatederror, this is because some other software/service is using these ports. We can check the listening ports usingnetstatorsscommand. Use a differentportto resolve this or stop that service.Sometimes
Dockerfails to download the packages with this errorFailed to download package package-name`. This is because the container may not be able to access the internet or other dependencies issues.
Docker Image Registries
As mentioned in Step 1, you should always choose verified official base images for your application.
The following table has the list of publicly available container registries where you can find officially verified base images and application images.
| Registry | Base Images |
|---|---|
Docker | Docker hub base images |
Google Cloud | Distroless base images |
AWS | ECR public registry |
Redhat Quay | Quay Registry |
Docker Image vs Containers
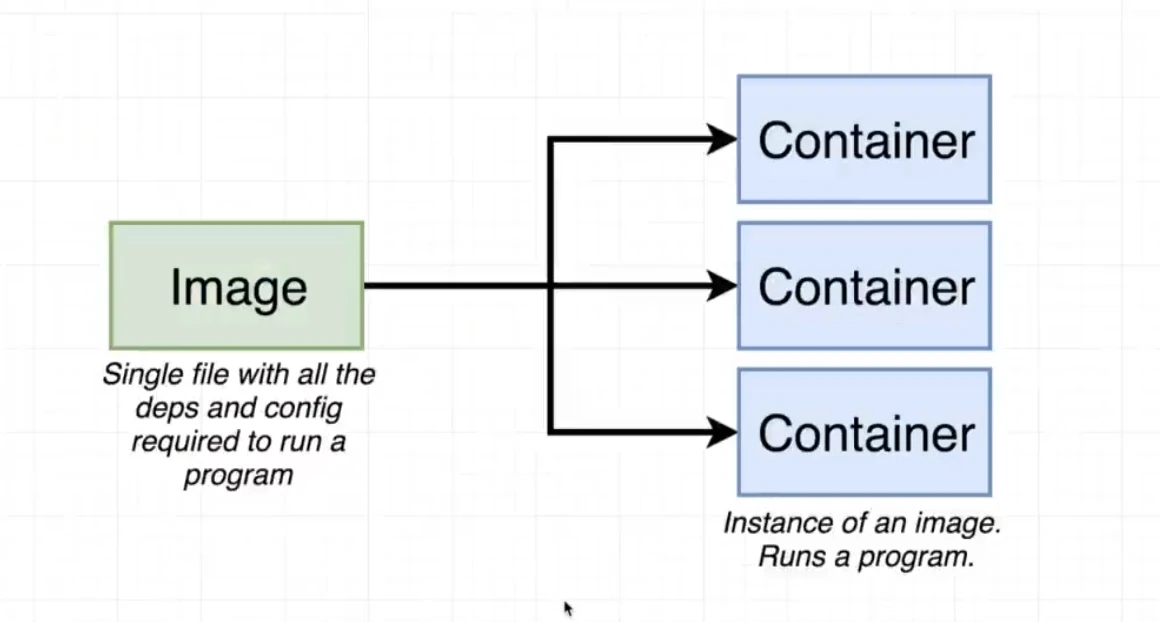
A Docker image is a snapshot of the file system and application dependencies. It is an executable package of software that includes everything needed like application code, libraries, tools, dependencies, and other files to run an application. You can compare it to a VM golden image.
A Docker image is organized in read-only layers stacked on top of each other.
The key difference between a Docker image and a container is the writable layer on top of the image. This means, that if you have five containers running from an image, all the containers share the same read-only layers from the image and only the top writable layer is different for all five containers.
This means, that when you delete the container, the writable layer gets deleted.
Images can exist without containers, whereas a container needs an image to run. We can create multiple containers from the same image, each with its own unique data and state.
Docker Image Build FAQs
What is Docker build context?
Docker build context is the docker host location where all the code, files, configs, and Dockerfile are present during the docker build process. You can specify the current build context using a dot [.] or the path of the folder. Also, you can have the Dockerfile in a different location than the build context. As a best practice, always have only the required files in the build context. Or else you will have unwanted files and a bloated Docker image.
How to build a Docker Image from a git repository?
You can use the docker build command with a git repository to build a docker image. The git repository should have the Dockerfile and required files for a successful image build.
Conclusion
In this article, we discussed how we can build a Docker Image and run our app as a Docker container using a Dockerfile.
We discussed Dockerfile in detail and went through some good practices to write it.